Log Analytics and RSS Feeds – Why Not?

The other day I was looking at the latest updates to Azure and noticed the handy RSS feed button, and that immediately made me think about automation that could be triggered from it. Obviously you could make a Power App to handle that, but since my head is in Azure Monitor at the moment, I thought – Why Not?

Let’s get that data into the gateway drug of Azure – Log Analytics. This post is a primer on integrating these 2 tools, so if you are experienced with Log Analytics Workspace, feel free to skip ahead! But if you want to see some first steps, follow along! First, we will need a couple of things:

  1. A Log Analytics Workspace
  2. A Logic App
  3. A desired outcome – this is handled by the Workspace and we will cover some of the possibilities in the next couple of posts.

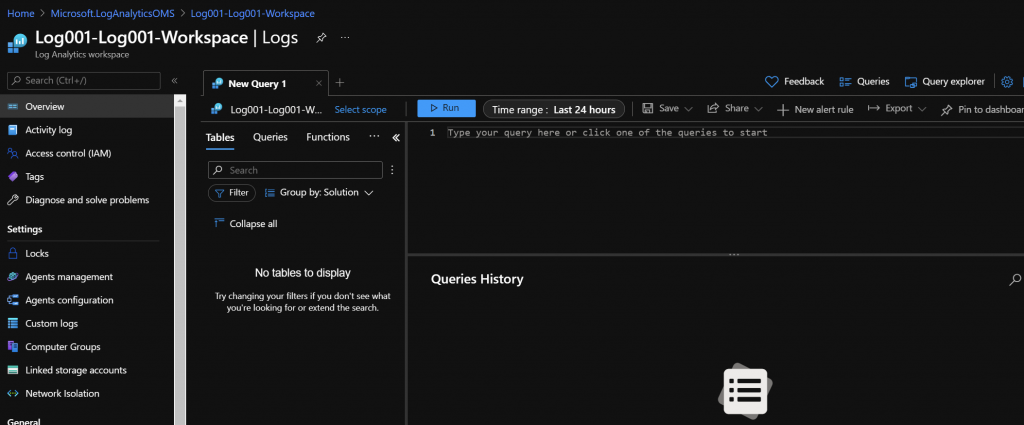
Let’s start. Below you can see my LA Workspace:

As you can see – it’s completely blank because it’s new. Before we create the Logic App, go ahead and select “Agents Management” and copy down the Workspace ID and the Primary (or secondary, I won’t judge) key.

Now it’s time to setup the Logic App. Now before you ask – do I need a Logic App or can I just use the LA Workspace API to send data? Well, if you are asking that question, then you already know the answer – of course you could! The point here is to make it easy to consume the RSS Feed, and not have to write some sort of feed consumer ourselves. We’re lazy, after-all. Here’s the blank Logic App:

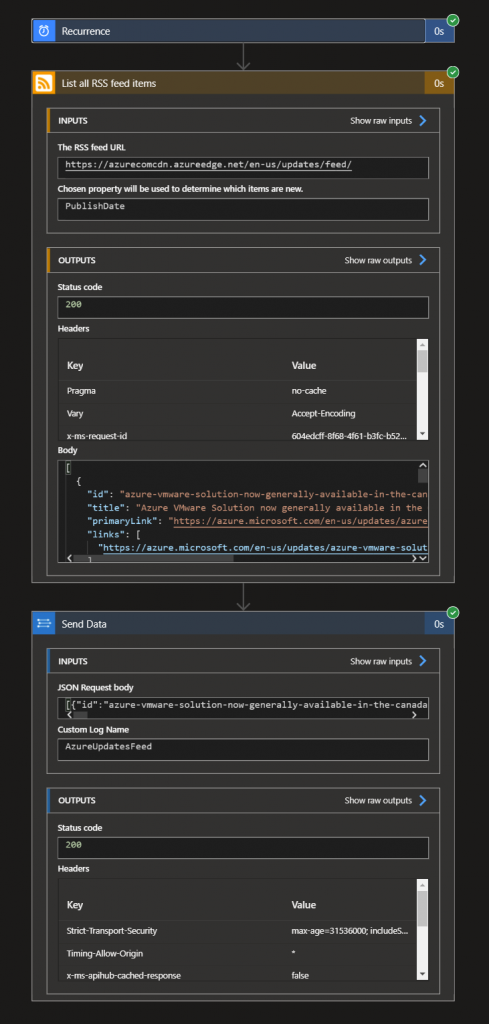
The actual Logic App is pretty straight forward. Just a timer, followed by a RSS Feed grabbing action, then a straight port of the data into the Log Analytics data ingestion action. Something like this:

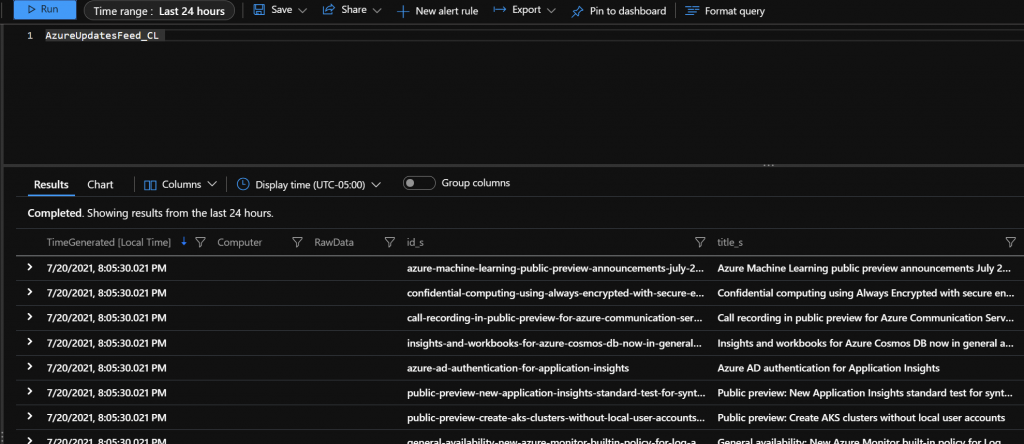
That’s pretty straight forward. After about 15 minutes you should see the data in your workspace:

Notice how the name we gave to the custom log in the Logic App is here, but has “_cl” appended to it? The workspace will do this automatically to any custom log we create. It literally stands for “custom log”. Same thing with the fields in the custom log. The Logic App automatically created the fields, but the workspace will append an underscore and an abbreviation for the type of field….’s’ for string for example.

Now 3 things immediately come to mind – how do we get the right timestamp into the workspace, what are we going to do with it, and how can we only add new items? Over the next couple of posts, we will go over both. Depending on your reoccurrence settings, you might get some dupes, so if you followed along you might want to disable the Logic App for now.

Why not? Pathfinder 2e API and PowerShell

In another of my “Why Not?” series – a category of posts that don’t actually set out to show a widespread use, but rather just highlight something cool I found, I present just how much of a nerd I am.

I love tabletop RPG games – DnD, Pathfinder, Shadowrun, Call of Cthulhu, Earthdawn,etc… You name it, I have probably sat around a table playing it with a group of friends. Our new favorite game to play recently – Pathfinder 2e.

Recently I found something very cool – a really good PF2e character builder/manager called Wanderer’s Guide. I don’t have any contact with the author at all – I am just a fan of the software.

A bit of background before I continue – I have been looking for an API to find raw PF2e data for quite a while. An app might be in the future, but I simply couldn’t find the data that I wanted. The Archive would be awesome to get API access to, but it’s not to be yet.

After moping around for a couple of months, I found this, and an choir of angels began to sing. Wanderers Guide has an API, and it is simple awesome. Grab you free API key, and start to follow along.

We are going to make a fairly standard API call first. Let’s craft the header with the API key you get from your profile. This is pretty straight forward:

$ApiKey = "<Put your Wanderer's Guide API Key here>"
$header = @{"Authorization" = "$apikey" }

Next, let’s look at the endpoints we want to access. Each call will access a category of PF2e data – classes, ancestries, feats, heritages, etc… This lists the categories of data available.

$baseurl = 'https://wanderersguide.app/api'
$endpoints = 'spell', 'feat', 'background', 'ancestry', 'heritage'

Now we are going to iterate through each endpoint and make the call to retrieve the data. But – since Wanderer’s Guide is nice enough to provide the API for free, we aren’t going to be jerks and constantly pull the full list of data each time we run the script. We want to only pull the data once (per session), so we will check to see if we have already done it.

foreach ($endpoint in $endpoints) {
    if ((Test-Path variable:$endpoint'data') -eq $false){
        "Fetching $endpoint data from $baseurl/$endpoint/all"
        New-Variable -name ($endpoint + 'data') -force -Value (invoke-webrequest -Uri "$baseurl/$endpoint/all" -headers $header)
    }
}

The trick here is the New-Variable cmdlet – it lets us create a variable with a dynamic name while simultaneously filing it with the webrequest data. We can check to see if the variable is already created with the Test-Path cmdlet.

Once we have the data, we need to do some simple parsing. Most of it is pretty straight forward – just convert it from JSON and pick the right property – but a couple of the endpoints need a bit more massaging. Heritages and Backgrounds, specifically.

Here is the full script – it’s really handy to actually use out-gridview in order to parse the data. For example, do you want to background that gives training in Athletics – just pull of the background grid and filter away!

$ApiKey = "<Put your Wanderer's Guide API Key here>"
$header = @{"Authorization" = "$apikey" }
$baseurl = 'https://wanderersguide.app/api'
$endpoints = 'spell', 'feat', 'background', 'ancestry', 'heritage'

foreach ($endpoint in $endpoints) {
    if ((Test-Path variable:$endpoint'data') -eq $false){
        "Fetching $endpoint data from $baseurl/$endpoint/all"
        New-Variable -name ($endpoint + 'data') -force -Value (invoke-webrequest -Uri "$baseurl/$endpoint/all" -headers $header)
    }
    else{
        switch ($endpoint){
            'spell' {$Spells = ($spelldata.content|convertfrom-json).psobject.properties.value.spell|Out-GridView}
            'feat'{$feats = ($featdata.content|convertfrom-json).psobject.properties.value.feat|Out-GridView}
            'ancestry'{$ancestries = ($ancestrydata.content|convertfrom-json).psobject.properties.value.ancestry|Out-GridView}
            'background'{$backgrounds = ($backgrounddata.content|convertfrom-json).psobject.properties|where-object {$_.name -eq 'syncroot'}|select-object -expandProperty value|out-gridview}
            'heritage'{$heritages = ($heritagedata.content|convertfrom-json).psobject.properties|where-object {$_.name -eq 'syncroot'}|select-object -expandProperty value|out-gridview}
            default{"Instruction set not defined."}
        }
    }
}

Enjoy!

PowerShell Secrets Gotchas

PowerShell Secrets Management is released, and it’s off to a very good start, but there are some things you might want to watch out for.

The first one got me almost immediately – right after installing both modules and creating my first store. I tried to create a new secret, and was prompted for a password. It manifested in 2 different ways:

“Exception Calling Prompt Unlock Vault” was the first, and occurred when trying to perform pretty much any cmdlet associated with a store. Deleting and recreating the store made no difference.

The second issue was an exception claiming a null value was passed as a password, when it clearly wasn’t the case:

"Cannot convert null to 'Microsoft.PowerShell.SecretStore.Authenticate' because it is a non-nullable value type"

There is good news, though – both issues can be solves with a simple Reset-SecretStore.

The next is an odd one – the scope for vaults is limited to the current user. You can’t add a vault with AllUsers, for example:

PS  C:\blog (8:10:28 PM) > Set-SecretStoreConfiguration -Scope AllUsers
Set-SecretStoreConfiguration: AllUsers scope is not yet supported.

So this means that you can’t create a store with your normal account, and access it with a service account or admin account. The only two currently allowed values are “CurrentUser” and “AllUsers”, but fails with the above error if you try AllUsers. This could potentially be a deal breaker for some, but the error message hints that support might be coming in the future.

So that’s it! A quick on this time, but I hope it helps save you a few minutes of frustration.

EASY PowerShell API Endpoint with FluentD

One of the biggest problems that I have had with PowerShell is that it’s just too good. I want to use it for everything. Need to perform automation based on monitoring events? Pwsh. Want to update rows in a database when someone clicks a link on a webpage? Pwsh. Want to automate annoying your friends with the push of a button on your phone? Pwsh. I use it for everything. There is just one problem.

I am lazy and impatient. Ok, that’s two problems. Maybe counting is a third.

I want things to happen instantly. I don’t want to schedule something in task scheduler. I don’t want have to run a script manually. I want an API like end-point that will allow me to trigger my shenanigans immediately.

Oh, and I want it to be simple.

Enter FluentD. What is Fluentd you ask? From the website – “Fluentd allows you to unify data collection and consumption for a better use and understanding of data.” I don’t necessarily agree with this statement, though – I believe it’s so much more than that. I view it more like an integration engine with a wide community of plug-ins that allow you to integrate a wide variety of toolsets. It’s simple, light-weight, and quick. It doesn’t consume a ton of resources sitting in the background, either. You can run it on a ton of different platforms too – *nix, windows, docker, etc… There is even a slim version for edge devices – IOT or small containers. And I can run it all on-prem if I want.

What makes it so nice to use with PowerShell is that I can have a web API endpoint stood up in seconds that will trigger my PowerShell scripts. Literally – it’s amazingly simple. A simple config file like this is all it takes:

<source>
  @type http
  port 9880
</source>

Boom – you have an listener on port 9880 ready to accept data. If you want to run a PowerShell script from the data it receives, just expand your config file a little.

<source>
  @type http
  port 9880
</source>

#Outputs
<match **>
  @type exec
  command "e:/tasks/pwsh/pwsh.exe  -file e:/tasks/pwsh/events/start-annoyingpeople.ps1"
  <format>
    @type json
  </format>
  <buffer>
    flush_interval 2s
  </buffer>
</match>

With this config file you are telling FluentD to listen on port 9880 (http://localhost:9880/automation?) for traffic. If it sees a JSON payload (post request) on that port, it will execute the command specified – in this case, my script to amuse me and annoy my friends. All I have to do is run this as a service on my Windows box (or a process on *Nix, of course) and I have a fully functioning PowerShell executing web API endpoint.

It doesn’t have to just be web, either. They have over 800 plug-ins for input and output channels. Want SNMP traps to trigger your scripts? You can do it. How about an entry in a log starting your PowerShell fun? Sure! Seriously – take a look at FluentD and how it can up your PowerShell game immensely.

Use a Config File with PowerShell

How many times has this occurred?


“Hey App Onwer – all of these PowerShell automation scripts you had our team create started failing this weekend. Did something change?”
“Oh yeah Awesome Automation Team. We flipped over to a new database cluster on Saturday, along with a new web front end. Our API endpoints all changed as well. Didn’t anyone tell you? How long will it take to update your code?”

Looking at dozens of scripts you personally didn’t create: “Ummmmm”

This scenario happens all of the time, and there are probably a hundred different ways to deal with it. I personally use a config file, and for very specific reasons. If you are coding in PowerShell 7+ (and you should be), then making your code cross-platform compatiable should be at the top of your priority list. In the past, I would store things like database connection strings or API endpoints in the Windows registry, and my scripts would just reference that reg key. This worked great – I didn’t have the same property listed in a dozen different scripts, and I only had to update the property in once place. Once I started coding with cross-plat in mind, I obviously had to change my thinking. This is where a simple JSON config file comes in handy. A config file can be placed anywhere, and the structured JSON format makes creating, editing, and reading easy to do. Using a config file allows me to take my whole code and move it from one system to another regardless of platform.

Here is what a sample config file might look like:

{
    "Environments": [
        {
            "Name": "Prod",
            "CMDBConnectionString": "Data Source=cmdbdatabaseserverAG;MultiSubnetFailover=True;Initial Catalog=CMDB;Integrated Security=SSPI",
            "LoggingDBConnectionString": "Data Source=LoggingAG;MultiSubnetFailover=True;Initial Catalog=Logs;Integrated Security=SSPI",
            "ServiceNowRestAPI":"https://prodservicenowURL:4433/rest",
            "Servers": [
                {
                    "ServerName": "prodserver1",
                    "ModulesDirectory": "e:\\tasks\\pwsh\\modules",
                    "LogsDirectory": "e:\\tasks\\pwsh\\logs\\"
                },
                {
                    "ServerName": "prodserver2",
                    "ModulesDirectory": "e:\\tasks\\pwsh\\modules",
                    "LogsDirectory": "e:\\tasks\\pwsh\\logs\\"
                }
            ]
        },
        {
            "Name": "Dev",
            "CMDBConnectionString": "Data Source=testcmdbdatabaseserverAG;MultiSubnetFailover=True;Initial Catalog=CMDB;Integrated Security=SSPI",
            "LoggingDBConnectionString": "Data Source=testLoggingAG;MultiSubnetFailover=True;Initial Catalog=Logs;Integrated Security=SSPI",
            "ServiceNowRestAPI":"https://testservicenowURL:4433/rest",
            "Servers": [
                {
                    "ServerName": "testserver1",
                    "ModulesDirectory": "e:\\tasks\\pwsh\\modules",
                    "LogsDirectory": "e:\\tasks\\pwsh\\logs\\"
                },
                {
                    "ServerName": "testserver2",
                    "ModulesDirectory": "e:\\tasks\\pwsh\\modules",
                    "LogsDirectory": "e:\\tasks\\pwsh\\logs\\"
                }
            ]            
        }
    ]
}

And here is what the code that parses it looks like in each script:

$config = get-content $PSScriptRoot\..\config.json|convertfrom-json
$ModulesDir = $config.Environments.Servers|where-object {$_.ServerName -eq [Environment]::MachineName}|select-object -expandProperty ModulesDirectory
$LogsDir = $config.Environments.Servers|where-object {$_.ServerName -eq [Environment]::MachineName}|select-object -expandProperty LogsDirectory
$DBConnectionString = $config.Environments|where-object {[Environment]::MachineName -in $_.Servers.ServerName}|select-object -expandProperty CMDBConnectionString

Note that in this particular setup, I use the server name of the server actually running the script to determine if the environment is production or not. That is completely optional – your config file might be as simple as a couple of lines – something like this:

{
    "CMDBConnectionString": "Data Source=cmdbdatabaseserverAG;MultiSubnetFailover=True;Initial Catalog=CMDB;Integrated Security=SSPI",
    "LoggingDBConnectionString": "Data Source=LoggingAG;MultiSubnetFailover=True;Initial Catalog=Logs;Integrated Security=SSPI",
    "ServiceNowRestAPI":"https://prodservicenowURL:4433/rest"
}

When you use a simple file like this, you don’t need to parse the machine name – a simple “$ModulesDir = $config |select-object -expandProperty ModulesDirectory” would work great!

Now you can simply update the connection string or any other property in one location and start your testing. No need to “Find in all Files” or search and replace across all your scripts. An added plus is that using a config file vs something like a registry key is that the code is cross-platform compatible. I’ve used JSON here due to a personal preference, but you could use any type of flat file you wanted, including a simple text file. If you use a central command and control tool – something like SMA, then those properties are already stored locally, but this method would be handy for those that don’t have capability or simply want to prepare their scripts for running on K8s or Docker.

Let me know what you think about this – Do you like this approach or do you have another method you like better? Hit me up on Twitter – @donnie_taylor

Monitor your Logic Apps with Log Analytics (Preview)

This is a continuation of the blog series that fellow MVP Billy York and I are putting on around the journey from on-prem SCORCH to Automation in Azure. In this post we will look at a new preview Log Analytics solution that will help you monitor and respond to issues that will invariably happen with Logic Apps.

Logic App Management allows heavy users of Logic Apps to get both ‘at-a-glance’ updates on the success or failure of their apps, or drill down deeply into app runs and get details such as start/stop time, execution duration, action durations, etc… It is especially useful when you have a very large set of Logic Apps. Trying to get a single pane of glass when you have dozens or hundreds of Logic Apps is difficult with this exciting preview feature.

To add this solution to Log Analytics, you will need…..wait for it…..a Log Analytics workspace! Your existing Log Analytics workspace will do just fine – no need to create a new one. In fact, there are a lot of reasons why you wouldn’t want to! Once you have an eligible workspace, it’s time to add the solution. You can get to this either by adding a resource to the resource group, or adding the solution directly from the workspace – both will start same wizard

One option to add the solution is to do it directly from your Log Analytics workspace.
Searching for the solution…
The actual solution is still in preview, but is very stable.

The actual wizard is very simple – just pick your workspace and click create. Once you have your solution provisioned, you can turn it on or off per Logic App by selecting the “Diagnostic Settings” on the LA and editing the setting below – if you want to turn it off, just uncheck the “Send to Log Analytics” setting.

For this article, I setup a couple of simple Logic Apps – both of them query RSS feeds, but one has a good feed URL, and the other doesn’t. I varied their start times a bit just to show some contrasting data.

The good logic app…..
And the bad one – this URL doesn’t actually work.

I let these apps run for a couple of days. When I look at my Log Analytics workspace, I am greeted with this new tile, and can drill down into to get a nice Logic App run overview:

New tile!
And some awesome graphs!!!

This is a great overview screen for your apps. Notice that the central graph is slightly off – I have tried it in multiple browsers on multiple themes, but it shows the same in each. Hence the ‘preview’ moniker on the solution, I guess. Regardless, at a simple glance I can see the LAs that have succeeded or failed, get a list of the errors, and see a visual comparison of the status of my apps. Clicking on the ‘runs’ tab brings me to a bit more details, and if I click on the “See All” link in the bottom left of each tile, I get a familiar looking interface 🙂

A bit more detail……
Our old friend – Kusto!

For anyone wanting to know the actual query, here it is:

AzureDiagnostics
| where Category == "WorkflowRuntime"
| where OperationName == "Microsoft.Logic/workflows/workflowRunCompleted"
| join kind = rightouter
(
    AzureDiagnostics
    | where Category == "WorkflowRuntime"
    | where OperationName == "Microsoft.Logic/workflows/workflowRunStarted"
    | where resource_runId_s in (( AzureDiagnostics
    | where Category == "WorkflowRuntime"
    | where OperationName == "Microsoft.Logic/workflows/workflowTriggerCompleted"
    | project resource_runId_s ))
    | project WorkflowStartStatus=status_s, WorkflowNameFromInnerQuery=resource_workflowName_s, WorkflowIdFromInnerQuery=workflowId_s, resource_runId_s
)
on resource_runId_s
| extend WorkflowStatus=iff(isnotempty(status_s), status_s, WorkflowStartStatus)
| extend WorkflowName=iff(isnotempty(resource_workflowName_s), resource_workflowName_s, WorkflowNameFromInnerQuery)
| extend WorkflowId=iff(isnotempty(workflowId_s), workflowId_s, WorkflowIdFromInnerQuery)
| summarize Count=count() by WorkflowId, WorkflowName, WorkflowStatus

The benefits of having this data in the “Gateway Drug” (trademark pending) of Azure – Log Analytics – should be obvious. Want to export your Logic App data to PowerBI, or even better setup alerts when a LA fails? Combine your LA data with feeds from AAD, Graph, Office365, etc…. Having all of this data in an easily queried repository is priceless.

Automation with Azure Event Grid

This is another post in a series of posts by fellow MVP Billy York and myself on migration from on-prem automation to Azure. Check out his post here to see the full list.

One of the challenges that needs to be addressed with moving off an on-prem tool such as Orchestrator is how to trigger your automations. Almost all of the tools individually have a method to call them remotely – things such as webhooks, watchers, api endpoints, etc… In this post I would like to highlight how another Azure tool – Azure Event Grid – can prove a useful tool for correlation and centralization. If you need a quick refresher on Event Grids – check out this post. I’m not going to dig into the concepts of Event Grid, but I will walk through how to do a quick setup of Event Grid and get it ready to trigger your workflows.

The first thing we are going to do is create an Event Grid Topic – go to the appropriate resource group, and create a new resource – pick Event Grid Topic, and click ‘Create’.

Specify the event topic name, subscription, resource group, location, etc… The deployment will take a minute or two.

When it’s created, you should see something like this. Take note of the “+ Event Subscription” and the Topic Endpoint.

The topic endpoint is important – this is where you can forward events to from your on-prem resources in order to for event grid to pick them up. This URL takes a json payload (under 64kb in the general release version, with 64kb increments being charged separately – 1mb version in public preview now). Because I am who I am, I wrote a quick PowerShell script that could be used by your resources as a quick and dirty integration.

Connect-AzAccount -Credential (get-credential)
$body = @{
    id= 123743
    eventType="recordInserted"
    subject="App01/Database/TLogFull"
    eventTime= (get-date).ToUniversalTime()
    data= @{
        database="master"
        version="2019"
        percent="93.5"
    }
    dataVersion="1.0"
}
$body = "["+(ConvertTo-Json $body)+"]"

$topicname="EventGridTopic01"
try{
    $endpoint = (Get-AzEventGridTopic -ResourceGroupName AzureAutomationOptions -Name $topicname).Endpoint
    $keys = Get-AzEventGridTopicKey -ResourceGroupName AzureAutomationOptions -Name $topicname
    Invoke-WebRequest -Uri $endpoint -Method POST -Body $body -Headers @{"aeg-sas-key" = $keys.Key1}
}
catch{
    write-output $_
}

The important bits:

  • Subject – What the event subject would be, which is what we will key off of later for subscriptions – this is a personal preference. You can trigger from the event type in the basic editor, but I prefer subject.
  • eventTime – Required, in UTC
  • id – Important, but only if you want unique event identifiers.
  • data – The important bits from your on-prem resources – the bits we will want to pass to the Azure Automation resources.

After sending a couple of events, you can look at the ‘Published Events’ metric to ensure they are coming in as expected:

Now it’s time to give the event grid something to do when the events arrive. There are several ways to accomplish this – all done with a ‘subscription’ to the events. Some of the ‘automation’ flavored options include:

  • Azure Functions
  • WebHooks
  • Sending to Event Hubs
  • Service Bus Queues and Topics

WebHooks are pretty self-explanatory, but also one of the most powerful. For example, you can create a Logic App that is triggered by an http request, and from there break out and perform any type of automation that you want. I will go over that in another post. For this post, I will show a slightly more difficult to setup, but equally as powerful method to start automation – the Azure Function EventGrid triggered function. Head over to your Azure Function, and let’s add a new function:

Select the “Azure Event Grid trigger” and give it a name – in my case I gave it the descriptive name ” EventGridTrigger1″. After it’s created, you should see something like this:

You can see the parameters – eventGridEvent and TriggerMetadata. Keep those in mind. Now head back over to the Event Grid Topic, and let’s add a new subscription. When you select the endpoint in the new subscription, you should see your EventGridTrigger function:

Great – since the function is created already, the endpoint is something we can select. If the function wasn’t created, there would be no option to create a new one.

Now we can dig into the actual subscription properties – notice the 3 tabs. Basic, Filters, and Advanced Features. Filters is where we will do most filtering for automation, although some can be done in the basic tab via the event type. For now, just set the Event Type to ‘recordInserted ‘, since that is what we put in the PowerShell code, so we can switch over to the filters and do the rest of the work.

On the Filters tab, the first thing we want to do in this example is check the box marked “Enable subject filtering”. If you remember in the PowerShell, we set the filter to “App01/Database/TLogFull”. You could imagine this being the unique identifier to trigger the appropriate automation – almost something like a unique monitor ID or an automation trigger id. In this example, let’s set that as our filter. We will do this simple one in this post, but branch out and look at advanced features in a future one:

When you are ready to create your new subscription, head back to the ‘Basic’ tab and give it a name – numbers, letters, and dashes only. Do it right, and you will be greeted with something like this:

Now that we have the subscription created, let’s send some events and see if they trigger the subscription! If you run that PowerShell snippet a couple of times, wait a minute or two, and check out the ‘monitor’ tab of the EventGridTrigger function, you will see something like this:

And clicking on the details:


From here, we can see the data fields that were passed, and which could be used in our PowerShell function.

Hopefully you can see how using an Event Grid can help trigger your automations, especially when dealing with IOT and monitoring situations, or when a simple webhook is all you have to work with. They offer an easy way to take those PowerShell workflows from Orchestrator and directly import them into Azure with little modification, while at the same time providing a centralized method of tracking.

Automation Tools in Azure – Q1 2020 Edition

Whether you are well into your automation journey or just starting out, it’s important to know what options are available. Moving a manual workload to the wrong automation engine can be just as disruptive as automating a bad workload. Luckily Microsoft has a plethora of tools, so you can be sure to pick the right tool for the right job.

Azure Automation – Process Automation

It’s tough to start an article about automation tools in Azure without starting with Azure Automation – so I won’t try. Azure Automation is going to be the first place you look if you are migrating things like:

  • PowerShell scripts
  • Python scripts
  • System Center Orchestrator runbooks
  • Simple commands called repeatedly (restarting services, for example)

Azure Automation uses RunBooks and Jobs, which will immediately be familiar to Orchestrator admins. Azure Automation supports PowerShell, and Python 2 scripts, along with PowerShell workflows. The automation jobs can be run either on-prem via Hybrid Workers, or in the cloud. A little known secret about Azure Automation – it runs a lot of the backend process that power Azure!

There is another piece to Azure Automation worth calling out – it’s CHEAP. Azure gives you 500 run-time minutes for free each month, with each additional minute costing only $0.002. Watcher tasks are even cheaper – I will go over those in another blog post.

Azure Functions

The server-less powerhouse of the automation options in Azure – Functions are designed for scale, speed, and complete extensibility. Deploy code or docker containers for your function and then build your functions with .Net Core, Node.js, Python, Java, and even PowerShell Core.

With the language options available, moving on-prem workloads should be a breeze. Access your functions from anywhere via API or schedule them to run automatically. Customize your compute stack, secure the functions with multiple keys, and monitor your runs with Log Analytics and App Insights.

You can build your functions in VSCode, any other code editor you choose, or edit and test your function right in the Azure portal. Each Function App can have multiple functions, and scaling can occur manually or automatically. There are so many options available for Azure Functions, it deserves it’s own blog series.

As with Azure Process Automation, Functions are priced really competitively. Check out the pricing list here.

Azure Logic Apps

Anyone coming from a tool like System Center Orchestrator, or other automation tools like MicroFocus Operations Orchestration will tell you one thing those tools have that the tools I have previously mentioned dont – a UI that shows logic flow. Microsoft’s answer to that – Logic Apps. Logic Apps are a personal favorite of mine, and I use them extensively

Building a Logic App couldn’t be simpler. You can start with a blank app, or choose from a LARGE selection of templates that are pre-built. Once in the Logic App Editor, it’s practically drag and drop automation creation. Logic Apps are started with ‘Triggers’, which lead to ‘Actions’. The apps can access services via ‘connections’, of which there are hundreds. If you do happen to find a 3rd party service that doesn’t have a built-in connector, build a custom one!

Logic Apps makes it easy to build complex automations by helping you with things like automatically creating loops when arrays are detected. Allowing you to control parallelism, offering you hundreds of ways to call your app, and more. You can add conditions, switches, do-until loops, etc… There isn’t much they can’t do.

Of course you get the enterprise controls you would expect – version controls, IP access restrictions, full metrics and logging, diagnostics, etc. We run a massive Systems Management and Monitoring conference almost entirely with Logic Apps.

If you are considering migrating from Orchestrator (or other 3rd party automation tool), then look no further. This should be one of the first Azure tools you do a proof of concept with.

Power Apps/Power BI/Power Automate

The tools I have talked about so far are focused on you – the enterprise system admin. But PowerApps gives your organization an exciting and probably under-utilized automation opportunity – your Business users! Even the biggest automation organizations don’t have the resources to automate everything their users want, so why not let them handle some of that automation on their own.

Power Apps let you or your users create new desktop or mobile business applications in a matter of minutes or hours. These can be self contained, or reach out to tools like Azure Functions to extend these simple to make apps into something truly enterprise worthy.

Power BI gives world class data visualizations and business intelligence to the average business user. Using Power BI you can allow your users to create their own dashboards or become their own data scientists directly from their desktop.

Power Automate is the tool formerly known as Flow. If you are familiar with Logic Apps, then Power Automate will look almost identical – and for good reason! Flow was originally built from Logic App code. There are a couple of big differences, though:

  • Power Automate has an amazing mobile app. Start a flow, or even create one from your phone.
  • Power Automate can no simulate screen clicks – Remember AutoIt?

Configuration and Update Management

I am going to lump these two into one description, mainly because each is slightly meta. Configuration management is like PowerShell DSC for your Azure and on-prem resources. Describe what your environment should look like, and determine if you want auto-remediation or not. Expect more information on this in future blog posts.

Update management is patching for all of your resources – on-prem or in Azure. Group your servers logically and schedule OS and app updates, or trigger update management from Log Analytics, runbooks, or functions.

The great thing about Configuration and Update management? The cost. Update and configuration management is practically free – only pay for the data ingestion used by Log Analytics. Update management is even ‘free’ for on-prem resources, including Linux! Configuration management does have a cost for on-prem resources, but the cost is still low.

Event Grid and Hub

Although not automation in the strictest sense of the term, Event Grids and Hubs are prime examples of triggers for automation. For most use cases, Event Grid is going to be the best trigger – Event Hub and even Service Bus are more for telemetry and high-value data, but Event Grid is designed to handle reactionary data. Filter events as they come into Grid, and create action groups based off filtered events. Action groups can have actions for starting Azure Functions, generic web-hooks, automation rubooks, Logic Apps, and more! Send your events to a endpoint API, and you are set to start your automation flows automatically!

Meta – ARM

What’s the first thing you need to automate if you are moving to Azure? The automation workflows themselves, of course! Whether it’s configuration or full deployments, ARM is your best friend.

Migrating from Orchestrator to Azure – A new blog series

Over the next several post I’ll be teaming up with Microsoft MVP Billy York to show you various ways and technologies to accomplish your automation tasks in a more modern way. We will explore automation options, show you how to prepare your Orchestrator environment for migration, pick the right tool for the right job, and even add new features and enhancements to your workloads. Check back tomorrow for Automation Options in Azure – Q1 2020 Edition, and watch Billy’s page as we prepare our migration journey!

Orchestrator is Dead, Long Live Automation

If you reading this blog and are considering installing Orchestrator 2016/2019 –  stop.  Don’t.  Do not pass go, do not collect your salary. Save your time and energy.  Seriously, we know other consultants that are still getting requests for proposals to install System Center Orchestrator, but now is not the time for new installations of Orchestrator. It’s time to migrate from Orchestrator. For those of you that have used Orchestrator 2012 R2 and installed the upgrades to 2016/2019, then you know that it wasn’t much of an upgrade.

For those of you are already heavily invested in Orchestrator, it’s time to start considering your migration path. Time to consider what product(s) you’re going to leverage, what your options are, and how to move to new tools. Orchestrator isn’t literally dead in that MS is going to reach into your environment and kill your scorch servers(s), but don’t count on getting any new cutting edge features or updates. Without new features it’s going to continue to be more and more difficult to keep up with automating new products and services.  Luckily Azure provides a myriad of ways to take on your automation workloads.

Disaster leads to Azure

How a sinister act leads to great things – in about 15 minutes

This Sunday, as the wife and I traveled back from Dallas to Austin after a weekend away I get a text from an automated website monitor. My WordPress blog – this blog – was either offline or not responding correctly. Happens occasionally. When I got home I popped up the site, and immediately got a message about php being a really old version – like 5.x – when it normally runs a 7.x version. I decided to log into my provider and check it out. I was not prepared with what I saw.

It was obvious that I had been hacked, big time. Redirects to shady pharma sites in Russia, CSS injection on every post, random hacked php files in practically every directory in not just this domain but in 8 sub-domains as well. I was well and truly up the creek. To make it even better, the hosting service I use seems to think that UI enhancements are forbidden – hence my inability to download a current backup.

I had to do something, and quick. This blog contains some of my contributions to the community, and does (shockingly) show up in search results. I needed to get it back up and running quick. The only thing I had was an XML export from the blog a couple of weeks back. I immediately decided to use Azure to get this running quick.

For those who don’t know, the easiest way to export from a WordPress blog is to go to Tools – Export – All content. I suggest you do it often.

I jumped over to Azure, and provisioned a new resource. Since this was going to be an actual production thing, and not just some testing resource for a conference or for a post, I decided to use a new resource group.

Note – I choose to do a MySQL database in the app – mainly because I needed this up and running quickly, and I don’t have traffic substantial enough to warrant scaling backend MySQL instances. For large instances, I would recommend using ‘Azure Database for MySQL’ – that allows options like scaling, larger instances, etc…

The deployment of the WordPress instance was honestly the longest part of the process – it took between 7 – 10 minutes, but once it was up and running you are presented with a brand new WordPress instance:

Click on the URL, and you are presented with the interface for your brand new WordPress instance. Now we continue with the WordPress setup

Now update your WordPress – immediately. After updating, log out and back in, just in case the WordPress database needs to update as well. Once everything is updated, it’s time to import the WordPress XML.

When you install the importer, then the ‘Run Importer’ option will appear. Upload your XML file and let the importer run. In my case it took about 5 minutes. A great thing about this import – it takes all of your settings – preferences, link post IDs, media, etc… This was in many ways much better than doing a restore on my normal hosting provider – I have my blog back up and running (minus some theme customization), but I have the entire power of Azure behind it! I get Azure Monitor – Azure Sentinel, App Insights, Log Analytics, and more!

Next, it was time to redirect my old-and-busted blog to the new blog website. This is going to differ by hosting provider, but in my case it was fairly simple.

What are the next steps? In my case, it is going to be adding a custom domain to my App service, so that I no longer have to rely on my old hosting provider, and use them solely as domain registrar. That will be in an upcoming post.

In my case, something as horrible as a hack has led to a great outcome – hosting in Azure, really cheaply, with an absolute glut of new features at my disposal. This hack might have been the best thing to happen to this blog in a while. Who knows – maybe I will just continue to add new Azure features and see how it turns out.