In another of my “Why Not?” series – a category of posts that don’t actually set out to show a widespread use, but rather just highlight something cool I found, I present just how much of a nerd I am.
I love tabletop RPG games – DnD, Pathfinder, Shadowrun, Call of Cthulhu, Earthdawn,etc… You name it, I have probably sat around a table playing it with a group of friends. Our new favorite game to play recently – Pathfinder 2e.
Recently I found something very cool – a really good PF2e character builder/manager called Wanderer’s Guide. I don’t have any contact with the author at all – I am just a fan of the software.
A bit of background before I continue – I have been looking for an API to find raw PF2e data for quite a while. An app might be in the future, but I simply couldn’t find the data that I wanted. The Archive would be awesome to get API access to, but it’s not to be yet.
After moping around for a couple of months, I found this, and an choir of angels began to sing. Wanderers Guide has an API, and it is simple awesome. Grab you free API key, and start to follow along.
We are going to make a fairly standard API call first. Let’s craft the header with the API key you get from your profile. This is pretty straight forward:
$ApiKey = "<Put your Wanderer's Guide API Key here>"
$header = @{"Authorization" = "$apikey" }
Next, let’s look at the endpoints we want to access. Each call will access a category of PF2e data – classes, ancestries, feats, heritages, etc… This lists the categories of data available.
$baseurl = 'https://wanderersguide.app/api'
$endpoints = 'spell', 'feat', 'background', 'ancestry', 'heritage'
Now we are going to iterate through each endpoint and make the call to retrieve the data. But – since Wanderer’s Guide is nice enough to provide the API for free, we aren’t going to be jerks and constantly pull the full list of data each time we run the script. We want to only pull the data once (per session), so we will check to see if we have already done it.
foreach ($endpoint in $endpoints) {
    if ((Test-Path variable:$endpoint'data') -eq $false){
        "Fetching $endpoint data from $baseurl/$endpoint/all"
        New-Variable -name ($endpoint + 'data') -force -Value (invoke-webrequest -Uri "$baseurl/$endpoint/all" -headers $header)
    }
}
The trick here is the New-Variable cmdlet – it lets us create a variable with a dynamic name while simultaneously filing it with the webrequest data. We can check to see if the variable is already created with the Test-Path cmdlet.
Once we have the data, we need to do some simple parsing. Most of it is pretty straight forward – just convert it from JSON and pick the right property – but a couple of the endpoints need a bit more massaging. Heritages and Backgrounds, specifically.
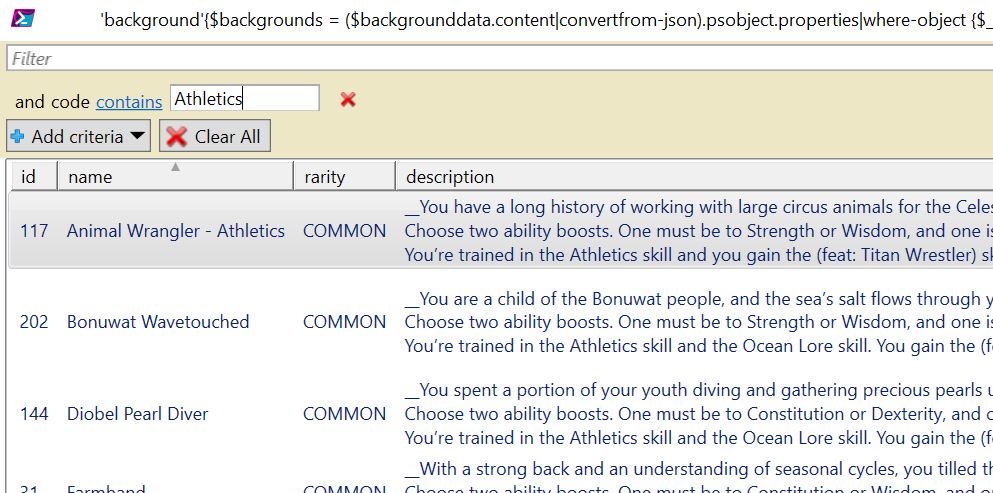
Here is the full script – it’s really handy to actually use out-gridview in order to parse the data. For example, do you want to background that gives training in Athletics – just pull of the background grid and filter away!
$ApiKey = "<Put your Wanderer's Guide API Key here>"
$header = @{"Authorization" = "$apikey" }
$baseurl = 'https://wanderersguide.app/api'
$endpoints = 'spell', 'feat', 'background', 'ancestry', 'heritage'

foreach ($endpoint in $endpoints) {
    if ((Test-Path variable:$endpoint'data') -eq $false){
        "Fetching $endpoint data from $baseurl/$endpoint/all"
        New-Variable -name ($endpoint + 'data') -force -Value (invoke-webrequest -Uri "$baseurl/$endpoint/all" -headers $header)
    }
    else{
        switch ($endpoint){
            'spell' {$Spells = ($spelldata.content|convertfrom-json).psobject.properties.value.spell|Out-GridView}
            'feat'{$feats = ($featdata.content|convertfrom-json).psobject.properties.value.feat|Out-GridView}
            'ancestry'{$ancestries = ($ancestrydata.content|convertfrom-json).psobject.properties.value.ancestry|Out-GridView}
            'background'{$backgrounds = ($backgrounddata.content|convertfrom-json).psobject.properties|where-object {$_.name -eq 'syncroot'}|select-object -expandProperty value|out-gridview}
            'heritage'{$heritages = ($heritagedata.content|convertfrom-json).psobject.properties|where-object {$_.name -eq 'syncroot'}|select-object -expandProperty value|out-gridview}
            default{"Instruction set not defined."}
        }
    }
}
Enjoy!