Run _Anything_ with Flow. PowerShell Triggers

Want to start PowerShell commands from a Tweet? Yeah you do, and you didn’t even know you wanted to.

Earlier this month, a great Flow of the Week was posted that highlighted the ability to use a .net filesystemwatcher to kick off local processes. This sparked an idea – I think we can expand on this and basically run anything we want. Here’s how:

First, let’s start with the Connected Gateway. The link above goes into a bit of detail on how to configure the connection. Nothing special there.
Second, on the Connected Gateway, run this PowerShell script:

$FileSystemWatcher = New-Object System.IO.FileSystemWatcher
$FileSystemWatcher.path = "C:\temp\WatchMe"
$FileSystemWatcher.Filter = "Flow.txt"
$FileSystemWatcher.EnableRaisingEvents = $true
 
Register-ObjectEvent $FileSystemWatcher "Changed" -Action {
$content =  get-content C:\temp\WatchMe\Flow.txt |select-object -last 1
powershell.exe $content
}

This script sets up a FileSystemWatcher on the C:\temp\WatchMe\Flow.txt file. The watcher will only perform an action if the file is changed. There are several options for the “Changed” parameter – Created, Deleted, Renamed, Error, etc… Once created, the watcher will look at the last line of the c:\temp\WatchMe\Flow.txt file, and launch a PowerShell process that takes that last line as the input.

Third – This is the best part. Since we have a FileSystemWatcher, and that watcher is reading the last line of the C:\temp\WatchMe\Flow.txt file and kicking that process off, all we have to do is append a line to that file to start a PowerShell session. Flow has a built-in connection for FileSystem. You can see where this is going. Create a new Flow, and add an input action – I am fond of the Outlook.com Email Arrives action. Supply a suitable trigger in the subject, and add the ‘Append File’ action from the FileSystem service. Here is how mine is configured:
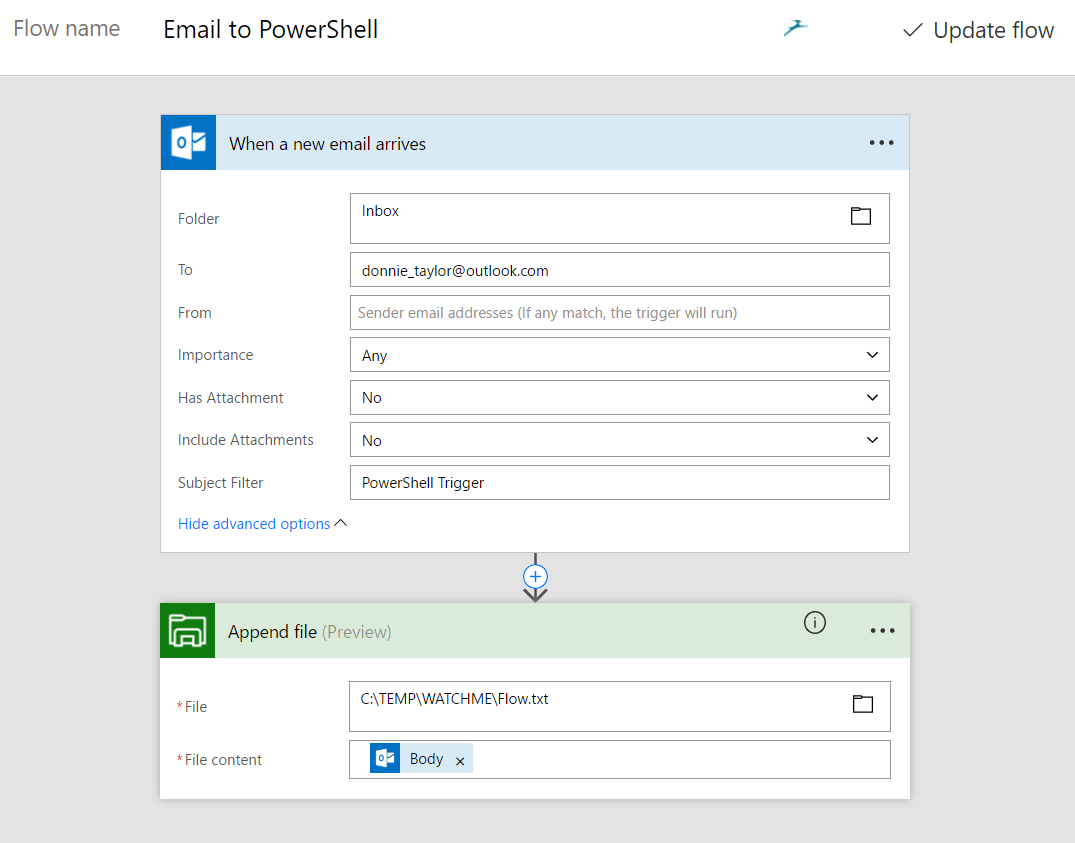
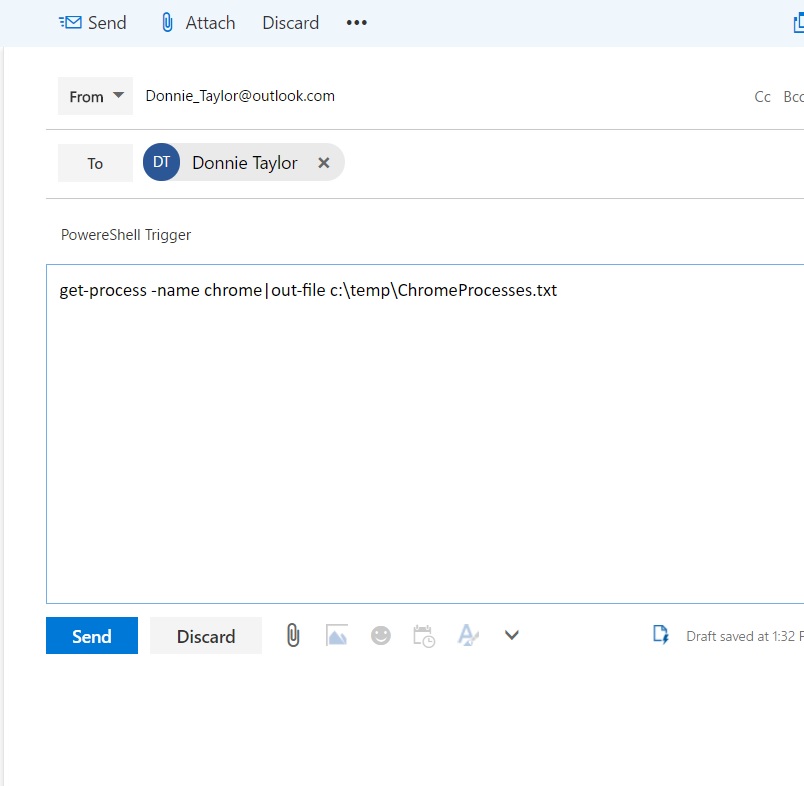
The only catch with this particular setup is that the body of the email needs to be in plain text – Windows 10 Mail app, for example, will not send in plain text. The body of the mail is the PowerShell command we want to run. For example, maybe we want PowerShell to get a list of processes that have a certain name, and dump those to a text file for parsing later. Simply send an email that has the body of “get-process -name chrome|out-file c:\temp\ChromeProcesses.txt”. Here is what that results in:
Before we send the email:

The Email:
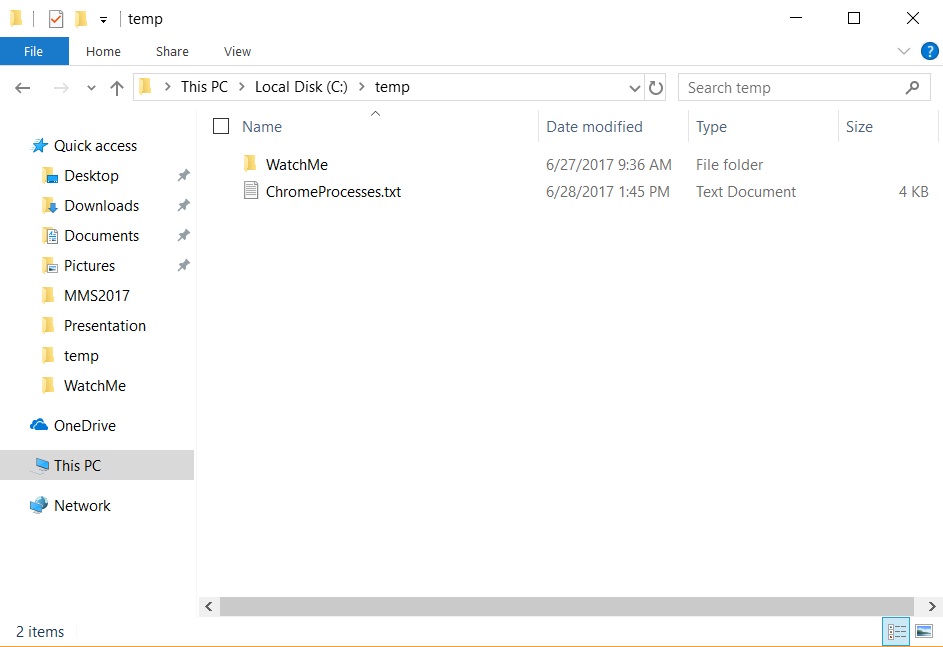
After a few minutes – an new folder appears!:
The contents of the text file:

Handles  NPM(K)    PM(K)      WS(K)     CPU(s)     Id  SI ProcessName                                                  
-------  ------    -----      -----     ------     --  -- -----------                                                  
   1956      97   131588     191648     694.98    728   1 chrome                                                       
    249      22    34268      43356       1.63   4264   1 chrome                                                       
    381      81   307592     331312     145.16   6080   1 chrome                                                       
    149      12     2140      10076       0.05   7936   1 chrome                                                       
    632      86   277900     557484     974.00   9972   1 chrome                                                       
    431      31   147956     159404     182.11  10056   1 chrome                                                       
    219      12     2132       9608       0.08  11636   1 chrome                                                       
    283      50   135932     141512      98.05  12224   1 chrome                                                       
    396      54   133912     297432      18.58  12472   1 chrome                                                       
    253      46   107348     106752      50.13  13276   1 chrome                                                       
    381      48   114452     128836     242.89  14328   1 chrome                                                       

Think about what you could do with this – Perhaps you want to do an Invoke-WebRequest every time a RSS Feed updates. Maybe start a set of diagnostic commands when an item is added to Sharepoint. Kick off actions with a Tweet. If you want full scripts to run instead of commands, change the Action section of the FileSystemWatcher to “PowerShell.exe -file $content”. Easy as pie.
PowerShell WSMAN Configuration for Massive Scale

In my day job, I constantly strive to push PowerShell to the limit, attempting to use absolutely every bit of processor/memory/network bandwidth available. One way I do this is with PoshRSJob written by Boe Prox. PoshRSJob is a wonder multi-threading tool, and I use it at pretty heavy scale – typically at a 100 thread throttle.

Sometimes, when you are running a lot of concurrent threads attaching to remote machines, you will run into WinRM connection limitations. They typically will show up in error messages like this when you try to do commands line “invoke-command -computername remoteserver01” :
“This user is allowed a maximum number of 5 concurrent shells, which has been exceeded. “

Configuring typical WSMAN connection limits are fairly well documented, but I was running into another type of error. This error was occurring even after I had upped the connection limits:
“The maximum number of concurrent shells allowed for this plugin has been exceeded.”

This was driving me crazy, until I realized the slightly different wording. Browsing the WSMAN PSDrive, I was eventually able to solve it. The key word in the second error was “plugin”. I had to configure the limits on the plugin, not just the shell. After I realized the difference, I was able to find the right settings. I have compiled them here in a small script that will enable WinRM, and set the limits very high for both the shell and plugin.

enable-psremoting -force 
cd WSMan:\localhost\Shell 
set-item MaxConcurrentUsers 100 
set-item MaxProcessesPerShell 10000 
set-item MaxMemoryPerShellMB 1024 
set-item MaxShellsPerUser 1000 
cd WSMan:\localhost\Plugin\microsoft.powershell\Quotas 
set-item MaxConcurrentUsers 100 
set-item MaxProcessesPerShell 10000 
set-item MaxShells 1000 
set-item MaxShellsPerUser 1000 
restart-service winrm 

Obviously test this before you deploy to production. I also found a neat one-liner to monitor the number of WSMan connections of a target system (set the $computername variable to the target, or use localhost):

while($true){(Get-WSManInstance -ComputerName $ComputerName -ResourceURI Shell -Enumerate).count;start-sleep 1} 

Azure Runbook for Posting to the OMS API

For MMSMOA 2017, I created an Azure Runbook that could post to the OMS API. Well, it’s more than a month later, but I finally got around to making a post around it. I’m going to skip the basics of creating a runbook, but if you need a primer, I suggest starting here.

Let’s start with the runbook itself. Here is a decent template that I modified from the OMS API documentation. This template takes an input string, parses the string into 3 different fields, and sends those fields over to OMS. Here’s the runbook:

Param
(
    [Parameter (Mandatory= $true)]
    [string] $InputString
)


$CustomerID = Get-AutomationVariable -Name "CustomerID"
$SharedKey = Get-AutomationVariable -Name "SharedKey"
write-output $customerId
write-output $SharedKey
$date = (get-date).AddHours(-1)

# Specify the name of the record type that you'll be creating
$LogType = "MyRecordType"

# Specify a field with the created time for the records
$TimeStampField = "DateValue"

# Create the function to create the authorization signature
Function Build-Signature ($customerId, $sharedKey, $date, $contentLength, $method, $contentType, $resource)
{
    $xHeaders = "x-ms-date:" + $date
    $stringToHash = $method + "`n" + $contentLength + "`n" + $contentType + "`n" + $xHeaders + "`n" + $resource

    $bytesToHash = [Text.Encoding]::UTF8.GetBytes($stringToHash)
    $keyBytes = [Convert]::FromBase64String($sharedKey)

    $sha256 = New-Object System.Security.Cryptography.HMACSHA256
    $sha256.Key = $keyBytes
    $calculatedHash = $sha256.ComputeHash($bytesToHash)
    $encodedHash = [Convert]::ToBase64String($calculatedHash)
    $authorization = 'SharedKey {0}:{1}' -f $customerId,$encodedHash
    return $authorization
}


# Create the function to create and post the request
Function Post-OMSData($customerId, $sharedKey, $body, $logType)
{
    $method = "POST"
    $contentType = "application/json"
    $resource = "/api/logs"
    $rfc1123date = [DateTime]::UtcNow.ToString("r")
    $contentLength = $body.Length
    $signature = Build-Signature `
        -customerId $customerId `
        -sharedKey $sharedKey `
        -date $rfc1123date `
        -contentLength $contentLength `
        -fileName $fileName `
        -method $method `
        -contentType $contentType `
        -resource $resource
    $uri = "https://" + $customerId + ".ods.opinsights.azure.com" + $resource + "?api-version=2016-04-01"

    $headers = @{
        "Authorization" = $signature;
        "Log-Type" = $logType;
        "x-ms-date" = $rfc1123date;
        "time-generated-field" = $TimeStampField;
    }

    $response = Invoke-WebRequest -Uri $uri -Method $method -ContentType $contentType -Headers $headers -Body $body -UseBasicParsing
    $WhatISent = "Invoke-WebRequest -Uri $uri -Method $method -ContentType $contentType -Headers $headers -Body $body -UseBasicParsing"
    write-output $WhatISent
    return $response.StatusCode
}

# Submit the data to the API endpoint

$ComputerName = $InputString.split(';')[0]
$AlertName = $InputString.split(';')[1]
$AlertValue = $InputString.split(';')[2]

# Craft JSON
$json = @"
[{  "StringValue": "$AlertName",
    "Computer": "$computername",
    "NumberValue": "$AlertValue",
    "BooleanValue": true,
    "DateValue": "$date",
    "GUIDValue": "9909ED01-A74C-4874-8ABF-D2678E3AE23D"
}]
"@

Post-OMSData -customerId $customerId -sharedKey $sharedKey -body ([System.Text.Encoding]::UTF8.GetBytes($json)) -logType $logType  

There are a couple of things to note with this runbook – first, the date it will post into OMS will be Central Standard Time. If you want to change to another timezone, change the $date = (get-date).AddHours(-1) line (aligning to EST). Second, this script has output which you can remove. The output will only show up in the output section in Azure Automation, which makes it handy for troubleshooting. The third thing you might want to change is the $LogType = “MyRecordType” line. This is the name that OMS will give the log (with one caveat mentioned below).

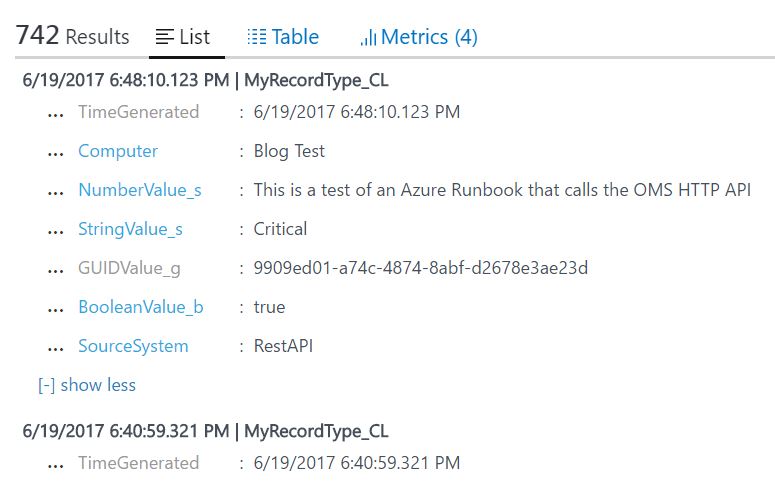
So, create your runbook in Azure Automation, and give it a test. You will be prompted for the InputString. In my example here, I will use the input string of “Blog Test;Critical;This is a test of an Azure Runbook that calls the OMS HTTP API”

Give it a minute or so, and you are rewarded with this:

Notice the “_CL” at the end of my log name? Notice the “_S” at the end of the fields? OMS does that automatically – CL for custom log, S for string (or whatever data type you happen to pass).

There you have it – runbooks that post to OMS. Add a webbook to the Runbook, and call it from Flow. Send an email to an inbox, have Flow trigger the Runbook with some of the email data, and suddenly you have the ability to send emails and have that data appear in OMS.