PoshAzurelab – starting azure machines in order

aka – please be careful of asking me something

Recently a friend sent me an email asking how to start a series of machines in Azure in a certain order.  These particular machines were all used for labs and demos – some of them needed to be started and running before others.  This is probably something that a lot of people can relate to; imagine needing to start domain controllers before bringing up SQL servers before bringing up ConfigMgr servers before starting demo client machines..  You get the idea.

So, even though we got something for my friend up and running, I decided to go ahead and build a repo for this.  The idea right now is that this repo will  start machines in order, but I will expand it later to also stop them.  Eventually I will expand it to other resources that have a start/stop action.  Thanks a lot, Shaun.

The basics of the current repo are 2 files – start-azurelab.ps1 and config.json.  Start-AzureLab performs the actual heavy lifting, but the important piece is really config.json.  Let’s examine the basic one:

{
    "TenantId": "fffffff-5555-4444-fake-tenantid",
    "subscriptions": [
        {
            "subscription_name": "Pay-As-You-Go",
            "resource_groups": [
                {
                    "resource_group_name": "AzureLabStartup001",
                    "data": {
                        "virtual_machines": [
                            {
                                "vm_name": "Server001",
                                "wait":false,
                                "delay_after_start": "1"
                            },
                            {
                                "vm_name": "Server002",
                                "wait":false,
                                "delay_after_start": "2"
                            }
                        ]
                    }
                }
            ]
        }
    ]
}

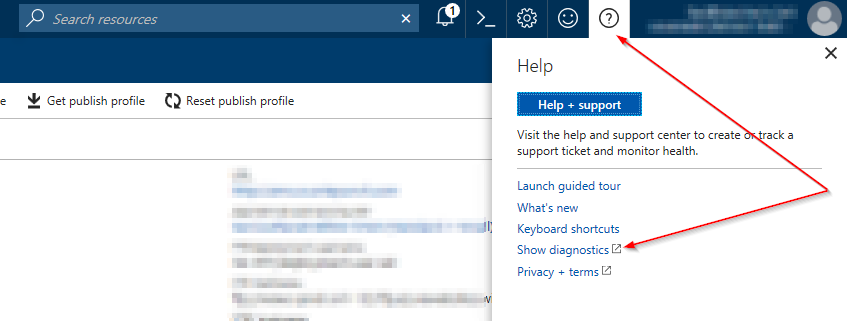
The first thing you see is the ‘tenantid’.  You will want to replace this with your personal tenant id from Azure.  To find your tenant id, click help and show diagnostics:
Next, you can see the subscription name.  If you are familiar with JSON, you can also see that you can enter multiple subscriptions – more on this later.  Enter your subscription name (not ID). 

Next, you can see the Resource_Group_Name.  Again, you can have multiple resource groups, but in this simple example there is only one.  Put in your specific resource group name.  Now we get down to the meat of the config.

"data": {
         "virtual_machines": [
          {
                "vm_name": "Server001",
                "wait":false,
                "delay_after_start": "1"
           },
           {
                 "vm_name": "Server002",
                 "wait":false,
                 "delay_after_start": "2"
            }
     ]
}

This is where we put in the VM names.  Place them in the order you want them to start.  The two other properties have special meaning – “wait” and “delay_after_start”.  Let’s look at “wait”.

When you start an Azure VM with start-azvm, there is a property you specify that tells the cmdlet to either start the VM and keep checking until the machine is running, or start the VM and immediately return back to the terminal.  If you set the “wait” property in this config to ‘false’, then when that VM is started the script will immediately return back to the terminal and process the next instruction.  This is important when dealing with machines that take a bit to start  – i.e. large Windows servers.

Now – combine the “wait” property with the “delay_after_start” property, and you have capability to really customize your lab start ups.  For example, maybe you have a domain controller, a DNS server , and a SQL server in your lab, plus a bunch of client machines.  You want the DC to come up first, and probably want to wait 20-30 seconds after it’s running to make sure your DC services are all up and running.  Same with the DNS and SQL boxes, but maybe you don’t need to wait so long after the box is running.  The client machines, though – you don’t need to wait at all, and you might set the delay to 0 or 1.  Just get them up and running and be done with it.

So now we can completely control how our lab starts, but say you have multiple resource groups or multiple subscriptions to deal with.  The JSON can be configured to allow for both!  In the github repo, there are 2 additional examples – config-multigroup.json and config-multisub.json.    A fully baked JSON might look like this:


{
    "TenantId": "ff744de5-59a0-4b5b-a181-54d5efbb088b",
    "subscriptions": [
        {
            "subscription_name": "Pay-As-You-Go",
            "resource_groups": [
                {
                    "resource_group_name": "AzureLabStartup001",
                    "data": {
                        "virtual_machines": [
                            {
                                "vm_name": "Server001",
                                "wait":true,
                                "delay_after_start": "1"
                            },
                            {
                                "vm_name": "Server002",
                                "wait":false,
                                "delay_after_start": "2"
                            }
                        ]
                    }
                },
                {
                    "resource_group_name": "AzureLabStartup002",
                    "data": {
                        "virtual_machines": [
                            {
                                "vm_name": "Server001",
                                "wait":true,
                                "delay_after_start": "1"
                            },
                            {
                                "vm_name": "Server002",
                                "wait":true,
                                "delay_after_start": "2"
                            }
                        ]
                    }
                }
            ]
        },
        {
            "subscription_name": "SubID2",
            "resource_groups": [
                {
                    "resource_group_name": "AzureLabStartup001",
                    "data": {
                        "virtual_machines": [
                            {
                                "vm_name": "Server001",
                                "wait":true,
                                "delay_after_start": "1"
                            },
                            {
                                "vm_name": "Server002",
                                "wait":true,
                                "delay_after_start": "2"
                            }
                        ]
                    }
                },
                {
                    "resource_group_name": "AzureLabStartup002",
                    "data": {
                        "virtual_machines": [
                            {
                                "vm_name": "Server001",
                                "wait":true,
                                "delay_after_start": "1"
                            },
                            {
                                "vm_name": "Server002",
                                "wait":true,
                                "delay_after_start": "2"
                            }
                        ]
                    }
                }
            ]
        }
    ]
}

So there you have it – hope you enjoy the repo, and keep checking back because I will be updating it to add more features and improve the actual code.  Hope this helps!  


Add multiple powershell versions to Vscode

Here is the quick and dirty way to add multiple PowerShell versions to VSCode, and switch between them quickly.

It’s often times advantageous to quickly switch between multiple versions of a programming language when coding to ensure that your code works on multiple platforms.  For me, that is switching between Windows PowerShell and multiple versions of Microsoft PowerShell (PowerShell Core).  He’s how to easily do it in VSCode.

First, I am going to assume you have the PowerShell extension already installed in VSCode.  If not, hit F1 (Ctrl-Shift-P) to open the command palette, and type this


ext install powershell

Now, let’s get some different PowerShell versions.  This is the link to PowerShell 7 preview 5.  Down that and extract it to any directory you want.  In this example I will also be using the latest stable version – 6.2.3.  In this example I have downloaded them both to the c:\pwsh directory.

Open VSCode, and create a new file.  Save the file with a .ps1 extension.  Notice how the terminal automatically starts PowerShell, and that the little green number in the lower right says 5.1?  That’s because VSCode is smart enough to look in common locations for PowerShell versions, and will add those automatically to your session options.  Since we are putting the version in a non-typical location, we have to edit our settings.json.  The easiest way to do it is this is to hit F1 (Ctrl-Shift-P), and type ‘language’.  Select “Configure Language Specific Settings”


You will open the settings.json for your user and language.  If you haven’t done much with VSCode, it probably looks something like this:


{
    "workbench.iconTheme": "vscode-icons",
    "team.showWelcomeMessage": false,
    "markdown.extension.toc.githubCompatibility": true,
    "git.enableSmartCommit": true,
    "git.autofetch": true,
    "[powershell]": {}
} 

To add our new versions, we need to add just a bit to this file.  We are going to add powershell.powerShellAdditionalExePaths settings – in our case 2 of them.  The important parts are to make sure you are escaping the “\” slashes with another slash, and just follow normal JSON formatting requirements.  Continuing with my example, my settings.json looks like this:

{
    "workbench.iconTheme": "vscode-icons",
    "team.showWelcomeMessage": false,
    "markdown.extension.toc.githubCompatibility": true,
    "git.enableSmartCommit": true,
    "git.autofetch": true,
    "[powershell]": {},
    
    "powershell.powerShellAdditionalExePaths": [
        {
            "exePath": "C:\\pwsh\\7.p5\\pwsh.exe",
            "versionName": "PowerShell Core 7p5"
        },
        {
            "exePath": "C:\\pwsh\\6.2.3\\pwsh.exe",
            "versionName": "PowerShell Core 6.2.3"
        }        
    ],
    "powershell.powerShellDefaultVersion": "PowerShell Core 7p5",
    "powershell.powerShellExePath": "C:\\pwsh\\7.p5\\pwsh.exe"
} 

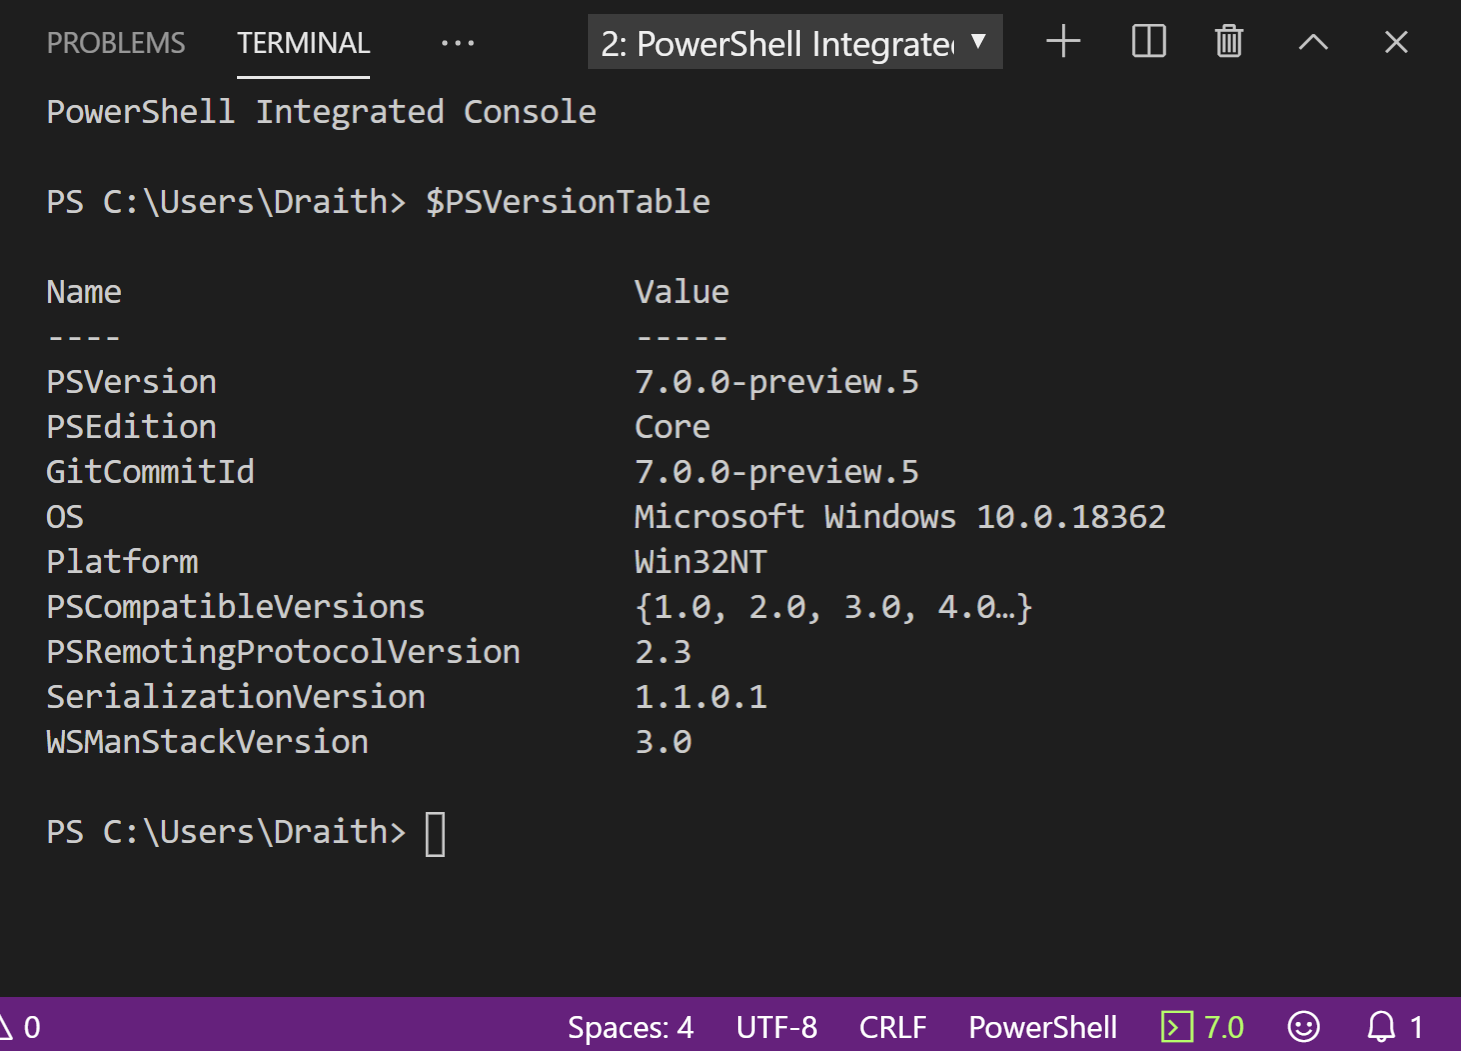
Save the settings file, and if you have an open terminal, either exit it, or crash/reload.  This will force VSCode to reload the settings file.  If you have done it correctly, if you click on the little green version number in the lower right, you should see something like this:

Switch between them, and verify you see the various version with $PSVersionTable

SCOM Incremental discovery

Limitless possibilities – very little code

One of the biggest pet peeves that I’ve had with SCOM discovery is that it was always very agent biased.  If you wanted to discover IIS, for example, the agent would look for the bits and pieces of IIS installed on a server.  While that works fine for most classes and objects, it does pose some limitations.  What if I wanted to add additional properties to an existing object, or mark a server with a custom attribute?  A common work around was to ‘tattoo’ a system with a reg key or perhaps a file, and then discover that via the normal mechanism.  That seems like extra steps for something that should be relatively easy.  I want to run discovery on something other than the agent, and have that discovery data roll up to the agent.

Why would someone want to perform discovery ‘remotely’?  Well, maybe you have a CMDB or an application to server relationship database.  Would you rather put a regkey on every server with the application information, or just query the database?  Imagine being able to have application owner properties (email, phone, manager, etc…) in SCOM as a property for every server, but without having to touch the server at all – no more regkeys or property files.

Microsoft.EnterpriseManagement.ConnectorFramework.IncrementalDiscoveryData

This class – IncrementalDiscoveryData – is an amazingly powerful tool.  The idea is that you can submit additional discovery data for an existing object, or even create brand new objects like normal.  The best way to imagine this is to look at the code itself:


$data = (invoke-sql @DBParams -method query -statement "select * from SomeDataTable").tables.rows 
New-SCOMManagementGroupConnection -ComputerName “localhost”
$mg = Get-SCOMManagementGroup

foreach ($row in $data){
    $class = get-scomclass -displayname $row.ClassName
    $ClassObject=New-Object Microsoft.EnterpriseManagement.Common.CreatableEnterpriseManagementObject($mg,$class)
    $servername = $row.servername
    $ClassObject[$Class.FindHostClass(),“PrincipalName”].Value = "$servername"
    $ClassInstanceDisplayName=$Servername
    $ClassObject[$Class,“AppID”].Value = $row.AppID
    $ClassObject[$Class,“MonitorCI”].Value = $row.MonitorCI
    $discovery=New-Object Microsoft.EnterpriseManagement.ConnectorFramework.IncrementalDiscoveryData
    $discovery.Add($ClassObject)
    $discovery.Overwrite($mg)
}

The first 3 lines are pretty straight forward.  A simple function that querys a database (invoke-sql), creating a connection the the local management server, and getting the management group.

Then we go row by row with what’s in the table.  In this case the table looks something like this:

ClassName ServerName AppID MonitorCI
Microsoft.Windows.Computer server01 COTS1 AssignmentGroup1
Microsoft.Windows.Computer server02 Custom2 AssignmentGroup2

The code is going to get the class (in this case $row.classname, which is Microsoft.Windows.Computer), then create a new instance of that class (even if the object exists – we won’t overwrite anything not in the discovery data).  We find the host using the servername , add a couple of our new attributes – AppID and MonitorCI – and then create our discovery object.  That is where the magic happens – 

$discovery=New-Object Microsoft.EnterpriseManagement.ConnectorFramework.IncrementalDiscoveryData

This is the bit that creates the actual discovery object.  Since it’s incremental, we aren’t going to mess with anything already in that object, just update the bits that we add to the discovery object.  In this case, we are adding the $ClassObject that we populated with our additional bits of data – AppID and MonitorCI.    Two more lines, and we have our remotely discovered data as properties in our server object.

    $discovery.Add($ClassObject)
    $discovery.Overwrite($mg)

With just that little bit of code we are able to store attributes, properties, configurations, or anything else in a central database and have a simple PowerShell script that updates the objects in SCOM with that discovery data!  Not only that, those items are not rolled up to some random object, we can roll them up to the exact object we want.  No more regkey tattoos, or configuration files that you have to keep update to date on servers.