Use a Config File with PowerShell

How many times has this occurred?


“Hey App Onwer – all of these PowerShell automation scripts you had our team create started failing this weekend. Did something change?”
“Oh yeah Awesome Automation Team. We flipped over to a new database cluster on Saturday, along with a new web front end. Our API endpoints all changed as well. Didn’t anyone tell you? How long will it take to update your code?”

Looking at dozens of scripts you personally didn’t create: “Ummmmm”

This scenario happens all of the time, and there are probably a hundred different ways to deal with it. I personally use a config file, and for very specific reasons. If you are coding in PowerShell 7+ (and you should be), then making your code cross-platform compatiable should be at the top of your priority list. In the past, I would store things like database connection strings or API endpoints in the Windows registry, and my scripts would just reference that reg key. This worked great – I didn’t have the same property listed in a dozen different scripts, and I only had to update the property in once place. Once I started coding with cross-plat in mind, I obviously had to change my thinking. This is where a simple JSON config file comes in handy. A config file can be placed anywhere, and the structured JSON format makes creating, editing, and reading easy to do. Using a config file allows me to take my whole code and move it from one system to another regardless of platform.

Here is what a sample config file might look like:

{
    "Environments": [
        {
            "Name": "Prod",
            "CMDBConnectionString": "Data Source=cmdbdatabaseserverAG;MultiSubnetFailover=True;Initial Catalog=CMDB;Integrated Security=SSPI",
            "LoggingDBConnectionString": "Data Source=LoggingAG;MultiSubnetFailover=True;Initial Catalog=Logs;Integrated Security=SSPI",
            "ServiceNowRestAPI":"https://prodservicenowURL:4433/rest",
            "Servers": [
                {
                    "ServerName": "prodserver1",
                    "ModulesDirectory": "e:\\tasks\\pwsh\\modules",
                    "LogsDirectory": "e:\\tasks\\pwsh\\logs\\"
                },
                {
                    "ServerName": "prodserver2",
                    "ModulesDirectory": "e:\\tasks\\pwsh\\modules",
                    "LogsDirectory": "e:\\tasks\\pwsh\\logs\\"
                }
            ]
        },
        {
            "Name": "Dev",
            "CMDBConnectionString": "Data Source=testcmdbdatabaseserverAG;MultiSubnetFailover=True;Initial Catalog=CMDB;Integrated Security=SSPI",
            "LoggingDBConnectionString": "Data Source=testLoggingAG;MultiSubnetFailover=True;Initial Catalog=Logs;Integrated Security=SSPI",
            "ServiceNowRestAPI":"https://testservicenowURL:4433/rest",
            "Servers": [
                {
                    "ServerName": "testserver1",
                    "ModulesDirectory": "e:\\tasks\\pwsh\\modules",
                    "LogsDirectory": "e:\\tasks\\pwsh\\logs\\"
                },
                {
                    "ServerName": "testserver2",
                    "ModulesDirectory": "e:\\tasks\\pwsh\\modules",
                    "LogsDirectory": "e:\\tasks\\pwsh\\logs\\"
                }
            ]            
        }
    ]
}

And here is what the code that parses it looks like in each script:

$config = get-content $PSScriptRoot\..\config.json|convertfrom-json
$ModulesDir = $config.Environments.Servers|where-object {$_.ServerName -eq [Environment]::MachineName}|select-object -expandProperty ModulesDirectory
$LogsDir = $config.Environments.Servers|where-object {$_.ServerName -eq [Environment]::MachineName}|select-object -expandProperty LogsDirectory
$DBConnectionString = $config.Environments|where-object {[Environment]::MachineName -in $_.Servers.ServerName}|select-object -expandProperty CMDBConnectionString

Note that in this particular setup, I use the server name of the server actually running the script to determine if the environment is production or not. That is completely optional – your config file might be as simple as a couple of lines – something like this:

{
    "CMDBConnectionString": "Data Source=cmdbdatabaseserverAG;MultiSubnetFailover=True;Initial Catalog=CMDB;Integrated Security=SSPI",
    "LoggingDBConnectionString": "Data Source=LoggingAG;MultiSubnetFailover=True;Initial Catalog=Logs;Integrated Security=SSPI",
    "ServiceNowRestAPI":"https://prodservicenowURL:4433/rest"
}

When you use a simple file like this, you don’t need to parse the machine name – a simple “$ModulesDir = $config |select-object -expandProperty ModulesDirectory” would work great!

Now you can simply update the connection string or any other property in one location and start your testing. No need to “Find in all Files” or search and replace across all your scripts. An added plus is that using a config file vs something like a registry key is that the code is cross-platform compatible. I’ve used JSON here due to a personal preference, but you could use any type of flat file you wanted, including a simple text file. If you use a central command and control tool – something like SMA, then those properties are already stored locally, but this method would be handy for those that don’t have capability or simply want to prepare their scripts for running on K8s or Docker.

Let me know what you think about this – Do you like this approach or do you have another method you like better? Hit me up on Twitter – @donnie_taylor

2 Great Experimental Features in Core 7

In this blog post, I want to drill into a couple of very useful experimental features that are available in PowerShell 7 preview 6.  The two features I want to dive into are ‘PSNullConditionalOperators’ and  ‘skip error check on web cmdlets’.  The former feature was available in preview5, and the latter was made available in preview 6.  Both of these are (as of the writing of this blog) experimental features.  In order to play around with these features, I suggest doing a ‘Enable-ExperimentalFeature *’ and restarting your PowerShell session.  When you are done with your testing, you can always do a “Disable-ExperimentalFeature” to get your session back to normal.

What exactly is ‘PSNullConditionalOperators’?  This specifically refers to the ‘&&’ and ‘||’ operators, which deal with continuing or stopping a set of commands depending on the success or failure of the first command.  The ‘&&’ operator will execute what is on it’s right if the command on it’s left succeeded, and conversely the ‘||’ operator will execute what is on it’s right if the command on it’s left failed.  Probably the best way to picture this is with an example.


Write-Host “This is a good command” && Write-Host “Therefore this command will run”

This is a good command

Therefore this command will run

The first write-host succeeded, and so the second write-host was run.  Now, let’s look at ‘||’.

write-badcmdlet "This is a bad command" || Write-Host “Therefore this command will run”
write-badcmdlet: The term 'write-badcmdlet' is not recognized as the name of a cmdlet, function, script file, or operable program.

Check the spelling of the name, or if a path was included, verify that the path is correct and try again.

Therefore this command will run

Here we can see that the ‘write-badcmdlet’ cmdlet doesn’t exist (if it does, we need to talk about your naming conventions), so the second command was run.  This can replace 3 or 4 lines of code easily – you would normally have to do an if-else block to check the $? variable and see if it was true or false.  You can also get fancy and chain these together for even more checks.

write-badcmdlet "This is a bad command" || Write-Host “Therefore this command will run” && "And so will this one"


write-badcmdlet: The term 'write-badcmdlet' is not recognized as the name of a cmdlet, function, script file, or operable program.

Check the spelling of the name, or if a path was included, verify that the path is correct and try again.

Therefore this command will run

And so will this one

You can see how the 3rd command worked because the 2nd command ran successfully.  Very handy, and dead simple to consolidate code.  They even work with OS commands!  Look at this example using notepad and the non-existent notepad2:

notepad && "Worked fine!"

Worked fine!

notepad2 && "Worked fine!"


notepad2: The term 'notepad2' is not recognized as the name of a cmdlet, function, script file, or operable program.

Check the spelling of the name, or if a path was included, verify that the path is correct and try again.

notepad2 || "Failed!"


notepad2: The term 'notepad2' is not recognized as the name of a cmdlet, function, script file, or operable program.

Check the spelling of the name, or if a path was included, verify that the path is correct and try again.

Failed!


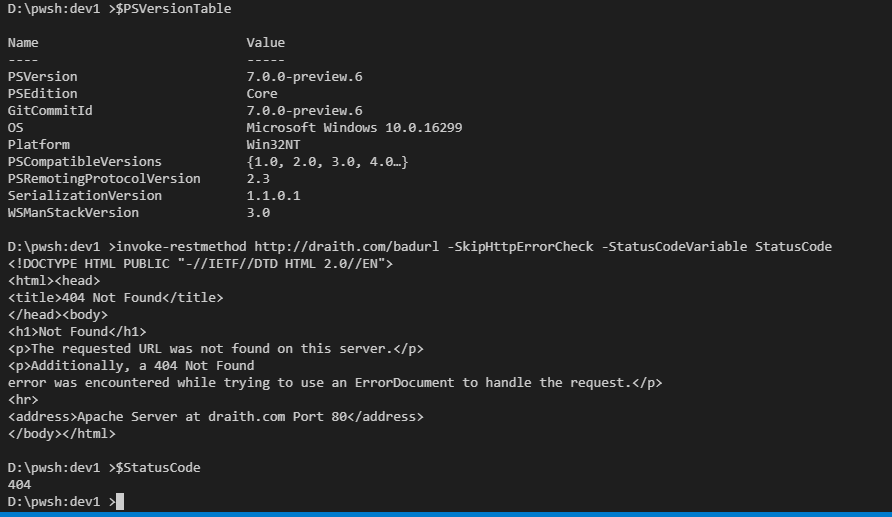
Now on to the second experimental feature – and one that I find amazingly handy.  Often times when you are working with RestAPIs or really any sort of web request, you are dealing with invoke-restmethod and invoke-webrequest.  One major pain point with these cmdlets is that if you get a non-200 error code back from the cmdlet, it returns an actual error object.  Consider this: 

That url doesn’t exist, but the way the error object is returned can be a massive pain!  What if I want to know if it was a 404 vs a 500 vs a 403 and actually want to do something about it?  Dealing with error objects is not the most intuitive, and I much prefer the way the new experimental feature ‘-SkipHttpErrorCheck’ handles this.  With this switch, a returned error code from these cmdlets will not return as an error.  Combine this with ‘-StatusCodeVariable’ and you can now act on the actual error without large try/catch blocks.  You can use switch blocks to route properly based on status code without diving into error objects.  This is a very welcome feature!

PoshAzurelab – starting azure machines in order

aka – please be careful of asking me something

Recently a friend sent me an email asking how to start a series of machines in Azure in a certain order.  These particular machines were all used for labs and demos – some of them needed to be started and running before others.  This is probably something that a lot of people can relate to; imagine needing to start domain controllers before bringing up SQL servers before bringing up ConfigMgr servers before starting demo client machines..  You get the idea.

So, even though we got something for my friend up and running, I decided to go ahead and build a repo for this.  The idea right now is that this repo will  start machines in order, but I will expand it later to also stop them.  Eventually I will expand it to other resources that have a start/stop action.  Thanks a lot, Shaun.

The basics of the current repo are 2 files – start-azurelab.ps1 and config.json.  Start-AzureLab performs the actual heavy lifting, but the important piece is really config.json.  Let’s examine the basic one:

{
    "TenantId": "fffffff-5555-4444-fake-tenantid",
    "subscriptions": [
        {
            "subscription_name": "Pay-As-You-Go",
            "resource_groups": [
                {
                    "resource_group_name": "AzureLabStartup001",
                    "data": {
                        "virtual_machines": [
                            {
                                "vm_name": "Server001",
                                "wait":false,
                                "delay_after_start": "1"
                            },
                            {
                                "vm_name": "Server002",
                                "wait":false,
                                "delay_after_start": "2"
                            }
                        ]
                    }
                }
            ]
        }
    ]
}

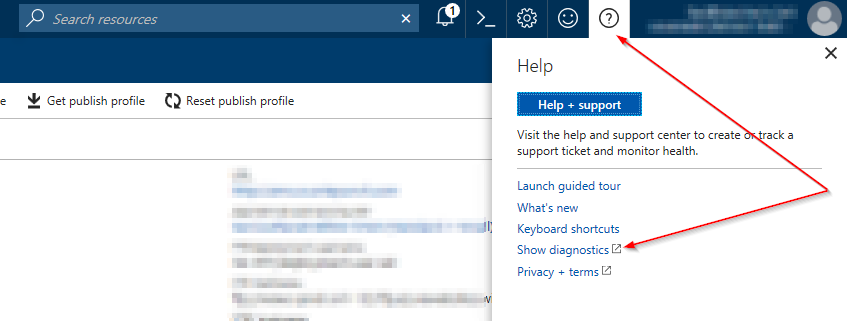
The first thing you see is the ‘tenantid’.  You will want to replace this with your personal tenant id from Azure.  To find your tenant id, click help and show diagnostics:

Next, you can see the subscription name.  If you are familiar with JSON, you can also see that you can enter multiple subscriptions – more on this later.  Enter your subscription name (not ID). 

Next, you can see the Resource_Group_Name.  Again, you can have multiple resource groups, but in this simple example there is only one.  Put in your specific resource group name.  Now we get down to the meat of the config.

"data": {
         "virtual_machines": [
          {
                "vm_name": "Server001",
                "wait":false,
                "delay_after_start": "1"
           },
           {
                 "vm_name": "Server002",
                 "wait":false,
                 "delay_after_start": "2"
            }
     ]
}

This is where we put in the VM names.  Place them in the order you want them to start.  The two other properties have special meaning – “wait” and “delay_after_start”.  Let’s look at “wait”.

When you start an Azure VM with start-azvm, there is a property you specify that tells the cmdlet to either start the VM and keep checking until the machine is running, or start the VM and immediately return back to the terminal.  If you set the “wait” property in this config to ‘false’, then when that VM is started the script will immediately return back to the terminal and process the next instruction.  This is important when dealing with machines that take a bit to start  – i.e. large Windows servers.

Now – combine the “wait” property with the “delay_after_start” property, and you have capability to really customize your lab start ups.  For example, maybe you have a domain controller, a DNS server , and a SQL server in your lab, plus a bunch of client machines.  You want the DC to come up first, and probably want to wait 20-30 seconds after it’s running to make sure your DC services are all up and running.  Same with the DNS and SQL boxes, but maybe you don’t need to wait so long after the box is running.  The client machines, though – you don’t need to wait at all, and you might set the delay to 0 or 1.  Just get them up and running and be done with it.

So now we can completely control how our lab starts, but say you have multiple resource groups or multiple subscriptions to deal with.  The JSON can be configured to allow for both!  In the github repo, there are 2 additional examples – config-multigroup.json and config-multisub.json.    A fully baked JSON might look like this:


{
    "TenantId": "ff744de5-59a0-4b5b-a181-54d5efbb088b",
    "subscriptions": [
        {
            "subscription_name": "Pay-As-You-Go",
            "resource_groups": [
                {
                    "resource_group_name": "AzureLabStartup001",
                    "data": {
                        "virtual_machines": [
                            {
                                "vm_name": "Server001",
                                "wait":true,
                                "delay_after_start": "1"
                            },
                            {
                                "vm_name": "Server002",
                                "wait":false,
                                "delay_after_start": "2"
                            }
                        ]
                    }
                },
                {
                    "resource_group_name": "AzureLabStartup002",
                    "data": {
                        "virtual_machines": [
                            {
                                "vm_name": "Server001",
                                "wait":true,
                                "delay_after_start": "1"
                            },
                            {
                                "vm_name": "Server002",
                                "wait":true,
                                "delay_after_start": "2"
                            }
                        ]
                    }
                }
            ]
        },
        {
            "subscription_name": "SubID2",
            "resource_groups": [
                {
                    "resource_group_name": "AzureLabStartup001",
                    "data": {
                        "virtual_machines": [
                            {
                                "vm_name": "Server001",
                                "wait":true,
                                "delay_after_start": "1"
                            },
                            {
                                "vm_name": "Server002",
                                "wait":true,
                                "delay_after_start": "2"
                            }
                        ]
                    }
                },
                {
                    "resource_group_name": "AzureLabStartup002",
                    "data": {
                        "virtual_machines": [
                            {
                                "vm_name": "Server001",
                                "wait":true,
                                "delay_after_start": "1"
                            },
                            {
                                "vm_name": "Server002",
                                "wait":true,
                                "delay_after_start": "2"
                            }
                        ]
                    }
                }
            ]
        }
    ]
}

So there you have it – hope you enjoy the repo, and keep checking back because I will be updating it to add more features and improve the actual code.  Hope this helps!  


Add multiple powershell versions to Vscode

Here is the quick and dirty way to add multiple PowerShell versions to VSCode, and switch between them quickly.

It’s often times advantageous to quickly switch between multiple versions of a programming language when coding to ensure that your code works on multiple platforms.  For me, that is switching between Windows PowerShell and multiple versions of Microsoft PowerShell (PowerShell Core).  He’s how to easily do it in VSCode.

First, I am going to assume you have the PowerShell extension already installed in VSCode.  If not, hit F1 (Ctrl-Shift-P) to open the command palette, and type this


ext install powershell

Now, let’s get some different PowerShell versions.  This is the link to PowerShell 7 preview 5.  Down that and extract it to any directory you want.  In this example I will also be using the latest stable version – 6.2.3.  In this example I have downloaded them both to the c:\pwsh directory.

Open VSCode, and create a new file.  Save the file with a .ps1 extension.  Notice how the terminal automatically starts PowerShell, and that the little green number in the lower right says 5.1?  That’s because VSCode is smart enough to look in common locations for PowerShell versions, and will add those automatically to your session options.  Since we are putting the version in a non-typical location, we have to edit our settings.json.  The easiest way to do it is this is to hit F1 (Ctrl-Shift-P), and type ‘language’.  Select “Configure Language Specific Settings”


You will open the settings.json for your user and language.  If you haven’t done much with VSCode, it probably looks something like this:


{
    "workbench.iconTheme": "vscode-icons",
    "team.showWelcomeMessage": false,
    "markdown.extension.toc.githubCompatibility": true,
    "git.enableSmartCommit": true,
    "git.autofetch": true,
    "[powershell]": {}
} 

To add our new versions, we need to add just a bit to this file.  We are going to add powershell.powerShellAdditionalExePaths settings – in our case 2 of them.  The important parts are to make sure you are escaping the “\” slashes with another slash, and just follow normal JSON formatting requirements.  Continuing with my example, my settings.json looks like this:

{
    "workbench.iconTheme": "vscode-icons",
    "team.showWelcomeMessage": false,
    "markdown.extension.toc.githubCompatibility": true,
    "git.enableSmartCommit": true,
    "git.autofetch": true,
    "[powershell]": {},
    
    "powershell.powerShellAdditionalExePaths": [
        {
            "exePath": "C:\\pwsh\\7.p5\\pwsh.exe",
            "versionName": "PowerShell Core 7p5"
        },
        {
            "exePath": "C:\\pwsh\\6.2.3\\pwsh.exe",
            "versionName": "PowerShell Core 6.2.3"
        }        
    ],
    "powershell.powerShellDefaultVersion": "PowerShell Core 7p5",
    "powershell.powerShellExePath": "C:\\pwsh\\7.p5\\pwsh.exe"
} 

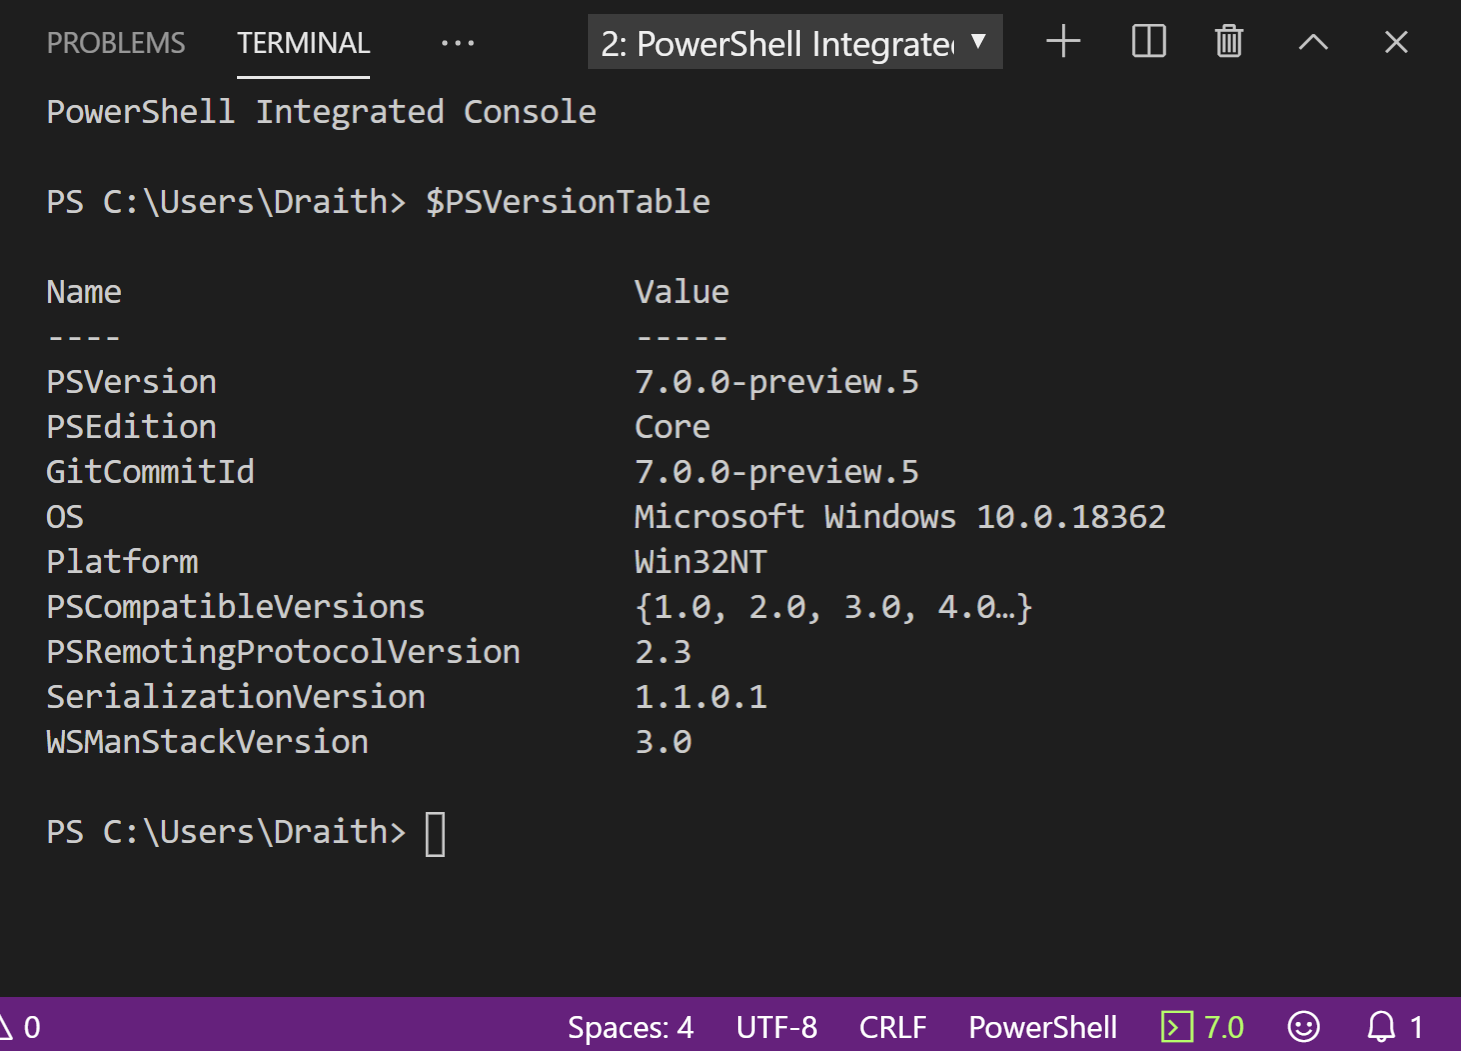
Save the settings file, and if you have an open terminal, either exit it, or crash/reload.  This will force VSCode to reload the settings file.  If you have done it correctly, if you click on the little green version number in the lower right, you should see something like this:

Switch between them, and verify you see the various version with $PSVersionTable

SCOM Incremental discovery

Limitless possibilities – very little code

One of the biggest pet peeves that I’ve had with SCOM discovery is that it was always very agent biased.  If you wanted to discover IIS, for example, the agent would look for the bits and pieces of IIS installed on a server.  While that works fine for most classes and objects, it does pose some limitations.  What if I wanted to add additional properties to an existing object, or mark a server with a custom attribute?  A common work around was to ‘tattoo’ a system with a reg key or perhaps a file, and then discover that via the normal mechanism.  That seems like extra steps for something that should be relatively easy.  I want to run discovery on something other than the agent, and have that discovery data roll up to the agent.

Why would someone want to perform discovery ‘remotely’?  Well, maybe you have a CMDB or an application to server relationship database.  Would you rather put a regkey on every server with the application information, or just query the database?  Imagine being able to have application owner properties (email, phone, manager, etc…) in SCOM as a property for every server, but without having to touch the server at all – no more regkeys or property files.

Microsoft.EnterpriseManagement.ConnectorFramework.IncrementalDiscoveryData

This class – IncrementalDiscoveryData – is an amazingly powerful tool.  The idea is that you can submit additional discovery data for an existing object, or even create brand new objects like normal.  The best way to imagine this is to look at the code itself:


$data = (invoke-sql @DBParams -method query -statement "select * from SomeDataTable").tables.rows 
New-SCOMManagementGroupConnection -ComputerName “localhost”
$mg = Get-SCOMManagementGroup

foreach ($row in $data){
    $class = get-scomclass -displayname $row.ClassName
    $ClassObject=New-Object Microsoft.EnterpriseManagement.Common.CreatableEnterpriseManagementObject($mg,$class)
    $servername = $row.servername
    $ClassObject[$Class.FindHostClass(),“PrincipalName”].Value = "$servername"
    $ClassInstanceDisplayName=$Servername
    $ClassObject[$Class,“AppID”].Value = $row.AppID
    $ClassObject[$Class,“MonitorCI”].Value = $row.MonitorCI
    $discovery=New-Object Microsoft.EnterpriseManagement.ConnectorFramework.IncrementalDiscoveryData
    $discovery.Add($ClassObject)
    $discovery.Overwrite($mg)
}

The first 3 lines are pretty straight forward.  A simple function that querys a database (invoke-sql), creating a connection the the local management server, and getting the management group.

Then we go row by row with what’s in the table.  In this case the table looks something like this:

ClassName ServerName AppID MonitorCI
Microsoft.Windows.Computer server01 COTS1 AssignmentGroup1
Microsoft.Windows.Computer server02 Custom2 AssignmentGroup2

The code is going to get the class (in this case $row.classname, which is Microsoft.Windows.Computer), then create a new instance of that class (even if the object exists – we won’t overwrite anything not in the discovery data).  We find the host using the servername , add a couple of our new attributes – AppID and MonitorCI – and then create our discovery object.  That is where the magic happens – 

$discovery=New-Object Microsoft.EnterpriseManagement.ConnectorFramework.IncrementalDiscoveryData

This is the bit that creates the actual discovery object.  Since it’s incremental, we aren’t going to mess with anything already in that object, just update the bits that we add to the discovery object.  In this case, we are adding the $ClassObject that we populated with our additional bits of data – AppID and MonitorCI.    Two more lines, and we have our remotely discovered data as properties in our server object.

    $discovery.Add($ClassObject)
    $discovery.Overwrite($mg)

With just that little bit of code we are able to store attributes, properties, configurations, or anything else in a central database and have a simple PowerShell script that updates the objects in SCOM with that discovery data!  Not only that, those items are not rolled up to some random object, we can roll them up to the exact object we want.  No more regkey tattoos, or configuration files that you have to keep update to date on servers.  

Powershell and Parsing html code in Core

When working on a PowerShell webservice, I came across an interesting problem that I think is only going to crop up more and more.  This webservice takes a json payload, performs some simple manipulation on the data, kicks off some automation, and logs some events.  Part of the payload is html code, however.  Of course the json payload doesn’t care, but when it was coming into PowerShell it was being interpreted as a string.  That meant that when you looked at the string, you literally saw html code:

<BODY><H3>OPEN Problem 256 in environment <I>EPG</I></H3>
                               <HR>
                               <B>1 impacted infrastructure component</B>
                               <HR>
                               <BR>
                               <DIV><SPAN>Process</SPAN><BR><B><SPAN style="FONT-SIZE: 120%; COLOR: #dc172a">bosh-dns-health</SPAN></B><BR>
                               <P style="MARGIN-LEFT: 1em"><B><SPAN style="FONT-SIZE: 110%">Network problem</SPAN></B><BR>Packet retransmission rate for process bosh-dns-health on host 
                               cloud_controller/<GUID> has increased to 18 %</P></DIV>
                               <HR>
                               Root cause
                               <HR>
                               
                               <DIV><SPAN>Process</SPAN><BR><B><SPAN style="FONT-SIZE: 120%; COLOR: #dc172a">bosh-dns-health</SPAN></B><BR>
                               <P style="MARGIN-LEFT: 1em"><B><SPAN style="FONT-SIZE: 110%">Network problem</SPAN></B><BR>Packet retransmission rate for process bosh-dns-health on host 
                               cloud_controller/<GUID> has increased to 18 %</P></DIV>
                               <HR>
                               
                               <P><A href="https://redacted.somewhere.com/e/<GUID>/#problems/problemdetails;pid=-<GUID>">Open in Browser</A></P></BODY> 

I wanted to put this data in the events I was logging, but I obviously didn’t want it to look like this.  There isn’t a PowerShell cmdlet for ‘ConvertFrom-HTML’, although that would be great.  I could have tried to parse the text and remove the formatting, but that would be a pain trying to escape the right characters and account for all of the html tags.  I found several ways online to handle this – namely creating a ‘HTMLFile’ object, writing the html code into it, and then extracting out the innertext property of the object.  This works fine in some environments, but throws a weird error if you don’t have Office installed.  Here is the code:

$HTML = New-Object -Com "HTMLFile"
$html.IHTMLDocument2_write($htmlcode)

And the error it throws when Office isn’t installed:

Method invocation failed because [System.__ComObject] does not contain a method named 'IHTMLDocument2_write'.

There is also a catch here – that error will also be thrown if you are trying this in PowerShell Core/Microsoft PowerShell (not Windows PowerShell – i.e. anything under 5.x)!  Fortunately, there is a quick fix:

$HTML = New-Object -Com "HTMLFile"
try {
    $html.IHTMLDocument2_write($htmlcode)
}
catch {
    $encoded = [System.Text.Encoding]::Unicode.GetBytes($htmlcode)
    $html.write($encoded)
}
$text = ($html.all | Where-Object { $_.tagname -eq 'body' } | Select-Object -Property innerText).innertext

A simple try/catch, and it works great.  I am going to create a new repo in GitHub and make this a new function.  Hopefully you haven’t wasted too much time trying to track this down – it took me a while, and it wasn’t until I stumbled upon a similar solution on StackOverflow (https://stackoverflow.com/questions/46307976/unable-to-use-ihtmldocument2) that I was able to wrap it up.  Expect the cmdlet/function soon!

Powershell – what modules are in use?

There comes a time when you are neck deep in code, and come to the realization that one of your modules could really use a tweak.  There is just one problem – what other scripts are using this module?  What if you wanted to inventory your scripts and the modules that each script is using?  This was the main use-case for this post.  I have a scripts directory, and want to get a quick inventory of what modules each one is using.  

First, the function:

#requires -version 3.0
Function Test-ScriptFile {
    <#
    .Synopsis
    Test a PowerShell script for cmdlets
    .Description
    This command will analyze a PowerShell script file and display a list of detected commands such as PowerShell cmdlets and functions. Commands will be compared to what is installed locally. It is recommended you run this on a Windows 8.1 client with the latest version of RSAT installed. Unknown commands could also be internally defined functions. If in doubt view the contents of the script file in the PowerShell ISE or a script editor.
    You can test any .ps1, .psm1 or .txt file.
    .Parameter Path
    The path to the PowerShell script file. You can test any .ps1, .psm1 or .txt file.
    .Example
    PS C:\> test-scriptfile C:\scripts\Remove-MyVM2.ps1
     
    CommandType Name                                   ModuleName
    ----------- ----                                   ----------
        Cmdlet Disable-VMEventing                      Hyper-V
        Cmdlet ForEach-Object                          Microsoft.PowerShell.Core
        Cmdlet Get-VHD                                 Hyper-V
        Cmdlet Get-VMSnapshot                          Hyper-V
        Cmdlet Invoke-Command                          Microsoft.PowerShell.Core
        Cmdlet New-PSSession                           Microsoft.PowerShell.Core
        Cmdlet Out-Null                                Microsoft.PowerShell.Core
        Cmdlet Out-String                              Microsoft.PowerShell.Utility
        Cmdlet Remove-Item                             Microsoft.PowerShell.Management
        Cmdlet Remove-PSSession                        Microsoft.PowerShell.Core
        Cmdlet Remove-VM                               Hyper-V
        Cmdlet Remove-VMSnapshot                       Hyper-V
        Cmdlet Write-Debug                             Microsoft.PowerShell.Utility
        Cmdlet Write-Verbose                           Microsoft.PowerShell.Utility
        Cmdlet Write-Warning                           Microsoft.PowerShell.Utility

    .Notes
    Original script provided by Jeff Hicks at (https://www.petri.com/powershell-problem-solver-find-script-commands)

    #>
     
    [cmdletbinding()]
    Param(
        [Parameter(Position = 0, Mandatory = $True, HelpMessage = "Enter the path to a PowerShell script file,",
            ValueFromPipeline = $True, ValueFromPipelineByPropertyName = $True)]
        [ValidatePattern( "\.(ps1|psm1|txt)$")]
        [ValidateScript( { Test-Path $_ })]
        [string]$Path
    )
     
    Begin {
        Write-Verbose "Starting $($MyInvocation.Mycommand)"  
        Write-Verbose "Defining AST variables"
        New-Variable astTokens -force
        New-Variable astErr -force
    }
     
    Process {
        Write-Verbose "Parsing $path"
        $AST = [System.Management.Automation.Language.Parser]::ParseFile($Path, [ref]$astTokens, [ref]$astErr)

        #group tokens and turn into a hashtable
        $h = $astTokens | Group-Object tokenflags -AsHashTable -AsString
     
        $commandData = $h.CommandName | where-object { $_.text -notmatch "-TargetResource$" } | 
        ForEach-Object {
            Write-Verbose "Processing $($_.text)" 
            Try {
                $cmd = $_.Text
                $resolved = $cmd | get-command -ErrorAction Stop
                if ($resolved.CommandType -eq 'Alias') {
                    Write-Verbose "Resolving an alias"
                    #manually handle "?" because Get-Command and Get-Alias won't.
                    Write-Verbose "Detected the Where-Object alias '?'"
                    if ($cmd -eq '?') { 
                        Get-Command Where-Object
                    }
                    else {
                        $resolved.ResolvedCommandName | Get-Command
                    }
                }
                else {
                    $resolved
                }
            } 
            Catch {
                Write-Verbose "Command is not recognized"
                #create a custom object for unknown commands
                [PSCustomobject]@{
                    CommandType = "Unknown"
                    Name        = $cmd
                    ModuleName  = "Unknown"
                }
            }
        } 

        write-output $CommandData
    }

    End {
        Write-Verbose -Message "Ending $($MyInvocation.Mycommand)"
    }
}


This function was originally from Jeff Hicks .  I made a few tweaks, but the majority of this is his code.  As always, Jeff puts out amazing work.

Next, a simple script to call the function on all of the scripts in a certain directory:

if ($IsWindows -or $IsWindows -eq $null){$ModulesDir = (Get-ItemProperty HKLM:\SOFTWARE\PWSH).PowerShell_Modules}
else{get-content '/var/opt/tifa/settings.json'}
$log = $PSScriptRoot + '\'+ ($MyInvocation.MyCommand.Name).split('.')[0] + '.log'
$ModulesToImport = 'logging', 'SQL', 'PoshKeePass', 'PoshRSJob', 'SCOM', "OMI", 'DynamicMonitoring', 'Nix','Utils'
foreach ($module in $ModulesToImport) {Get-ChildItem $ModulesDir\$module\*.psd1 -Recurse | resolve-path | ForEach-Object { import-module $_.providerpath -force }}

$files = (Get-ChildItem 'D:\pwsh\' -Include *.ps1 -Recurse | where-object { $_.FullName -notmatch "\\modules*" }).fullname

[System.Collections.ArrayList]$AllData = @()
foreach ($file in $files) {
    [array]$data = Test-ScriptFile -Path $file
    foreach ($dataline in $data) {
        $path = $Dataline.module.path
        $version = $dataline.Module.version
        $dataobj = [PSCustomObject]@{
            File          = $File;
            Type          = $dataline.CommandType;
            Name          = $dataline.Name;
            ModuleName    = $dataline.ModuleName;
            ModulePath    = $path;
            ModuleVersion = $version;
        }
        $AllData.add($dataobj)|out-null
    }
}
$AllData|select-object -Property file, type, name, modulename,modulepath,moduleversion -Unique|out-gridview

There are a few gotchas you want to keep an eye out for – in order to correctly identify the cmdlets, you will need to load the module that contains said cmdlet.  You can see where I am loading several modules  – SCOM, SQL, logging, etc.  The modules in my script are loaded from modules stored in a reg key – HKLM:\Software\PWSH.  Load your modules in any way that works for you.  Also note that the last line sends the output to a gridview – change that output to something more useful unless you just previewing it.

And there you have it!  Thanks to Jeff for the core function, and I hope this helps keep your modules organized!

SQL Process Automation with PowerShell

Here is a handy way to handle SQL processes that you find yourself needing to schedule. Of course you can always setup that kind scheduling via the SQL Server Agent, but there are two good reasons to do this kind of scheduling via PowerShell.

1: You don’t have rights to add jobs to via the SQL Server Agent. Some security teams will restrict non-dba access to either the agent or insist on setting the agent to a manual start.
2: You wish to have easier tracking, easier configuration, and just want to do something cool with PowerShell.

The other option you have when trying to schedule something like SQL processes would be to simply use Task Scheduler. Indeed – in my solution I actually use Task Scheduler as a base engine to run every minute or so. What I don’t like about Task Scheduler is trying to put SQL command lines in it. It’s flat out a pain. So, I built something that was easy to configure – even by someone who is not skilled in PowerShell, easy to implement, and has all of the typical good stuff you want with PowerShell.

The solution utilizes 3 main pieces. First, is a script that we will schedule to run every minute via Task Scheduler. Second, a configuration file in JSON format. I choose JSON since it’s simple to read and easy to write. Lastly, we will have XML file that tracks when the last time something ran. Let’s examine each piece:

The script file is fairly straight forward, and there are only a couple of pieces that need explaining. In simple terms this script file will be used as the engine that calls the various SQL commands we specify in the config.json file. We import a few modules, setup a couple of base variables, and then loop through the SQL commands, updating the runhistory.xml file with the timestamp. Schedule this file to run every minute via task scheduler.

$log = $PSScriptRoot + '\'+ ($MyInvocation.MyCommand.Name).split('.')[0] + '.log'
$ModulesDir = 'D:\pwsh\modules'
$ModulesToImport = 'DDTLogging','SQL'
foreach ($module in $ModulesToImport){Get-ChildItem $ModulesDir\$module\*.psd1 -Recurse | resolve-path | ForEach-Object { import-module $_.providerpath -force }}
$Date = Get-Date
$Commands = (get-content $PSScriptRoot\config.json|convertfrom-json).commands
[xml]$RunHistory = get-content "$PSScriptRoot\runhistory.xml"
foreach ($command in $Commands){
    $commandname = $command.name
    $LastRunTime = ($runhistory.Catalog.dataset|where-object {$_.name -eq $commandname}|select-object -Property time).time
    if ($LastRunTime -lt $Date.AddMinutes(-$command.TimePeriod) -or $LastRunTime -eq $null)
    {
        if ($LastRunTime -eq $null){
            $newdata = $RunHistory.Catalog.AppendChild($RunHistory.CreateElement("dataset"))
            $newdata.SetAttribute("name","$commandname")
            $newdata.SetAttribute("time","$date")
            $RunHistory.Save("$PSScriptRoot\runhistory.xml")
        }
        else {
            $RunHistory.Catalog.dataset|where-object {$_.name -eq $commandname}|foreach {$_.time = [string]$date}
            $RunHistory.Save("$PSScriptRoot\runhistory.xml")
        }
        try{
            invoke-sql -server $command.server -database $command.database -method $command.commandtype -integratedsecurity $true -statement $command.statement
        }
        catch{
            write-log -text "Error in $commandname.  $_" -level ERROR -log $log
        }
    }
}

If you are wondering about the Invoke-SQL command, it’s something that I wrapped up in a quick module. You can get the module here.

Now that we have the base script, let’s look at the config.json file. This is where the meat of the information about your commands come from:

{
    "Commands":
    [
        {
            "name":"SQL_Views_Stored_Proc",
            "timeperiod":15,
            "statement":"exec refreshviews",
            "server":"sqlserver1.constoso.com",
            "database":"customers",
            "commandtype":"execute"
        },
        {
            "name":"Update_Time",
            "timeperiod":15,
            "statement":"update cogsuppliers set time = getdate()",
            "server":"sqlserver2.constoso.com",
            "database":"suppliers",
            "commandtype":"update"
        }       
    ]
}

As you can see – it’s a pretty straight forward. Put in the frequency you would like the statement to run (timeperiod), the statement itself, the server and database to run on, and finally the ‘type’ of command it is. This is just to tell the SQL module whether or not to load the data into a data table. That’s it! Anyone with a basic knowledge of how to write a json file can add or remove from this config file quickly!

The final piece is the runshistory.xml file. This simply lets the main script keep track of the last time each statement was run. You shouldn’t have to ever update this file manually.

<Catalog>
  <dataset name="SQL_Views_Stored_Proc" time="11/15/2018 10:49:12" />
  <dataset name="Update_Time" time="11/15/2018 10:49:12" />
</Catalog>

For full transparency, there are a few things I just need to swing back around and address. First – the commands runs sequentially. Long running SQL statements might cause others to fail or fall behind. The plan for that is to use something like PoshRSJob to run the jobs in parallel, and each in it’s own runspace. Secondly, there is a small chance that if someone was to manually edit the runhistory.xml file and remove one of the lines the script could error. I will update the script with a catch to make sure this doesn’t happen.

PowerShell Logging – What about file locking?

Today I was working on one of my large-scale enterprise automation scripts, when a common annoyance reared it’s ugly head. When dealing with multi-threaded applications, in this case Runspaces, it’s common to have one runspace trying to access a resource another runspace is currently using. For example – writing some output data to a log file. If two or more runspaces attempt to access the same log at the same time you will receive an error message. This isn’t a complete stoppage when dealing with log files, but if a critical resource is locked then your script could certainly fail.

So what is the easiest way to get around this? Enter the humble Mutex. There are several other posts that deal with Mutex locking, so I won’t go over the basics. Here I want to share some simple code that makes use of the mutex for writing to a log file.

The code below is a sample write-log function that takes 4 parameters. 3 of them are mandatory – Text for the log entry, name of the log to write to, and the ‘level’ of the entry. Level is really only used to help color coding and reading of the log in something like CMTrace. The last of the four parameters is ‘UseMutex’. This is what is going to tell our function whether or not to lock the resource being accessed.

<#
    .SYNOPSIS
        Simple function to write to a log file
    
    .DESCRIPTION
        This function will write to a log file, pre-pending the date/time, level of detail, and supplied information
    
    .PARAMETER text
        This is the main text to log
    
    .PARAMETER Level
        INFO,WARN,ERROR,DEBUG
    
    .PARAMETER Log
        Name of the log file to send the data to.
    
    .PARAMETER UseMutex
        A description of the UseMutex parameter.
    
    .EXAMPLE
        write-log -text "This is the main problem." -level ERROR -log c:\test.log
    
    .NOTES
        Created by Donnie Taylor.
        Version 1.0     Date 4/5/2016
#>
function Write-Log
{
    param
    (
        [Parameter(Mandatory = $true,
                   Position = 0)]
        [ValidateNotNull()]
        [string]$text,
        [Parameter(Mandatory = $true,
                   Position = 1)]
        [ValidateSet('INFO', 'WARN', 'ERROR', 'DEBUG')]
        [string]$level,
        [Parameter(Mandatory = $true,
                   Position = 2)]
        [string]$log,
        [Parameter(Position = 3)]
        [boolean]$UseMutex
    )
    
    Write-Verbose "Log:  $log"
    $date = (get-date).ToString()
    if (Test-Path $log)
    {
        if ((Get-Item $log).length -gt 5mb)
        {
            $filenamedate = get-date -Format 'MM-dd-yy hh.mm.ss'
            $archivelog = ($log + '.' + $filenamedate + '.archive').Replace('/', '-')
            copy-item $log -Destination $archivelog
            Remove-Item $log -force
            Write-Verbose "Rolled the log."
        }
    }
    $line = $date + '---' + $level + '---' + $text
    if ($UseMutex)
    {
        $LogMutex = New-Object System.Threading.Mutex($false, "LogMutex")
        $LogMutex.WaitOne()|out-null
        $line | out-file -FilePath $log -Append
        $LogMutex.ReleaseMutex()|out-null
    }
    else
    {
        $line | out-file -FilePath $log -Append
    }
}

To write to the log, you use the function like such:

write-log -log c:\temp\output.txt -level INFO -text "This is a log entry" -UseMutex $true

Let’s test this. First, let’s make a script that will fail due to the file being in use. For this example, I am going to use PoshRSJob, which is a personal favorite of mine. I have saved the above function as a module to make sure I can access it from inside the Runspace. Run this script:

import-module C:\blog\PoshRSJob\PoshRSJob.psd1
$I = 1..3000
$I|start-rsjob -Throttle 250 -ScriptBlock{
    param($param)
    import-module C:\blog\write-log.psm1
    Write-Log -log c:\temp\mutex.txt  -level INFO -text $param
}|out-null 

Assuming you saved your files in the same locations as mine, and this runs, then you should see something like this when you do a get-rsjob|receive-rsjob:

So what exactly happened here? Well, we told 3000 Runspaces to write their number ($param) to the log file….250 at a time (throttle). That’s obviously going to cause some contention. In fact, if we examine the output file (c:\temp\mutex.txt), and count the actual lines written to it, we will have missed a TON of log entries. On my PC, out of the 3000 that should write, we ended up with only 2813 entries. That is totally unacceptable to miss that many log entries. I’ve exaggerated the issue you will normally see using these large numbers, but this happens all the time when using smaller sets as well. To fix this, we are going to run the same bit of code, but we are going to use the ‘UseMutex’ option in write-log function. This tells each runspace to grab the mutex and attempt to write to the log. If it can’t grab the mutex, it will wait until it can (in this case forever – $LogMutex.WaitOne()|out-null). Run this code:

import-module C:\blog\PoshRSJob\PoshRSJob.psd1
$I = 1..3000
$I|start-rsjob -Throttle 250 -ScriptBlock{
    param($param)
    import-module C:\blog\write-log.psm1
    Write-Log -log c:\temp\mutex.txt  -level INFO -text $param -UseMutex $true
}|out-null 

See the ‘-UseMutex’ switch? That should fix our problem. A get-rsjob|receive-rsjob now returns this:

Success! If we examine our output file, we find that all 3000 lines have been written. Using our new write-log function that uses a Mutex, we have solved our locking problem. Coming soon, I will publish the actual code on Github – stay tuned!

PowerShell – Get is optional

Here is something I learned a while back from Mr. Snover himself, and it was something I just couldn’t believe. Sure enough it’s true, and it’s still true in PowerShell Core 6. The “Get-” part of almost all “Get-” commands is completely optional. Yeah – you heard that right. “Get” is optional for almost all. Get-Process can’t run correctly, mainly because “Process” expects some arguments. Otherwise, give it a try!

PS  C:\Blog (9:24:23 PM) > timezone


Id                         : Central Standard Time
DisplayName                : (UTC-06:00) Central Time (US & Canada)
StandardName               : Central Standard Time
DaylightName               : Central Daylight Time
BaseUtcOffset              : -06:00:00
SupportsDaylightSavingTime : True
PS  C:\Blog (9:24:27 PM) > random
1240576702
PS  C:\Blog (9:25:18 PM) > computerinfo


WindowsBuildLabEx                                       : 16299.15.amd64fre.rs3_release.170928-1534
WindowsCurrentVersion                                   : 6.3
WindowsEditionId                                        : EnterpriseN
WindowsInstallationType                                 : Client
WindowsInstallDateFromRegistry                          : 12/7/2017 10:29:37 AM
WindowsProductId                                        : 00330-00180-00000-AA567
WindowsProductName                                      : Windows 10 Enterprise N
WindowsRegisteredOrganization                           :
WindowsRegisteredOwner                                  : Draith
WindowsSystemRoot                                       : C:\WINDOWS
WindowsVersion                                          : 1709
WindowsUBR                                              : 192
BiosCharacteristics                                     : {7, 11, 12, 15...}
BiosBIOSVersion                                         : {ALASKA - 1072009, V1.12, American Megatrends - 4028F}
BiosBuildNumber                                         :
BiosCaption                                             : V1.12
BiosCodeSet                                             :
BiosCurrentLanguage                                     : en|US|iso8859-1
BiosDescription                                         : V1.12
BiosEmbeddedControllerMajorVersion                      : 255
BiosEmbeddedControllerMinorVersion                      : 255
BiosFirmwareType                                        : Uefi
BiosIdentificationCode                                  :
BiosInstallableLanguages                                : 1
BiosInstallDate                                         :
BiosLanguageEdition                                     :
BiosListOfLanguages                                     : {en|US|iso8859-1}
BiosManufacturer                                        : American Megatrends Inc.
BiosName                                                : V1.12
BiosOtherTargetOS                                       :
BiosPrimaryBIOS                                         : True
BiosReleaseDate                                         : 8/10/2015 7:00:00 PM
BiosSerialNumber                                        : To be filled by O.E.M.
BiosSMBIOSBIOSVersion                                   : V1.12
BiosSMBIOSMajorVersion                                  : 2
BiosSMBIOSMinorVersion                                  : 8
BiosSMBIOSPresent                                       : True
BiosSoftwareElementState                                : Running
BiosStatus                                              : OK
BiosSystemBiosMajorVersion                              : 4
BiosSystemBiosMinorVersion                              : 6
BiosTargetOperatingSystem                               : 0
BiosVersion                                             : ALASKA - 1072009
CsAdminPasswordStatus                                   : Disabled
CsAutomaticManagedPagefile                              : True
CsAutomaticResetBootOption                              : True
CsAutomaticResetCapability                              : True
CsBootOptionOnLimit                                     :
CsBootOptionOnWatchDog                                  :
CsBootROMSupported                                      : True
CsBootStatus                                            : {0, 0, 0, 0...}
CsBootupState                                           : Normal boot
CsCaption                                               : DESKTOP-KL1CDTP
CsChassisBootupState                                    : Safe
CsChassisSKUNumber                                      : To be filled by O.E.M.
CsCurrentTimeZone                                       : -360
CsDaylightInEffect                                      : False
CsDescription                                           : AT/AT COMPATIBLE
CsDNSHostName                                           : <>
CsDomain                                                : WORKGROUP
CsDomainRole                                            : StandaloneWorkstation
CsEnableDaylightSavingsTime                             : True
CsFrontPanelResetStatus                                 : Disabled
CsHypervisorPresent                                     : True
CsInfraredSupported                                     : False
CsInitialLoadInfo                                       :
CsInstallDate                                           :
CsKeyboardPasswordStatus                                : Disabled
CsLastLoadInfo                                          :
CsManufacturer                                          : MSI
CsModel                                                 : MS-7917
CsName                                                  : <>
CsNetworkAdapters                                       : {Ethernet 2, Ethernet, vEthernet (Default Switch), vEthernet
                                                          (ExternalSwitch)...}
CsNetworkServerModeEnabled                              : True
CsNumberOfLogicalProcessors                             : 8
CsNumberOfProcessors                                    : 1
CsProcessors                                            : {Intel(R) Core(TM) i7-4790K CPU @ 4.00GHz}
CsOEMStringArray                                        : {To Be Filled By O.E.M.}
CsPartOfDomain                                          : False
CsPauseAfterReset                                       : -1
CsPCSystemType                                          : Desktop
CsPCSystemTypeEx                                        : Desktop
CsPowerManagementCapabilities                           :
CsPowerManagementSupported                              :
CsPowerOnPasswordStatus                                 : Disabled
CsPowerState                                            : Unknown
CsPowerSupplyState                                      : Safe
CsPrimaryOwnerContact                                   :
CsPrimaryOwnerName                                      : Draith
CsResetCapability                                       : Other
CsResetCount                                            : -1
CsResetLimit                                            : -1
CsRoles                                                 : {LM_Workstation, LM_Server, NT}
CsStatus                                                : OK
CsSupportContactDescription                             :
CsSystemFamily                                          : To be filled by O.E.M.
CsSystemSKUNumber                                       : To be filled by O.E.M.
CsSystemType                                            : x64-based PC
CsThermalState                                          : Safe
CsTotalPhysicalMemory                                   : 34305863680
CsPhysicallyInstalledMemory                             : 33554432
CsUserName                                              : <>\Draith
CsWakeUpType                                            : PowerSwitch
CsWorkgroup                                             : WORKGROUP
OsName                                                  : Microsoft Windows 10 Enterprise N
OsType                                                  : WINNT
OsOperatingSystemSKU                                    : WindowsEnterprise
OsVersion                                               : 10.0.16299
OsCSDVersion                                            :
OsBuildNumber                                           : 16299
OsHotFixes                                              : {KB4048951, KB4053577, KB4054022, KB4055237...}
OsBootDevice                                            : \Device\HarddiskVolume2
OsSystemDevice                                          : \Device\HarddiskVolume4
OsSystemDirectory                                       : C:\WINDOWS\system32
OsSystemDrive                                           : C:
OsWindowsDirectory                                      : C:\WINDOWS
OsCountryCode                                           : 1
OsCurrentTimeZone                                       : -360
OsLocaleID                                              : 0409
OsLocale                                                : en-US
OsLocalDateTime                                         : 1/24/2018 9:25:52 PM
OsLastBootUpTime                                        : 1/20/2018 4:14:27 PM
OsUptime                                                : 4.05:11:25.3101843
OsBuildType                                             : Multiprocessor Free
OsCodeSet                                               : 1252
OsDataExecutionPreventionAvailable                      : True
OsDataExecutionPrevention32BitApplications              : True
OsDataExecutionPreventionDrivers                        : True
OsDataExecutionPreventionSupportPolicy                  : OptIn
OsDebug                                                 : False
OsDistributed                                           : False
OsEncryptionLevel                                       : 256
OsForegroundApplicationBoost                            : Maximum
OsTotalVisibleMemorySize                                : 33501820
OsFreePhysicalMemory                                    : 22288576
OsTotalVirtualMemorySize                                : 38482556
OsFreeVirtualMemory                                     : 25010532
OsInUseVirtualMemory                                    : 13472024
OsTotalSwapSpaceSize                                    :
OsSizeStoredInPagingFiles                               : 4980736
OsFreeSpaceInPagingFiles                                : 4980736
OsPagingFiles                                           : {C:\pagefile.sys}
OsHardwareAbstractionLayer                              : 10.0.16299.192
OsInstallDate                                           : 12/7/2017 4:29:37 AM
OsManufacturer                                          : Microsoft Corporation
OsMaxNumberOfProcesses                                  : 4294967295
OsMaxProcessMemorySize                                  : 137438953344
OsMuiLanguages                                          : {en-US}
OsNumberOfLicensedUsers                                 :
OsNumberOfProcesses                                     : 194
OsNumberOfUsers                                         : 2
OsOrganization                                          :
OsArchitecture                                          : 64-bit
OsLanguage                                              : en-US
OsProductSuites                                         : {TerminalServicesSingleSession}
OsOtherTypeDescription                                  :
OsPAEEnabled                                            :
OsPortableOperatingSystem                               : False
OsPrimary                                               : True
OsProductType                                           : WorkStation
OsRegisteredUser                                        : Draith
OsSerialNumber                                          : 00330-00180-00000-AA567
OsServicePackMajorVersion                               : 0
OsServicePackMinorVersion                               : 0
OsStatus                                                : OK
OsSuites                                                : {TerminalServices, TerminalServicesSingleSession}
OsServerLevel                                           :
KeyboardLayout                                          : en-US
TimeZone                                                : (UTC-06:00) Central Time (US & Canada)
LogonServer                                             : \\<>
PowerPlatformRole                                       : Desktop
HyperVisorPresent                                       : True
HyperVRequirementDataExecutionPreventionAvailable       :
HyperVRequirementSecondLevelAddressTranslation          :
HyperVRequirementVirtualizationFirmwareEnabled          :
HyperVRequirementVMMonitorModeExtensions                :
DeviceGuardSmartStatus                                  : Running
DeviceGuardRequiredSecurityProperties                   : {0}
DeviceGuardAvailableSecurityProperties                  : {BaseVirtualizationSupport, DMAProtection}
DeviceGuardSecurityServicesConfigured                   : {0}
DeviceGuardSecurityServicesRunning                      : {0}
DeviceGuardCodeIntegrityPolicyEnforcementStatus         : Off
DeviceGuardUserModeCodeIntegrityPolicyEnforcementStatus : Off