Hola! Today let’s look at a simple way to get PowerShell scripts to run from a Logic App. It will involve a single extra tool, but this really adds versatility to an already versatile tool.
Start by creating a PowerShell script for your specific task. This script will be uploaded to an Azure Automation Runbook. For instance, if you aim to manage VMs, ensure the script includes Azure RM or Az module commands to start, stop, or monitor VM states. Here is an example:
# Sample PowerShell Script to Start a Specific Azure VM
Param(
    [string]$vmName,
    [string]$resourceGroupName
)

Connect-AzAccount -Identity
Start-AzVM -Name $vmName -ResourceGroupName $resourceGroupName
Obviously this is a short script that we can do with just Logic Apps (and not involve pwsh at all), but you get the point.
Now – Upload and publish your PowerShell script in an Azure Automation Runbook.
In your Azure Automation Account, create a new Runbook.
Choose “PowerShell” as the Runbook type.
Import your script and publish the Runbook.
Go ahead test the runbook if you want.
Next – create a Logic App to trigger the Runbook. You might use a schedule, an HTTP request, or another event in Azure as a trigger.
In the Logic App Designer, add a new step and search for the “Azure Automation” connector.
Select “Create job” action.
Fill in the necessary details: Automation Account, Runbook Name, and parameters (if your script requires them). In our example we might dynamically pass the VM name, or maybe look for only VMs that are off and loop through them.
For more complex scenarios, you might need to integrate with other Azure services before or after executing your PowerShell script:
Azure Functions: For custom logic that cannot be implemented directly in PowerShell or needs a specific runtime environment.
Azure Event Grid: To trigger your Logic App based on events from various Azure services.
Azure Monitor: To analyze logs and metrics from your Logic App and Automation Runbooks, enabling proactive management and optimization of your automated tasks.
Let’s cut to the chase: Integrating Azure Logic Apps with Azure OpenAI unlocks a plethora of possibilities, from automating content creation to enhancing data analysis. Below is a step-by-step guide to melding these powerful tools.
Step 1: Set Up Azure OpenAI
First, you need an Azure OpenAI service instance. Go to the Azure Portal, search for Azure OpenAI Service, and create a new instance. Once deployed, grab your API key and endpoint URL from the resource management section.
Step 2: Create Your Logic App
Navigate back to the Azure Portal and create a new Logic App:
Choose your subscription and resource group.
Pick a region close to you for lower latency.
Name your Logic App.
Click “Review + create” and then “Create” after validation passes.
Step 3: Design Your Logic App Workflow
Once your Logic App is ready, it’s time to design the workflow:
Open your Logic App in the Azure Portal and go to the Logic App Designer.
Start with a common trigger like “When an HTTP request is received” if you want your Logic App to act based on external requests.
Add a new step by searching for “HTTP” in the actions list and choose the “HTTP – HTTP” action. This will be used to call the Azure OpenAI API.
Step 4: Configure the HTTP Action for Azure OpenAI
Method: POST
URI: Enter the endpoint URL of your Azure OpenAI service.
Headers: Add two headers:
Content-Type with the value application/json
Authorization with the value Bearer <Your Azure OpenAI API Key>
Body: Craft the JSON payload according to your task. For example, to generate text, your body might look like this:
{
  "prompt": "Write a brief about integrating Azure OpenAI with Logic Apps.",
  "temperature": 0.7,
  "max_tokens": 100
}
Step 5: Process the Response
After calling the Azure OpenAI API, you’ll want to handle the response:
Add a “Parse JSON” action to interpret the API response.
In the “Content” box, select the body of the HTTP action.
Define the schema based on the Azure OpenAI response format. For text generation, you’ll focus on extracting the generated text from the response.
Step 6: Add Final Actions
Decide what to do with the Azure OpenAI’s response. You could:
Send an email with the generated content.
Save the response to a database or a file in Azure Blob Storage.
Respond to the initial HTTP request with the generated content.
Step 7: Test Your Logic App
Save your Logic App and run a test by triggering it based on your chosen trigger method.
Monitor the run in the “Overview” section of your Logic App to ensure everything executes as expected.
Before integrating AI into your Azure automation processes, it’s crucial to assess your current Azure environment. This assessment will help identify the strengths, limitations, and potential areas for improvement.
Evaluate Existing Resources and Capabilities
Take an inventory of your current Azure resources. This includes virtual machines, databases, storage accounts, and any other services in use.
Assess the performance and scalability of these resources. Are they meeting your current needs? How might they handle increased loads with AI integration?
Use Azure’s built-in tools like Azure Advisor for recommendations on optimizing resource utilization.
Review Current Automation Configurations
Examine your existing automation scripts and workflows. How are they configured and managed? Are there opportunities for optimization or enhancement?
Consider the use of Azure Automation to streamline these processes.
Identify Data Sources and Workflows
Identify the data sources that your automation processes use. How is this data stored, accessed, and managed?
Map out the workflows that are currently automated. Understanding these workflows is crucial for integrating AI effectively.
Check Compliance and Security Measures
Ensure that your setup complies with relevant data protection regulations and security standards. This is particularly important when handling sensitive data with AI.
Pinpoint where in your current setup AI can be integrated for maximum benefit. Look for processes that are repetitive, data-intensive, or could significantly benefit from predictive insights.
After assessing your Azure environment, the next step is to set up and configure the essential services that form the backbone of AI-driven automation. Here’s how you can approach the setup of these key services:
Navigate to Machine Learning: Find “Machine Learning” under “AI + Machine Learning” in the ‘All services’ section.
Create a New Workspace: Click “Create” and choose your Azure subscription and resource group.
Configure Workspace: Provide a unique name, select a region, and optionally choose or allow Azure to create a storage account, key vault, and application insights resource.
Review and Create: Verify all details are correct, then click “Review + create” followed by “Create” to finalize.
Access the Workspace: After creation, visit your resource group, select the new workspace, and note the key details like subscription ID and resource group.
Explore Azure Machine Learning Studio: Use the provided URL to access the studio at https://ml.azure.com and familiarize yourself with its features.
Set Up Additional Resources: If not auto-created, manually set up a storage account, key vault, and application insights resource in the same region as your workspace.
Azure Cognitive Services
Navigate to Cognitive Services: Search for “Cognitive Services” in the portal’s search bar.
Create a Resource: Click “Create” to start setting up a new Cognitive Services resource.
Fill in Details: Choose your subscription, create or select an existing resource group, and name your resource.
Select the Region: Choose a region near you or your users for better performance.
Review Pricing Tiers: Select an appropriate pricing tier based on your expected usage.
Review and Create: Confirm all details are correct, then click “Review + create”, followed by “Create”.
Access Resource Keys: Once deployed, go to the resource, and find the “Keys and Endpoint” section to get your API keys and endpoint URL.
Integrate with Applications: Use the retrieved keys and endpoint to integrate cognitive services into your applications.
Azure Logic Apps
Search for Logic Apps: In the portal, find “Logic Apps” via the search bar.
Initiate Logic App Creation: Click “Add” or “Create” to start a new Logic App.
Configure Basic Settings: Select your subscription, resource group, and enter a name for your Logic App. Choose a region.
Create the Logic App: After configuring, click “Create” to deploy your Logic App.
Open Logic App Designer: Once deployed, open the Logic App and navigate to the designer.
Design the Workflow: We will go over this later! This is where the fun begins!!
Setting up these essential Azure services is a foundational step in creating an environment ready for AI-driven automation. Each service plays a specific role, and together, they provide a powerful toolkit for automating complex and intelligent workflows.
Leveraging Azure Machine Learning
Create a Machine Learning Model:
Navigate to Azure Machine Learning Studio.
Create a new experiment and select a dataset or import your own.
Choose an algorithm and train your machine learning model.
Deploy the Model:
Once your model is trained and evaluated, navigate to the “Models” section.
Select your model and click “Deploy”. Choose a deployment option (e.g., Azure Container Instance).
Configure deployment settings like name, description, and compute type.
Consume the Model:
After deployment, get the REST endpoint and primary key from the deployment details.
Use these details to integrate the model into your applications or services.
Utilizing Azure Cognitive Services
Select a Cognitive Service:
Determine which Cognitive Service (e.g., Text Analytics, Computer Vision) fits your needs.
In Azure Portal, navigate to “Cognitive Services” and create a resource for the selected service.
Configure and Retrieve Keys:
Once the resource is created, go to the “Keys and Endpoint” section.
Copy the key and endpoint URL for use in your application.
Integrate with Your Application:
Use the provided SDK or REST API to integrate the Cognitive Service into your application.
Pass the key and endpoint URL in your code to authenticate the service.
Automating with Azure Logic Apps
Create a New Logic App:
In Azure Portal, go to “Logic Apps” and create a new app.
Select your subscription, resource group, and choose a name and region for the app.
Design the Workflow:
Open the Logic App Designer.
Add a trigger (e.g., HTTP request, schedule) to start the workflow.
Add new steps by searching for connectors (e.g., Azure Functions, Machine Learning).
Integrate AI Services:
Add steps that call Azure Machine Learning models or Cognitive Services.
Configure these steps by providing necessary details like API keys, endpoints, and parameters.
Save and Test the Logic App:
Save your changes and use the “Run” button to test the Logic App.
Check the run history to verify if the workflow executed as expected.
Welcome to my new blog series on “AI-Enhanced Event Automation in Azure,” where I will delve into the integration of AI with Azure’s amazing automation capabilities. This series will be more than just a conceptual overview; it will be a practical guide to applying AI in Azure.
Through this series I will explore the role of AI in enhancing Azure’s event monitoring and automation processes. This journey will be tailored for those with a foundational understanding of Azure, aiming to leverage AI to unlock unprecedented potential in cloud computing.
We will begin with the basics of setting up your Azure environment for AI integration, where we’ll reference Azure’s comprehensive Learn documentation.
Moreover, I’ll explore advanced AI techniques and their applications in real-world scenarios, utilizing resources from the Azure AI Gallery to illustrate these concepts.
Let’s dig in!
Key Concepts and Terminologies
To ensure we’re all on the same page let’s clarify some key concepts and terminologies that will frequently appear throughout this series.
Artificial Intelligence (AI): AI involves creating computer systems that can perform tasks typically requiring human intelligence. This includes learning, decision-making, and problem-solving. Azure provides various AI tools and services, which we will explore. Learn more about AI in Azure.
Azure Automation: This refers to the process of automating the creation, deployment, and management of Azure resources. Azure Automation can streamline complex tasks and improve operational efficiencies. Azure Automation documentation offers a comprehensive guide.
Azure Logic Apps: These are part of Azure’s app service, providing a way to automate and orchestrate tasks, business processes, and workflows when you need to integrate apps, data, systems, and services across enterprises or organizations. Explore Azure Logic Apps.
Machine Learning: A subset of AI, machine learning involves training a computer system to learn from data, identify patterns, and make decisions with minimal human intervention. Azure’s machine learning services are pivotal in AI-enhanced automation. Azure Machine Learning documentation provides detailed information.
Event-Driven Architecture: This is a design pattern used in software architecture where the flow of the program is determined by events. In Azure, this concept is crucial for automating responses to specific events within your infrastructure. Understanding Event-Driven Architecture in Azure can give you more insights.
Understanding these terms will be key to concepts we will discuss in this series. They form the building blocks of our exploration into AI-enhanced automation in Azure.
The Role of AI in Azure Automation
AI is not just an add-on but a transformative resource. AI in Azure Automation opens up new avenues for efficiency, intelligence, and sophistication in automated processes.
Enhancing Efficiency and Accuracy: AI algorithms are adept at handling large volumes of data and complex decision-making processes much faster than traditional methods. In Azure, AI can be used to analyze operational data, predict trends, and automate responses with high precision. This leads to a significant increase in the efficiency and accuracy of automated tasks. AI and Efficiency in Azure provides further insights.
Predictive Analytics: One of the most significant roles of AI in Azure Automation is predictive analytics. By analyzing historical data, AI models can predict future trends and behaviors, enabling Azure services to proactively manage resources, anticipate system failures, and automatically adjust to changing demands. The Predictive Analytics in Azure guide is a valuable resource for understanding this aspect.
Intelligent Decision Making: AI enhances Azure automation by enabling systems to make smart decisions based on real-time data and learned patterns. This capability is particularly useful in scenarios where immediate and accurate decision-making is critical, such as in load balancing or threat detection. Azure’s Decision-Making Capabilities further explores this topic.
Automating Complex Workflows: With AI, Azure can automate more complex, multi-step workflows that would be too intricate or time-consuming to handle manually. This includes tasks like data extraction, transformation, loading (ETL), and sophisticated orchestration across various services and applications. Complex Workflow Automation in Azure provides a deeper dive into this functionality.
Continuous Learning and Adaptation: A unique aspect of AI in automation is its ability to continuously learn and adapt. Azure’s AI-enhanced automation systems can evolve based on new data, leading to constant improvement in performance and efficiency over time.
By integrating AI into Azure Automation, we unlock a realm where automation is not just about executing predefined tasks but about creating systems that can learn, adapt, and make intelligent decisions. This marks a significant leap from traditional automation, propelling businesses towards more dynamic and responsive operational models.
Examples of AI Enhancements in Automation
Understanding the practical impact of AI in Azure automation is easier with real-world examples.
Automated Scaling Based on Predictive Analytics: Utilizing AI for predictive analysis, Azure can dynamically adjust resources for an e-commerce platform based on traffic and shopping trends, optimizing performance and cost. Learn more about Azure Autoscale.
Intelligent Data Processing and Insights: Azure AI can analyze large datasets, like customer feedback or sales data, automating the extraction of valuable insights for quick, data-driven decision-making. Explore Azure Cognitive Services.
Proactive Threat Detection and Response: AI-driven monitoring in Azure can identify and respond to security threats in real-time, enhancing network and data protection. Read about Azure Security Center.
Custom Workflow Automation for Complex Tasks: In complex sectors like healthcare or finance, AI can automate intricate workflows, analyzing data for risk assessments or health predictions, improving accuracy and efficiency. Discover Azure Logic Apps.
Adaptive Resource Management for IoT Devices: For IoT environments, Azure’s AI automation can intelligently manage devices, predict maintenance needs, and optimize resource allocation. See Azure IoT Hub capabilities.
These examples highlight AI’s ability to revolutionize Azure automation across various applications, demonstrating efficiency, insight, and enhanced security.
Challenges and Considerations
While integrating AI into Azure automation offers numerous benefits, it also comes with its own set of challenges and considerations.
Complexity of AI Models: AI models can be complex and require a deep understanding of machine learning algorithms and data science principles. Ensuring that these models are accurately trained and tuned is crucial for their effectiveness. Understanding AI Model Complexity provides more insights.
Data Privacy and Security: When dealing with AI, especially in automation, you often handle sensitive data. Ensuring data privacy and complying with regulations like GDPR is paramount. Azure’s Data Privacy Guide offers guidelines on this aspect.
Integration and Compatibility Issues: Integrating AI into existing automation processes might involve compatibility challenges with current systems and workflows. Careful planning and testing are essential to ensure seamless integration. Azure Integration Services can help understand these complexities.
Scalability and Resource Management: As your AI-driven automation scales, managing resources efficiently becomes critical. Balancing performance and cost, especially in cloud environments, requires continuous monitoring and adjustment. Azure Scalability Best Practices provides valuable insights.
Keeping up with Technological Advancements: The field of AI is rapidly evolving. Staying updated with the latest advancements and understanding how they can be applied to Azure automation is crucial for maintaining an edge. Azure Updates is a useful resource for keeping up with new developments.
By understanding and addressing these challenges, you can more effectively harness the power of AI in Azure automation, leading to more robust and efficient solutions.
That’s all for now! In the next post we will dig into Azure and actually start to get our hands dirty!
There are a ton of articles that detail how to get all sorts of data into Log Analytics. My friend Cameron Fuller has demonstrated several ways to do it, for example. Heck, I even wrote a post or two.
Recently it occurred to me that I hadn’t read a lot of articles on WHY you want your data in Log Analytics. For people that already have data being ingested it’s obvious, but if you haven’t started down that road yet you might be wondering what all the hype is about. This article is for you.
I will tell you right now – Log Analytics is the ‘gateway drug’ of Azure. One hit, and you are hooked. Once you get your data into Log Analytics the possible uses skyrocket. Let’s break down some of the obvious ones first.
Analysis
This one is the get’s the “Duh” award. Get the data into Log Analytics immediately let’s you use the Azure Data Explorer Query Language (aka at one time as Kusto).
The language is easy to understand, easy to write, and there are tons of examples for doing everything from simple queries to complex monsters with charts, predictions, and cross resource log searches. This is the first, and the most obvious benefit of data ingestion. Not to diminish the capability offered by stopping here, but if this is the extent of the usage of your data then you are missing out.
Solutions
Built right into Log Analytics is set of amazing pre-built solutions that can automatically take your logs and turn it into consumable and actionable data points. Need to know how your Operations Manager environment is doing? Connect SCOM to Log Analytics and you are just a few clicks away from seeing performance improvement suggestions, availability recommendations, and even spot upgrade issues before they occur. The SQL Assessment supplies even more actionable data across your entire connected SQL environment. Most of the solutions come with exquisitely details recommendations. Check out this example from my personal SQL Assessment.
There are many different solutions, and they are being added all the time. Container analysis, upgrade assessment, change tracking, malware checking, AD replication status – the list of solutions is amazing! Even better, the product team that builds these solutions wants to know what you want to see! Go here to see the full list of solutions currently available, and check out the link at the bottom of the page to leave your suggestions.
The not so obvious, and the most fun!
Ok – we’ve knocked out the most obvious usages, but now let’s look at some of the other fun uses!
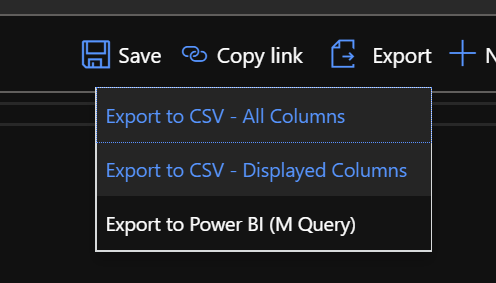
Log Analytics queries can be directly exported and imported into PowerBI! Simply craft your query, click export (see below) and LA will automatically craft the connection information and query for in a way that PowerBI can understand! All of that data suddenly available to the power of one best BI engines in the business.
Ok – I can hear you all now. PowerBI is just another reporting type application (it’s not, btw), but what else can we do? How about integration to one of the most powerful set of automation tool-sets in the market? Connectors are available directly in both Flow and Logic Apps that allow you to query your data and trigger from the returned data. This is where your data integration truly starts!
Imagine some of the possibilities for both your on-prem and cloud resources:
Get texts about critical updates as they are found
Schedule update installations with a full approval chain
Send notifications about changes that occur in your environment, sending the notifications to the appropriate teams based on the change type
Azure Monitor alerts sent straight to Event Grids or Event Hubs for further processing
Connect your SCOM alerts through LA and right into Azure automation to perform runbooks in the cloud or on-prem
Consume logs from your building entry system and schedule software distributions when people leave the office
Whether you are well into your automation journey or just starting out, it’s important to know what options are available. Moving a manual workload to the wrong automation engine can be just as disruptive as automating a bad workload. Luckily Microsoft has a plethora of tools, so you can be sure to pick the right tool for the right job.
Azure Automation – Process Automation
It’s tough to start an article about automation tools in Azure without starting with Azure Automation – so I won’t try. Azure Automation is going to be the first place you look if you are migrating things like:
PowerShell scripts
Python scripts
System Center Orchestrator runbooks
Simple commands called repeatedly (restarting services, for example)
Azure Automation uses RunBooks and Jobs, which will immediately be familiar to Orchestrator admins. Azure Automation supports PowerShell, and Python 2 scripts, along with PowerShell workflows. The automation jobs can be run either on-prem via Hybrid Workers, or in the cloud. A little known secret about Azure Automation – it runs a lot of the backend process that power Azure!
There is another piece to Azure Automation worth calling out – it’s CHEAP. Azure gives you 500 run-time minutes for free each month, with each additional minute costing only $0.002. Watcher tasks are even cheaper – I will go over those in another blog post.
Azure Functions
The server-less powerhouse of the automation options in Azure – Functions are designed for scale, speed, and complete extensibility. Deploy code or docker containers for your function and then build your functions with .Net Core, Node.js, Python, Java, and even PowerShell Core.
With the language options available, moving on-prem workloads should be a breeze. Access your functions from anywhere via API or schedule them to run automatically. Customize your compute stack, secure the functions with multiple keys, and monitor your runs with Log Analytics and App Insights.
You can build your functions in VSCode, any other code editor you choose, or edit and test your function right in the Azure portal. Each Function App can have multiple functions, and scaling can occur manually or automatically. There are so many options available for Azure Functions, it deserves it’s own blog series.
As with Azure Process Automation, Functions are priced really competitively. Check out the pricing list here.
Azure Logic Apps
Anyone coming from a tool like System Center Orchestrator, or other automation tools like MicroFocus Operations Orchestration will tell you one thing those tools have that the tools I have previously mentioned dont – a UI that shows logic flow. Microsoft’s answer to that – Logic Apps. Logic Apps are a personal favorite of mine, and I use them extensively
Building a Logic App couldn’t be simpler. You can start with a blank app, or choose from a LARGE selection of templates that are pre-built. Once in the Logic App Editor, it’s practically drag and drop automation creation. Logic Apps are started with ‘Triggers’, which lead to ‘Actions’. The apps can access services via ‘connections’, of which there are hundreds. If you do happen to find a 3rd party service that doesn’t have a built-in connector, build a custom one!
Logic Apps makes it easy to build complex automations by helping you with things like automatically creating loops when arrays are detected. Allowing you to control parallelism, offering you hundreds of ways to call your app, and more. You can add conditions, switches, do-until loops, etc… There isn’t much they can’t do.
Of course you get the enterprise controls you would expect – version controls, IP access restrictions, full metrics and logging, diagnostics, etc. We run a massive Systems Management and Monitoring conference almost entirely with Logic Apps.
If you are considering migrating from Orchestrator (or other 3rd party automation tool), then look no further. This should be one of the first Azure tools you do a proof of concept with.
Power Apps/Power BI/Power Automate
The tools I have talked about so far are focused on you – the enterprise system admin. But PowerApps gives your organization an exciting and probably under-utilized automation opportunity – your Business users! Even the biggest automation organizations don’t have the resources to automate everything their users want, so why not let them handle some of that automation on their own.
Power Apps let you or your users create new desktop or mobile business applications in a matter of minutes or hours. These can be self contained, or reach out to tools like Azure Functions to extend these simple to make apps into something truly enterprise worthy.
Power BI gives world class data visualizations and business intelligence to the average business user. Using Power BI you can allow your users to create their own dashboards or become their own data scientists directly from their desktop.
Power Automate is the tool formerly known as Flow. If you are familiar with Logic Apps, then Power Automate will look almost identical – and for good reason! Flow was originally built from Logic App code. There are a couple of big differences, though:
Power Automate has an amazing mobile app. Start a flow, or even create one from your phone.
Power Automate can no simulate screen clicks – Remember AutoIt?
Configuration and Update Management
I am going to lump these two into one description, mainly because each is slightly meta. Configuration management is like PowerShell DSC for your Azure and on-prem resources. Describe what your environment should look like, and determine if you want auto-remediation or not. Expect more information on this in future blog posts.
Update management is patching for all of your resources – on-prem or in Azure. Group your servers logically and schedule OS and app updates, or trigger update management from Log Analytics, runbooks, or functions.
The great thing about Configuration and Update management? The cost. Update and configuration management is practically free – only pay for the data ingestion used by Log Analytics. Update management is even ‘free’ for on-prem resources, including Linux! Configuration management does have a cost for on-prem resources, but the cost is still low.
Event Grid and Hub
Although not automation in the strictest sense of the term, Event Grids and Hubs are prime examples of triggers for automation. For most use cases, Event Grid is going to be the best trigger – Event Hub and even Service Bus are more for telemetry and high-value data, but Event Grid is designed to handle reactionary data. Filter events as they come into Grid, and create action groups based off filtered events. Action groups can have actions for starting Azure Functions, generic web-hooks, automation rubooks, Logic Apps, and more! Send your events to a endpoint API, and you are set to start your automation flows automatically!
Meta – ARM
What’s the first thing you need to automate if you are moving to Azure? The automation workflows themselves, of course! Whether it’s configuration or full deployments, ARM is your best friend.
I am working on a project for a very popular conference – working on backend automation that controls everything from speaker coordination to session scheduling. The current task at hand involves deploying the entire suite of Logic Apps, Azure Automation accounts, Azure Functions, etc… These would all be deployed to a new Resource Group. When deploying these resources for a new conference a few things change – changing the conference name from ‘Jazz’ to ‘Midway’ for example, or changing the backend data sources.
Normally you would use Azure ARM Template Parameters to pass these values when you deploy the resources, and you would be absolutely right! They are powerful assets to have in your pocket. It does get a bit dodgy, however, when you start to deploy Logic Apps in the ARM template and those Logic Apps have parameters of their own.
Logic Apps have parameters and variables all their own, and they are defined just like parameters and variables in ARM templates. When you want to deploy a Logic App that has parameters you can put them in the ARM Template and reference them in the Logic App, or you can use an ARM template expression in the Logic App. The latter is not a popular idea, and the former doesn’t evaluate the parameters until the execution of the Logic App. That obviously makes it difficult to work on the Logic App after it’s deployed.
That’s when I got the idea of using a popular SCOM tool – SCOM Fragments by Kevin Holman – in order to get the best of both worlds. I wanted a quick way to deploy, and a quick way to edit after deployment. Cake and all that….
The idea is simplistic – Find/Replace what you want to change before you deploy. Sounds simple, and it is! That is essentially how the SCOM Fragments work, and the same idea can be utilized here. Say, for example, you have a simple Conference Name parameter you want to change. The first thing you would do is build your Logic App like normal, keeping in place a static conference name. Export that template. Now, at the top of the template, add a new parameter to the parameters section in the template, like this:
{
    "$schema": "https://schema.management.azure.com/schemas/2015-01-01/deploymentTemplate.json#",
    "contentVersion": "1.0.0.0",
    "parameters": {
        "Conference_Name": {
            "metadata": {
                "defaultValue": "###Awesome_Conference_Name###",
                "description": "Name of the conference - i.e. Management Conference 2019"
            }
        },
Now, find your static conference name down in the code for the Logic App itself, and replace the name with ###Awesome_Conference_Name###. That’s it! That is all that is needed to prepare your template for a rapid deployment. When you need to deploy this template, simply Find/Replace ###Awesome_Conference_Name### with whatever text you want – i.e. “My Super Conference 2019”. It will update it both in the parameters section, and in the code itself. Do we really need the Parameter at the top of ARM template, especially if we are just going to replace the text ourselves before we deploy? That answer is no, but it does help immensely when keeping track when you have a ton of parameters:
By putting the parameters in your code, even though you aren’t going to use them in the way they are intended, you can easily see which ones you need to replace in one place.
For MMSMOA 2017, I created an Azure Runbook that could post to the OMS API. Well, it’s more than a month later, but I finally got around to making a post around it. I’m going to skip the basics of creating a runbook, but if you need a primer, I suggest starting here.
Let’s start with the runbook itself. Here is a decent template that I modified from the OMS API documentation. This template takes an input string, parses the string into 3 different fields, and sends those fields over to OMS. Here’s the runbook:
Param
(
    [Parameter (Mandatory= $true)]
    [string] $InputString
)


$CustomerID = Get-AutomationVariable -Name "CustomerID"
$SharedKey = Get-AutomationVariable -Name "SharedKey"
write-output $customerId
write-output $SharedKey
$date = (get-date).AddHours(-1)

# Specify the name of the record type that you'll be creating
$LogType = "MyRecordType"

# Specify a field with the created time for the records
$TimeStampField = "DateValue"

# Create the function to create the authorization signature
Function Build-Signature ($customerId, $sharedKey, $date, $contentLength, $method, $contentType, $resource)
{
    $xHeaders = "x-ms-date:" + $date
    $stringToHash = $method + "`n" + $contentLength + "`n" + $contentType + "`n" + $xHeaders + "`n" + $resource

    $bytesToHash = [Text.Encoding]::UTF8.GetBytes($stringToHash)
    $keyBytes = [Convert]::FromBase64String($sharedKey)

    $sha256 = New-Object System.Security.Cryptography.HMACSHA256
    $sha256.Key = $keyBytes
    $calculatedHash = $sha256.ComputeHash($bytesToHash)
    $encodedHash = [Convert]::ToBase64String($calculatedHash)
    $authorization = 'SharedKey {0}:{1}' -f $customerId,$encodedHash
    return $authorization
}


# Create the function to create and post the request
Function Post-OMSData($customerId, $sharedKey, $body, $logType)
{
    $method = "POST"
    $contentType = "application/json"
    $resource = "/api/logs"
    $rfc1123date = [DateTime]::UtcNow.ToString("r")
    $contentLength = $body.Length
    $signature = Build-Signature `
        -customerId $customerId `
        -sharedKey $sharedKey `
        -date $rfc1123date `
        -contentLength $contentLength `
        -fileName $fileName `
        -method $method `
        -contentType $contentType `
        -resource $resource
    $uri = "https://" + $customerId + ".ods.opinsights.azure.com" + $resource + "?api-version=2016-04-01"

    $headers = @{
        "Authorization" = $signature;
        "Log-Type" = $logType;
        "x-ms-date" = $rfc1123date;
        "time-generated-field" = $TimeStampField;
    }

    $response = Invoke-WebRequest -Uri $uri -Method $method -ContentType $contentType -Headers $headers -Body $body -UseBasicParsing
    $WhatISent = "Invoke-WebRequest -Uri $uri -Method $method -ContentType $contentType -Headers $headers -Body $body -UseBasicParsing"
    write-output $WhatISent
    return $response.StatusCode
}

# Submit the data to the API endpoint

$ComputerName = $InputString.split(';')[0]
$AlertName = $InputString.split(';')[1]
$AlertValue = $InputString.split(';')[2]

# Craft JSON
$json = @"
[{  "StringValue": "$AlertName",
    "Computer": "$computername",
    "NumberValue": "$AlertValue",
    "BooleanValue": true,
    "DateValue": "$date",
    "GUIDValue": "9909ED01-A74C-4874-8ABF-D2678E3AE23D"
}]
"@

Post-OMSData -customerId $customerId -sharedKey $sharedKey -body ([System.Text.Encoding]::UTF8.GetBytes($json)) -logType $logType
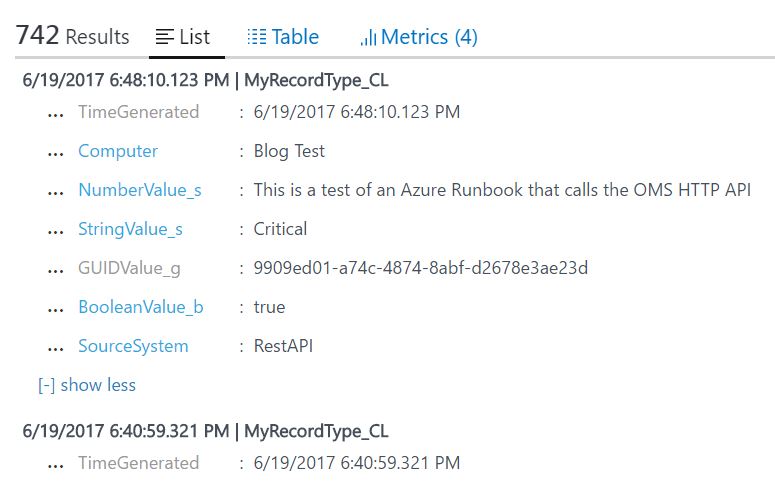
There are a couple of things to note with this runbook – first, the date it will post into OMS will be Central Standard Time. If you want to change to another timezone, change the $date = (get-date).AddHours(-1) line (aligning to EST). Second, this script has output which you can remove. The output will only show up in the output section in Azure Automation, which makes it handy for troubleshooting. The third thing you might want to change is the $LogType = “MyRecordType” line. This is the name that OMS will give the log (with one caveat mentioned below).
So, create your runbook in Azure Automation, and give it a test. You will be prompted for the InputString. In my example here, I will use the input string of “Blog Test;Critical;This is a test of an Azure Runbook that calls the OMS HTTP API”
Give it a minute or so, and you are rewarded with this:
Notice the “_CL” at the end of my log name? Notice the “_S” at the end of the fields? OMS does that automatically – CL for custom log, S for string (or whatever data type you happen to pass).
There you have it – runbooks that post to OMS. Add a webbook to the Runbook, and call it from Flow. Send an email to an inbox, have Flow trigger the Runbook with some of the email data, and suddenly you have the ability to send emails and have that data appear in OMS.
Azure Automation – the 800lb gorilla in the room. If you can think of a way to accomplish a task, more than likely Azure Automation can do it. Combining the ease of use of PowerShell, the sheer power of Azure, and the multitude of integrations available, you can build enterprise worthy automation runbooks quickly and easily.
It’s a no-brainer.
Until it isn’t.
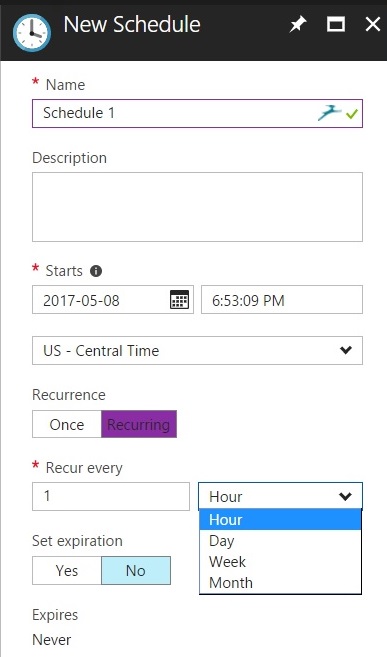
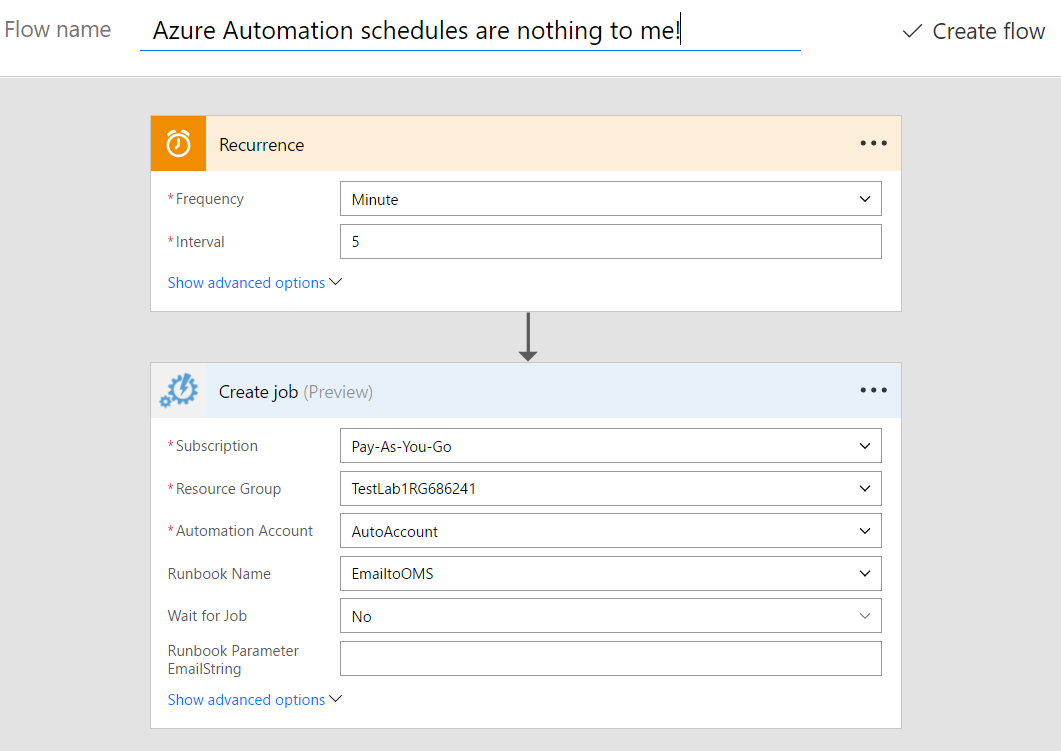
One of the most frustrating limitations of Azure Automation is the scheduling tool. Sure – you can setup one-time and reoccurring schedules with ease, but what if you need something to run often – say every 10 or 15 minutes? Unfortunately, when you go to set a schedule like that, you are greeted with this:
That means you can’t set a single schedule shorter than an hour. Sure, you can set multiple schedules – you would need 4 if you want to run every 15 minutes. What if you want something to run every 5? Are you going to create 20 schedules? Of course not! This is where Microsoft Flow comes to the rescue.
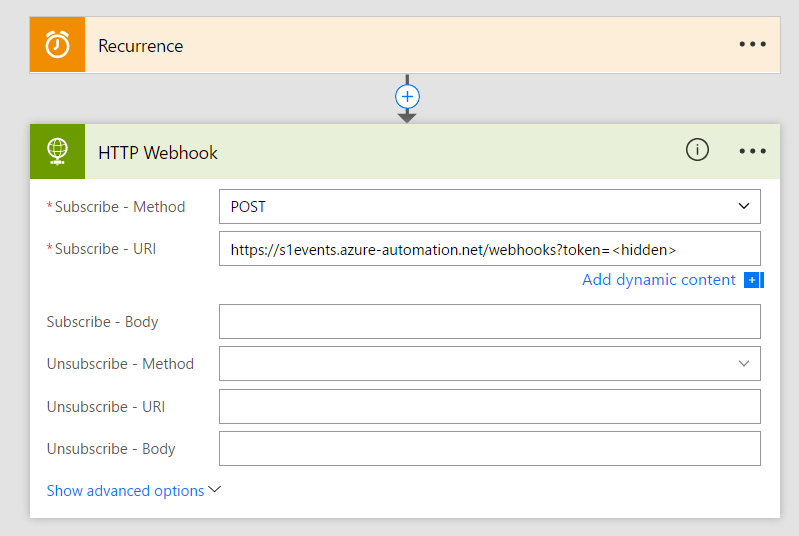
There are 2 ways to trigger an Azure Automation job from Flow (probably more, if you dig deep), so let’s start with the simplest one. If you have a connection from Flow to Azure Automation already, then this simple Flow will start an Azure Automation Runbook:
Boom – no need for 20 schedules here! This simple Flow probably just saved you an hour of clicking and checking. But what if you don’t have a connection to Azure Automation already established? Perhaps you want to run a Runbook that isn’t in your subscription? It’s still pretty easy. The first step is to obtain the webhook URL for the Runbook. Start by access your Azure Automation Runbook – make sure it has focus. In the left navigation pane you should see a link for ‘Webhooks’. Click that to shift focus to the Webhook listing page. Click the ‘Add Webhook’ button at the top of the main pane. From here on out, it’s pretty straight forward. Give your webhook a name, set the expiration date for the webhook, and it your Runbook has any parameters you want the webhook to pass, specify those name.
IMPORTANT – Make sure you copy the URL before clicking OK. Finding that URL later is like pulling teeth – you might be able to do it, but it will be painful.
When you are satisfied with the settings, and have copied the URL, click ‘OK’.
No that you have your webhook created in Azure Automation, it time to setup flow. Luckily for you, it couldn’t be easier!
That’s it! No more Azure Automation Scheduling limitations! Run those runbooks as often as you like!