500 Error when setting up Windows Azure Pack

I am putting this out there so the next person doesn’t have to spend the DAYS I wasted trying to fix this. Here is the story:

You want to install SMA on your brand new Windows 2016 Server, but obviously need Windows Azure Pack. Grab the web installer, fire it up, verify that you have the right pre-reqs, and pick the Windows Azure Pack Express and Admin API selection. The install goes fine, and a web page will launch so you can configure Azure Pack. You enter your database info, user and passphrase info, and ‘next’ your way to the end. You press that last checkmark and expect all of the little circles to come back green……but then you see that the Admin Authentication Site has come back with an error:

“500 Internal Server Error – Failed to configure databases and services: Some or all identity references could not be translated.”

Long story short – Go to your inetpub directory, and pull up the properties on the folder named “MgmtSvc-WindowsAuthSite”. Un-check the Read-Only box at the bottom, apply, and when prompted tell it apply to all sub-items.

From what I can tell – the connection strings and users you entered during the config are entered into the webconfig for this site. My guess is that the setup program is attempting to decrypt the webconfig and create additional files (an un-encrypted version of the webconfig?) but was failing due to the read-only property. I can’t verify that (I refuse to go through that setup program again), but I do know that unchecking that box finally got the config to complete successfully, I was able to finally launch the Service Management Portal, and get my SMA web service registered.

The literal days I wasted on this – I hope none of you have to go through that.

Super-fast mass update of management servers for OpsMgr

Here’s a quick one – you want to update the failover management servers on your agents en-mass, and don’t want to wait 12 years for it to complete. Why do you want to set it? Maybe you only want certain agents talking to certain data-centers, or specific management servers have very limited resources. Regardless of the reasons, if you do need to update the agent config, it can be a bit slow. Here is a quick little script that can make those update a LOT quicker.

First thing first – download PoshRSJob from Boe Prox. It’s about the best thing since sliced bread, and I use it constantly. Download the module and place it in one of your module directories (C:\Windows\System32\WindowsPowerShell\v1.0\Modules, for example). Next, create a CSV called FailOverPairs.csv. This should have 2 columns – Primary and Failover. For example:

Primary,Failover
MS01,MS02
MS03,MS04
MS05,MS06

You will want that header line – mainly because it saves us a couple of lines of code in PowerShell. Next, save that CSV in the same directory as the script below. This CSV will be used to set the appropriate failover partner. Save the script below in the same directory as the csv, and you are good to go! Here is the script:

Import-Module PoshRSJob -Force
Import-Module OperationsManager -Force
$modules = (Get-Module | Where-Object{ $_.Name -notlike 'Microsoft.*' -and $_.Name -ne 'PoshRSJob' -and $_.Name -ne 'ISE' }).path
try
{
    $agents = Get-SCOMAgent
}
catch
{
    write-verbose "Cannot load agent list"
}
$Pairs = Import-Csv -Path $PSScriptRoot + '\FailoverPairs.csv' -Header Primary,Failover
$agents|Start-RSJob -Name { $_.DisplayName } -Throttle 20 -ModulesToImport $modules -ScriptBlock {
    param($agent)
    $Pairs = $using:Pairs
    $primary = $agent.PrimaryManagementServerName
    $CurrentFailover = ($agent.GetFailoverManagementServers().DisplayName)
    foreach ($Pair in $Pairs)
    {
        if ($Pair.Primary -eq $primary){$secondary = $Pair.Failover}
        if ($Pair.Failover -eq $primary){$secondary = $Pair.primary}
    }
    if ($secondary -ne $CurrentFailover)
    {
        $AgentName = $agent.DisplayName
        write-verbose "$AgentName Secondary wrong. Primary $Primary, Current Secondary $CurrentFailover, Discovered Secondary $secondary"
        try
        {
            $Failover = Get-SCOMManagementServer | Where-Object {$_.Name -eq $secondary}
            if ($Failover.IsGateway -eq $true)
            {
                $FailOverServerObject = Get-SCOMGatewayManagementServer | Where-Object {$_.Name -eq $secondary}
            }
            else 
            {
                $FailOverServerObject = $Failover
            }
            Set-SCOMParentManagementServer -Agent $agent -FailoverServer $FailOverServerObject
            write-verbose "$AgentName $secondary set."
        }
        catch
        {
            $ErrorText = $error[0]
            write-verbose "$AgentName Failed to set failover. Current Failover $CurrentFailover, Discovered Failover $secondary.$ErrorText"
        }
    }
}|Out-Null
get-rsjob|Wait-RSJob|Remove-RSJob -force|Out-Null

Let’s examine some of this – the imports are obvious. If you have any issue with unblocking files or execution policy, leave a comment and I will help you through the import. The next line is different:

$modules = (Get-Module | Where-Object{ $_.Name -notlike 'Microsoft.*' -and $_.Name -ne 'PoshRSJob' -and $_.Name -ne 'ISE' }).path

What we are doing here is to get a list of the loaded modules, then exclude some of them. We are doing this because when we run this script, we are creating a ton of Runspaces. By default, these runspaces will need to know which modules to load. We don’t need them to load PoshRSJob, and we don’t need them to load things like the ISE because they are ephemeral – they will go away after they have completed their processing. This line can be modified if you don’t need to load other modules. It will load the OperationsManager module, which is the heavy lifter of this script.

Next, we get all of the agents from the management group. This script needs to be run from a SCOM server, but you could easily modify this script to run from a non-SCOM system by adding the “-computername” switch to the get-scomagent command. Then we import the CSV that contains our failover pairs.

Now the fun starts – this line starts the magic:

$agents|Start-RSJob -Name { $_.DisplayName } -Throttle 20 -ModulesToImport $modules -ScriptBlock {

This is the magic. We are feeding the list of SCOM agents (via the pipeline) to the start-rsjob cmdlet. The “-name” parameter tells the runspaces to use the Agent name as the job name, and the “-Throttle” parameter is set to control the number of runspaces we want running at once. I typically find that there isn’t a lot of benefit to going much over 2 or 3 times the number of logical cores. Maybe if you have remote processes that were very long running it might be beneficial to go up to 5-10 times the number of processors, but for this I found 2-3 to be the sweet spot. You will also see that we are telling start-rsjob what modules to import (see above).

The rest of the script is the scriptblock we want PoshRSJob to run. This is actually pretty straight forward – we set some variables (some of the we have to get with “$using:“). Then we find the current primary and failover, see if they match our pairs, and if they don’t we correct them. This isn’t a fast process, but if you are doing 20 of them at a time, it goes by a lot faster!

At the end of the script, we are simply waiting for the jobs to finish. In fact, if you want to track the progress, comment out this line:

get-rsjob|Wait-RSJob|Remove-RSJob -force|Out-Null

If you comment that line out, you can track how fast your jobs are completing by using this:

get-rsjob|group -property state

We’ve been able to check several thousand systems daily in very little time to make sure our primary and failover pairs are set correctly. I hope you guys get some use from this, and go give Boe some love for his awesome module! Leave a comment if you have any questions, or hit me up on Twitter.

PowerShell Core – Get it now!!

PowerShell Core 6.0 was released yesterday! This is a huge step forward for PowerShell as it becomes an even stronger cross-platform powerhouse. In addition to the public announcement, Jeffery Snover and the PowerShell team did an AMA!
Here’s a quick primer:
Get it here.

Windows PowerShell and Powershell Core are different products and no, Windows PowerShell isn’t going away! There is a caveat, though – no new features for Windows PowerShell – Core is the future!
Windows PowerShell is built on full .Net whereas Core is built on .Net Core. In order to work on .Net Core and consequently be cross-platform, so things are either gone or being deprecated. Things like Workflows, and WMI cmdlets are a couple that will not work with Core.

Check out this OS List!:
Windows 7, 8.1, and 10
Windows Server 2008 R2, 2012 R2, 2016
Windows Server Semi-Annual Channel
Ubuntu 14.04, 16.04, and 17.04
Debian 8.7+, and 9
CentOS 7
Red Hat Enterprise Linux 7
OpenSUSE 42.2
Fedora 25, 26
macOS 10.12+
Arch Linux*
Kali Linux*
AppImage*
Windows on ARM32/ARM64**
Raspbian (Stretch)**
* = Community Support Only;** = Experimental

What does this new PowerShell look like? I grabbed the MSI (will do posts on Linux and MacOS later!) and took the defaults:

Super easy. Now you can launch a console window from the start menu, but if you browse to your install directory from a command line you get your first surprise!

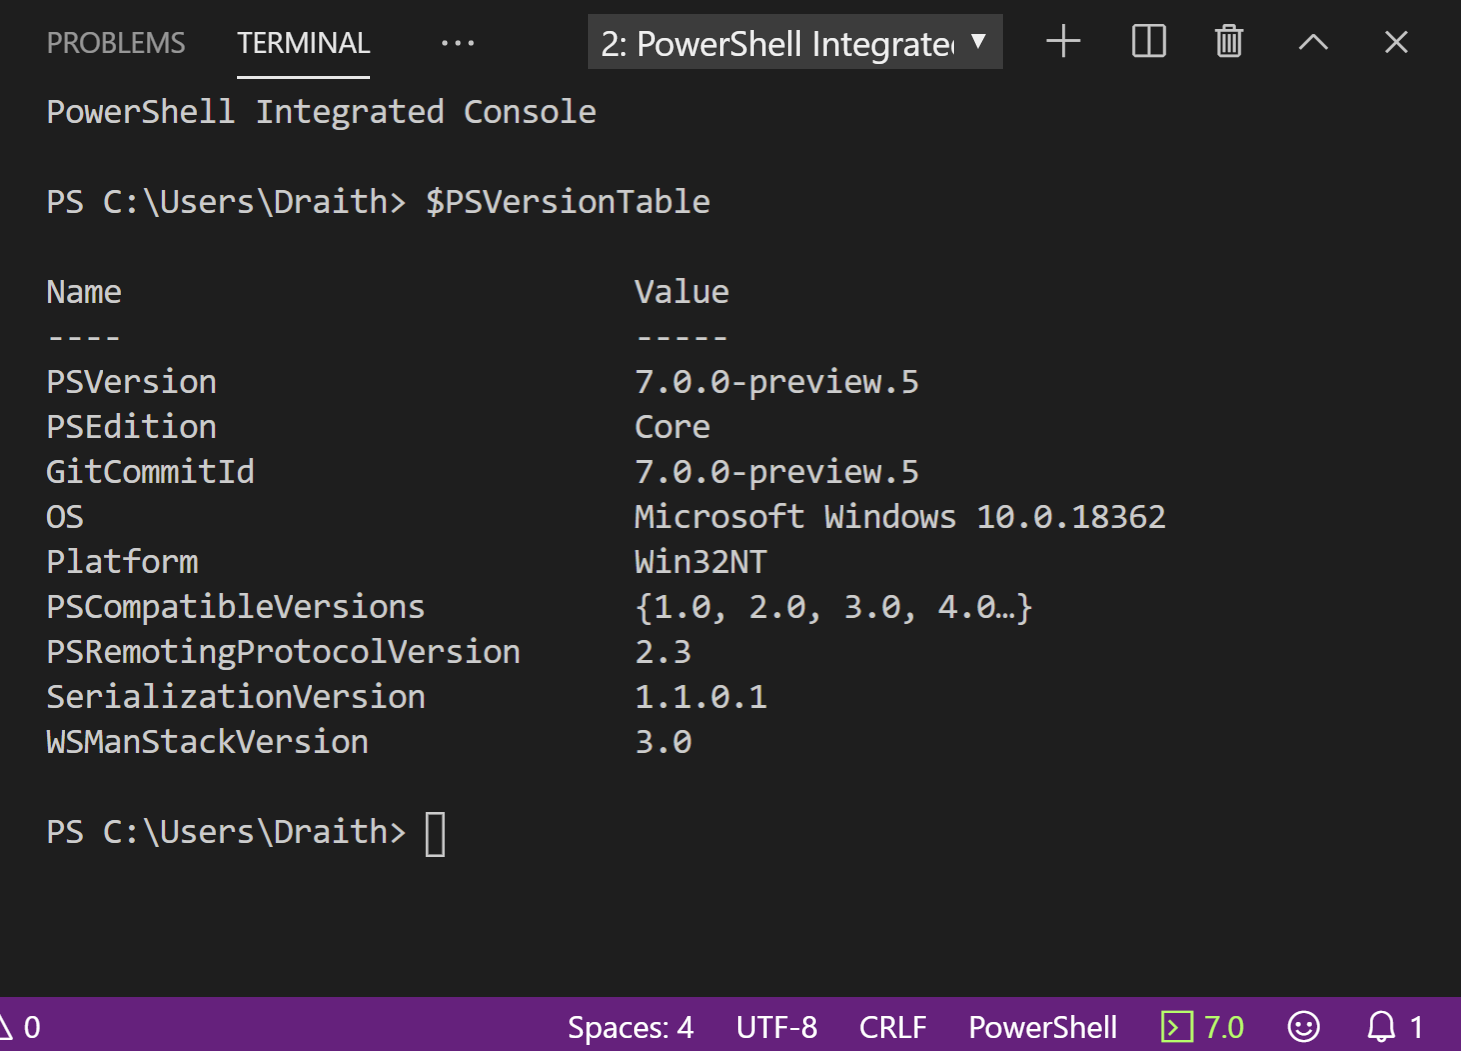
That’s right! No powershell.exe! PowerShell.exe has been renamed to pwsh.exe. Start it, and check out your version – $PSVersionTable:
Name Value
—- —–
PSVersion 6.0.0
PSEdition Core
GitCommitId v6.0.0
OS Microsoft Windows 10.0.16299
Platform Win32NT
PSCompatibleVersions {1.0, 2.0, 3.0, 4.0…}
PSRemotingProtocolVersion 2.3
SerializationVersion 1.1.0.1
WSManStackVersion 3.0

If you have read my blog before, you know I like my customized prompt and profile. Core has a profile just like Windows PowerShell – located here on a typical Windows machine: \Documents\PowerShell\Microsoft.PowerShell_profile.ps1 Time to make Core feel like home again:

Yep – that’s better. There is a ton of fun stuff to do now – cross platform remote scripting is going to be a focus on some upcoming posts. Stay tuned!

Need some Demo boxes? Azure Burstable VMs

Back in September, Microsoft announced the new B-series of Azure virtual machines. In a nutshell, these are cheap VMs that are great for workloads that normally run little to no CPU utilization, but at times have “burst” workloads that consume more CPU. When the VM is running idle, a bank of credits is accumulated. When the VM needs to really use the CPUs, credits are consumed. Here is a quick glance of the sizes:

While getting my demos ready for an upcoming presentation at ExpertsLiveUS I had a thought. Why on Earth am I concerning myself with the cpu/ram on my demo laptop, when I can have a fully setup demo environment running in Azure? The B-series allows me to run with little cost, as they sit idle most of the time. When I am actually preparing or doing the demo, I get all the CPU I need! Combine that with AutoShutdown, and my costs are amazingly low. Setting up is really easy. Simply start to create your VM as normal, selecting one of the follow B-series VMs:

Once setup your VM will start to either bank or consume CPU credits. You can see these credits in the Azure Portal, and see how well your machines are trending. First, let’s see how a typical demo environment might look – here is a snapshot of a ConfigMgr server with about 6 clients (and remote SQL). As you can see, the CPU is normally low for a demo environment:

See that spike in the CPU consumption at the end of the graph? I started an update cycle, which is obviously going to consume some CPU as the updates are downloaded, processed, and made ready for deployment/installation. Let’s find out how my burstable credits are stacking up. To see how your machine is banking, click on “Metrics” under the “Monitoring” section.

There are two metrics we are concerned with – [Host] CPU Credits Consumed and [Host] CPU Credits Remaining. These show up how our credits are banking (or being consumed). Here is a snapshot of that same ConfigMgr box consuming those credits:

And the remaining credits:

To give you an idea – this is what the accumulation of those credits looked like:

It doesn’t take long to max your credit bank, and you can keep those in your back pocket for when you really need them – doing presentations or prepping for presentations. Of course you can use the B-series for normal workloads, but these boxes make an excellent demo environment. No more worrying about my laptop handling the workload!

MVP

I got a nice surprise this Sunday. I have been awarded MVP status in Cloud and Datacenter Management!! I am beyond happy – this is something that I have worked towards for a while, and it feels great! I am humbled to bear the same moniker of same of the legends in our field…I don’t feel like I deserve to be in the same room as some of them, but I will strive to do my best and continue to contribute to the community as best I can.

I was asked what my journey to MVP was like – my experiences, the steps I took, and what I wanted to get out of it. Here’s how it all played out.

It started a couple of years ago – I had (and still have) several MVP friends that I always looked up to. They are pillars of the tech community who willingly share their hard fought knowledge, so I naturally wanted to join their ranks. I was already on the board of the Central Texas Systems Management User Group, so I was already involved in the community to a certain extent, but I knew that I needed to up my game if I was going to qualify.

I started speaking more at user groups – CTSMUG, Austin PowerShell, DFWSMUG, etc… In a previous job at Dell, I had engaged in a lot of customer briefings (200+ in one year!), and had spoken at old school MMS several times, so I was comfortable speaking to large groups. The speaking at the user groups really helped me adjust the tone and detail, though. I found out what the users wanted to hear, how much detail to put in my presentations, and to make sure that every presentation ended with the users walking away with actionable knowledge. I went from speaking once a year to speaking to groups once a month or more. The more I spoke to these groups, the more I wanted to do it again.

At the same time I began to blog more – I always had a WordPress blog, but I was horrible about putting fingers-to-keyboard and actually writing articles. Just as with the speaking engagements, I found that the more I wrote, the more I wanted to write. I would be in the middle of writing an article when suddenly an idea for _another_ article would pop into my head. OneNote became my best friend – handy place to store those ideas/drafts and access them anywhere! I still don’t write as much as I want, but it’s definitely a lot more than it used to be!

MMSMOA. I cannot say enough about this conference. I submitted four session ideas, two of which were accepted. Both of my co-presenters were (still are) MVPs, and it was a wonderful experience. The feel was much closer to old-school MMS – the sessions are small and extremely technical. Managing to get through this conference, and getting excellent speaker evaluations back, is an extreme ego boost. It was at this conference when I heard, for the first time – “Wait, you aren’t an MVP?”. I knew at that point I needed to find out more.

I sent out some emails – to MVPS that would give me solid feedback. The email was simple – “If you think I could be a MVP, please nominate me. If not, let me know what I need to improve!” I specifically sent it to people I knew would smack me down if I deserved it. This was extremely valuable – I got honest responses back (along with some good-natured jabs) that helped me improve my blog posts, speaking engagements, and how to tune my message to a specific area of expertise. In addition I got 3 nominations. I was elated!

The process from there on was straight forward – I was asked to register on the MVP site, and then record my community activities. Keeping a list of those as I did them would have been a life-saver here, so if you are interested in pursuing a MVP, keep track of what you are doing! Specifically – Date, Location, Type of Activity (Blog, Speaking at user group, Speaking at Conference, etc…), description of the activity, and the reach (number of user group members present, page views, etc…). I did this at the start of June, and on October 1st, I got the email that I had been waiting for!

Customize your PowerShell profile for useful startup actions

Did you know you can make PowerShell run any commands you want when you start a shell? This is amazingly useful for gathering information, making settings changes, or kicking off processes – all at shell startup. There are plenty of places that talk about the profiles, so I won’t go into each type, but long story short there are almost 10 different profiles when you account for 32 and 64 bit PowerShell. Some of them are explained in detail here.

For my example here, I am going to deal with the %UserProfile%\My Documents\WindowsPowerShell\profile.ps1 profile, which affects the current user, but all shells. This is useful for when you are switching back and forth between the ISE and console – say when you are testing new scripts. By default this file won’t exist – you will have to create it if it doesn’t.

#See if your profile file exists.  Checks the 'My Documents\WindowsPowerShell' directory
Test-Path $profile

The profile file is really just a .ps1 file. You can put any PowerShell you want in this file. Say you want to get a random Cat Fact every time you start a shell? (who am I to judge?)

[Net.ServicePointManager]::SecurityProtocol = [Net.SecurityProtocolType]::Tls12
((((invoke-webrequest -uri https://catfact.ninja/fact -Method get).content).split(':')[1])).trim('","length"')

There are some really useful things you can do now that you know you can run anything. For example – this will show the number of running PowerShell processes, along with WinRM service status:

write-host -ForegroundColor Green "PowerShell Processes: " (Get-process 'PowerShell').count
write-host -ForegroundColor Green "WinRM Status: " (Get-service 'winrm').status

And this will show the PowerShell module paths:

write-host -ForegroundColor Green "Module Paths:"
foreach ($module in ($env:PSModulePath).Split(";")){write-host -ForegroundColor Green "    "$module}

Notice here – I also added a simple “cd c:\blog” to my profile – really useful for starting straight in your scripts directory (no more “cd c:\workspaces\app\development\scripts….” every time you start a console)

But you can do even more! Full functions can be loaded into your profile and are available immediately. One of my favorites is one that will add a Start-RDP function, so I can initiate a remote desktop session without ever touching the start menu! How cool is this?

write-host -ForegroundColor Green "PowerShell Processes: " (Get-process 'PowerShell').count
write-host -ForegroundColor Green "WinRM Status: " (Get-service 'winrm').status
write-host -ForegroundColor Green "Module Paths:"
foreach ($module in ($env:PSModulePath).Split(";")){write-host -ForegroundColor Green "    "$module}
cd C:\Blog
function Start-RDP
{
    param  
    (  
        [Parameter(
            Position = 0,
            ValueFromPipeline=$true,
            Mandatory=$true
        )]
        [ValidateNotNullOrEmpty()]
        [string]
        $ServerName
    )
    mstsc /v:$ServerName 
}

There is also a special function you can put in your profile – it’s the ‘prompt’ function. This will change the PowerShell command line prompt to whatever you want! Just create a new function called ‘prompt’, write-host anything you want into the function, and make sure you put a ‘return ” “‘ at the end – it’s that’s simple! You can put some great data right on the prompt – for example, you can make the current time show up each time the prompt is shown! This is really useful for measuring how long something takes to run if you don’t want to pull out measure-object! Here is my prompt, along with the full profile:

function prompt
{
    $time = "("+(get-date).ToLongTimeString()+")"
    write-host -NoNewline -ForegroundColor Green "PS " (Get-Location).Path $time ">"
    return " "
}
write-host -ForegroundColor Green "PowerShell Processes: " (Get-process 'PowerShell').count
write-host -ForegroundColor Green "WinRM Status: " (Get-service 'winrm').status
write-host -ForegroundColor Green "Module Paths:"
foreach ($module in ($env:PSModulePath).Split(";")){write-host -ForegroundColor Green "    "$module}
cd C:\Blog
function Start-RDP
{
    param  
    (  
        [Parameter(
            Position = 0,
            ValueFromPipeline=$true,
            Mandatory=$true
        )]
        [ValidateNotNullOrEmpty()]
        [string]
        $ServerName
    )
    mstsc /v:$ServerName 
}

And the outcome:

It’s that simple! Customize your profile, and start being productive quicker! Leave a comment below to tell me what your favorite profile modifications are!!

Austin PowerShell User Group Survey Responses!

Last week, I sent out a survey where we were asking people questions about the Austin PowerShell User Group. Basically we are trying to find out what you all want when it comes to location, meeting times, etc… Well, here are the results!!

To begin with we had around 40 responses, which is excellent! Thank you all for responding!

The first question – “Would you be interested in attending an Austin PowerShell User Group meeting in the future?”. I know – I know – softball question. If someone is responding, then they are probably interested in attending. Not surprisingly, the percent that answered yes was 100%! That’s great!

When we asked what days worked best, a couple of clear winners emerged – Friday and Doesn’t Matter.

Next – How often should we meet? Again, a pretty clear winner – Once every other month took almost 50% of the votes!

Now we get to the fun questions – Where and for how long should we meet. First, here are the primary and secondary choices for location. North Austin and Round Rock/Pflugerville appear to be the leaders for Primary choice, and North Austin taking the bulk of the Secondary choice!


When we asked how long each meeting should be, we got some great varied responses! All day and Afternoon took 2/3rds from the Primary, while Afternoon and Mornings dominated the Secondary Choice!


We know we can’t pick everyone’s preferred time and/or location, so next we asked how likely you would still be able to attend if the selection didn’t go your way. All in all, everyone seemed somewhat flexible!

Now on the to the free-form text! Some great suggestions on venues:

Microsoft or Dell Campus
Employer
Microsoft, Member Facilities
Just happy to be aware of this
Dave & Busters, Alamo Drafthouse, MSFT Store (free)
Domain area
eBay (Daytime only), Microsoft (daytime only), User Group Member Businesses
Private companies to host
Yes 🙂
Microsoft Austin on Stonelake

I don’t know who the smart-ass was that said “Yes” with a smiley face, but I will find you 🙂

I should have know better than ask for open comments, but here they are.

I think this is a great idea! It would be great to meet other PS developers in the area
I could participate more easily on days I could not attend if we had live feed or if the presentations were available on you tube or something
Maybe we could expand CTSMUG and devote a session to Powershell every time we meet – We could schedule it after lunch to allow for those attendees who cant take an entire day – Or whenever during the CTSMUG Day that makes the most sense. The technologies are complimentary and it benefits the CTSMUGers as much as the PUGers. Or barring that how about a Powershell Happy Hour post CTSMUG.
Newcomers’ meeting would be cool for a start.
Meetings during business hours opens up more options for locations because you don’t have to pay for extra security or host in a Retail/Food location which may be too noisy. I work for eBay and can easily host meetings (small or large) given enough advanced notice but it must be during the week, during business hours.
Ask for more volunteers to lead the group so we can spread the load.

Here is something nice – someone thanked me!

Thanks Donnie !

And then there’s Duncan McAlynn’s comment (Yes, I know it was you)

Donnie’s an asshole.

Thanks to everyone that took the survey (except Duncan) – we REALLY appreciate it! We will munch on this data, and send out invites shortly!

Run _Anything_ with Flow. PowerShell Triggers

Want to start PowerShell commands from a Tweet? Yeah you do, and you didn’t even know you wanted to.

Earlier this month, a great Flow of the Week was posted that highlighted the ability to use a .net filesystemwatcher to kick off local processes. This sparked an idea – I think we can expand on this and basically run anything we want. Here’s how:

First, let’s start with the Connected Gateway. The link above goes into a bit of detail on how to configure the connection. Nothing special there.
Second, on the Connected Gateway, run this PowerShell script:

$FileSystemWatcher = New-Object System.IO.FileSystemWatcher
$FileSystemWatcher.path = "C:\temp\WatchMe"
$FileSystemWatcher.Filter = "Flow.txt"
$FileSystemWatcher.EnableRaisingEvents = $true
 
Register-ObjectEvent $FileSystemWatcher "Changed" -Action {
$content =  get-content C:\temp\WatchMe\Flow.txt |select-object -last 1
powershell.exe $content
}

This script sets up a FileSystemWatcher on the C:\temp\WatchMe\Flow.txt file. The watcher will only perform an action if the file is changed. There are several options for the “Changed” parameter – Created, Deleted, Renamed, Error, etc… Once created, the watcher will look at the last line of the c:\temp\WatchMe\Flow.txt file, and launch a PowerShell process that takes that last line as the input.

Third – This is the best part. Since we have a FileSystemWatcher, and that watcher is reading the last line of the C:\temp\WatchMe\Flow.txt file and kicking that process off, all we have to do is append a line to that file to start a PowerShell session. Flow has a built-in connection for FileSystem. You can see where this is going. Create a new Flow, and add an input action – I am fond of the Outlook.com Email Arrives action. Supply a suitable trigger in the subject, and add the ‘Append File’ action from the FileSystem service. Here is how mine is configured:

The only catch with this particular setup is that the body of the email needs to be in plain text – Windows 10 Mail app, for example, will not send in plain text. The body of the mail is the PowerShell command we want to run. For example, maybe we want PowerShell to get a list of processes that have a certain name, and dump those to a text file for parsing later. Simply send an email that has the body of “get-process -name chrome|out-file c:\temp\ChromeProcesses.txt”. Here is what that results in:
Before we send the email:

The Email:

After a few minutes – an new folder appears!:

The contents of the text file:

Handles  NPM(K)    PM(K)      WS(K)     CPU(s)     Id  SI ProcessName                                                  
-------  ------    -----      -----     ------     --  -- -----------                                                  
   1956      97   131588     191648     694.98    728   1 chrome                                                       
    249      22    34268      43356       1.63   4264   1 chrome                                                       
    381      81   307592     331312     145.16   6080   1 chrome                                                       
    149      12     2140      10076       0.05   7936   1 chrome                                                       
    632      86   277900     557484     974.00   9972   1 chrome                                                       
    431      31   147956     159404     182.11  10056   1 chrome                                                       
    219      12     2132       9608       0.08  11636   1 chrome                                                       
    283      50   135932     141512      98.05  12224   1 chrome                                                       
    396      54   133912     297432      18.58  12472   1 chrome                                                       
    253      46   107348     106752      50.13  13276   1 chrome                                                       
    381      48   114452     128836     242.89  14328   1 chrome                                                       

Think about what you could do with this – Perhaps you want to do an Invoke-WebRequest every time a RSS Feed updates. Maybe start a set of diagnostic commands when an item is added to Sharepoint. Kick off actions with a Tweet. If you want full scripts to run instead of commands, change the Action section of the FileSystemWatcher to “PowerShell.exe -file $content”. Easy as pie.

PowerShell WSMAN Configuration for Massive Scale

In my day job, I constantly strive to push PowerShell to the limit, attempting to use absolutely every bit of processor/memory/network bandwidth available. One way I do this is with PoshRSJob written by Boe Prox. PoshRSJob is a wonder multi-threading tool, and I use it at pretty heavy scale – typically at a 100 thread throttle.

Sometimes, when you are running a lot of concurrent threads attaching to remote machines, you will run into WinRM connection limitations. They typically will show up in error messages like this when you try to do commands line “invoke-command -computername remoteserver01” :
“This user is allowed a maximum number of 5 concurrent shells, which has been exceeded. “

Configuring typical WSMAN connection limits are fairly well documented, but I was running into another type of error. This error was occurring even after I had upped the connection limits:
“The maximum number of concurrent shells allowed for this plugin has been exceeded.”

This was driving me crazy, until I realized the slightly different wording. Browsing the WSMAN PSDrive, I was eventually able to solve it. The key word in the second error was “plugin”. I had to configure the limits on the plugin, not just the shell. After I realized the difference, I was able to find the right settings. I have compiled them here in a small script that will enable WinRM, and set the limits very high for both the shell and plugin.

enable-psremoting -force 
cd WSMan:\localhost\Shell 
set-item MaxConcurrentUsers 100 
set-item MaxProcessesPerShell 10000 
set-item MaxMemoryPerShellMB 1024 
set-item MaxShellsPerUser 1000 
cd WSMan:\localhost\Plugin\microsoft.powershell\Quotas 
set-item MaxConcurrentUsers 100 
set-item MaxProcessesPerShell 10000 
set-item MaxShells 1000 
set-item MaxShellsPerUser 1000 
restart-service winrm 

Obviously test this before you deploy to production. I also found a neat one-liner to monitor the number of WSMan connections of a target system (set the $computername variable to the target, or use localhost):

while($true){(Get-WSManInstance -ComputerName $ComputerName -ResourceURI Shell -Enumerate).count;start-sleep 1} 

Azure Runbook for Posting to the OMS API

For MMSMOA 2017, I created an Azure Runbook that could post to the OMS API. Well, it’s more than a month later, but I finally got around to making a post around it. I’m going to skip the basics of creating a runbook, but if you need a primer, I suggest starting here.

Let’s start with the runbook itself. Here is a decent template that I modified from the OMS API documentation. This template takes an input string, parses the string into 3 different fields, and sends those fields over to OMS. Here’s the runbook:

Param
(
    [Parameter (Mandatory= $true)]
    [string] $InputString
)


$CustomerID = Get-AutomationVariable -Name "CustomerID"
$SharedKey = Get-AutomationVariable -Name "SharedKey"
write-output $customerId
write-output $SharedKey
$date = (get-date).AddHours(-1)

# Specify the name of the record type that you'll be creating
$LogType = "MyRecordType"

# Specify a field with the created time for the records
$TimeStampField = "DateValue"

# Create the function to create the authorization signature
Function Build-Signature ($customerId, $sharedKey, $date, $contentLength, $method, $contentType, $resource)
{
    $xHeaders = "x-ms-date:" + $date
    $stringToHash = $method + "`n" + $contentLength + "`n" + $contentType + "`n" + $xHeaders + "`n" + $resource

    $bytesToHash = [Text.Encoding]::UTF8.GetBytes($stringToHash)
    $keyBytes = [Convert]::FromBase64String($sharedKey)

    $sha256 = New-Object System.Security.Cryptography.HMACSHA256
    $sha256.Key = $keyBytes
    $calculatedHash = $sha256.ComputeHash($bytesToHash)
    $encodedHash = [Convert]::ToBase64String($calculatedHash)
    $authorization = 'SharedKey {0}:{1}' -f $customerId,$encodedHash
    return $authorization
}


# Create the function to create and post the request
Function Post-OMSData($customerId, $sharedKey, $body, $logType)
{
    $method = "POST"
    $contentType = "application/json"
    $resource = "/api/logs"
    $rfc1123date = [DateTime]::UtcNow.ToString("r")
    $contentLength = $body.Length
    $signature = Build-Signature `
        -customerId $customerId `
        -sharedKey $sharedKey `
        -date $rfc1123date `
        -contentLength $contentLength `
        -fileName $fileName `
        -method $method `
        -contentType $contentType `
        -resource $resource
    $uri = "https://" + $customerId + ".ods.opinsights.azure.com" + $resource + "?api-version=2016-04-01"

    $headers = @{
        "Authorization" = $signature;
        "Log-Type" = $logType;
        "x-ms-date" = $rfc1123date;
        "time-generated-field" = $TimeStampField;
    }

    $response = Invoke-WebRequest -Uri $uri -Method $method -ContentType $contentType -Headers $headers -Body $body -UseBasicParsing
    $WhatISent = "Invoke-WebRequest -Uri $uri -Method $method -ContentType $contentType -Headers $headers -Body $body -UseBasicParsing"
    write-output $WhatISent
    return $response.StatusCode
}

# Submit the data to the API endpoint

$ComputerName = $InputString.split(';')[0]
$AlertName = $InputString.split(';')[1]
$AlertValue = $InputString.split(';')[2]

# Craft JSON
$json = @"
[{  "StringValue": "$AlertName",
    "Computer": "$computername",
    "NumberValue": "$AlertValue",
    "BooleanValue": true,
    "DateValue": "$date",
    "GUIDValue": "9909ED01-A74C-4874-8ABF-D2678E3AE23D"
}]
"@

Post-OMSData -customerId $customerId -sharedKey $sharedKey -body ([System.Text.Encoding]::UTF8.GetBytes($json)) -logType $logType  

There are a couple of things to note with this runbook – first, the date it will post into OMS will be Central Standard Time. If you want to change to another timezone, change the $date = (get-date).AddHours(-1) line (aligning to EST). Second, this script has output which you can remove. The output will only show up in the output section in Azure Automation, which makes it handy for troubleshooting. The third thing you might want to change is the $LogType = “MyRecordType” line. This is the name that OMS will give the log (with one caveat mentioned below).

So, create your runbook in Azure Automation, and give it a test. You will be prompted for the InputString. In my example here, I will use the input string of “Blog Test;Critical;This is a test of an Azure Runbook that calls the OMS HTTP API”

Give it a minute or so, and you are rewarded with this:

Notice the “_CL” at the end of my log name? Notice the “_S” at the end of the fields? OMS does that automatically – CL for custom log, S for string (or whatever data type you happen to pass).

There you have it – runbooks that post to OMS. Add a webbook to the Runbook, and call it from Flow. Send an email to an inbox, have Flow trigger the Runbook with some of the email data, and suddenly you have the ability to send emails and have that data appear in OMS.